
This week's battle report is the first game featuring my new Deathwatch army. I was playing at Heaton Games Club taking on Adam and his Tyranids. I had previously played his Dark Eldar, so was interested to see how this game would play out. We rolled for mission and got the Relic.

My army consisted of:
Combined Arms Detachment
Combined Arms Detachment
Watch Master- Beacon Angelis
5 Veterans- 5 Stalker Pattern Boltguns
5 Veterans- 4 Frag Cannons, Storm Shield, Auspex
Drop Pod
5 Veterans- Infernus Heavy Bolter, Sergeant with Xenophase Blade and Combi-melta
5 Veterans- Black Shield with Power Sword, 2 Heavy Thunder Hammers, Power Sword, 2 Storm Shields
5 Bikers- 4 Power Swords, Power Axe, Meltabombs
Corvus Blackstar- Extra Armour, Auspex Array, Blackstar Rocket Launcher
Vanguard Veteran- Heavy Thunder Hammer
Vanguard Veteran- Heavy Thunder Hammer
For my warlord trait, I got Lord of Hidden Knowledge, giving my warlord and his unit one re-roll.
I started the army with the Watch Master. He is essentially a Chapter Master with an AP2 power weapon that strikes at initiative, pretty handy! I gave him the Beacon Angelis to allow me to quickly re-deploy a unit.
I took a combat tooled-up Veteran squad to accompany him; a Blackshield with a power sword, two Heavy Thunder Hammers, a power weapon and a couple of Storm Shields for defence. I planned to put them in the Corvus Blackstar for assault.
I took a combat tooled-up Veteran squad to accompany him; a Blackshield with a power sword, two Heavy Thunder Hammers, a power weapon and a couple of Storm Shields for defence. I planned to put them in the Corvus Blackstar for assault.
I then took a Veteran squad with 4 Frag Cannons. Deployed in the drop pod, these should eliminate any threat on the turn they arrive. I could use the Beacon to re-deploy them quickly to support the Watch Master. I also took a unit with Stalker Boltguns for some long range firepower. A final unit with an assault Heavy Bolter and a Sergeant with a Xenophase Blade was also added.
I took a Bike unit with power weapons, this would give them some good mobility and combat ability. With the points left over, I took two individual Vanguard Veterans with Heavy Thunder Hammers. This would give them good mobility and could hit really hard in combat.
Apologies for the "grey army", I've just got them built and am waiting on some decent weather to get them undercoated. It may be some time.....
Apologies for the "grey army", I've just got them built and am waiting on some decent weather to get them undercoated. It may be some time.....
Adam's army consisted of:
Combined Arms Detachement
Hive Tyrant- Wings, two twin-linked Devourers, egrubs
Hive Tyrant- Wings, two twin-linked Devourers, egrubs
10 Termagaunts
10 Termagaunts
10 Termagaunts
3 Ripper Swarm
Venomthrope
Venomthrope
2 Zoanthropes
Carnifex- 2 Devourers
Carnifex- 2 Devourers
Allied Detachment
Hive Tyrant- Wings, two twin-linked Devourers, egrubs
10 Termagaunts
3 Ripper Swarm
His warlord trait gave him +1 to seize and reserves re-rolls. His psychic powers were:
Tyrant 1- Warp Blast, Catalyst
Tyrant 2- Warp Blast, Psychic Scream
Tyrant 3- Warp Blast, The Horror
Zoanthropes- Warp Blast, Psychic Scream
Wow, three Flyrants. This should be tough!
Adam won the roll for deployment and chose to go first. He set up most of his army on his right flank, the big Tyranid creatures spaced in between the units of Termagaunts.
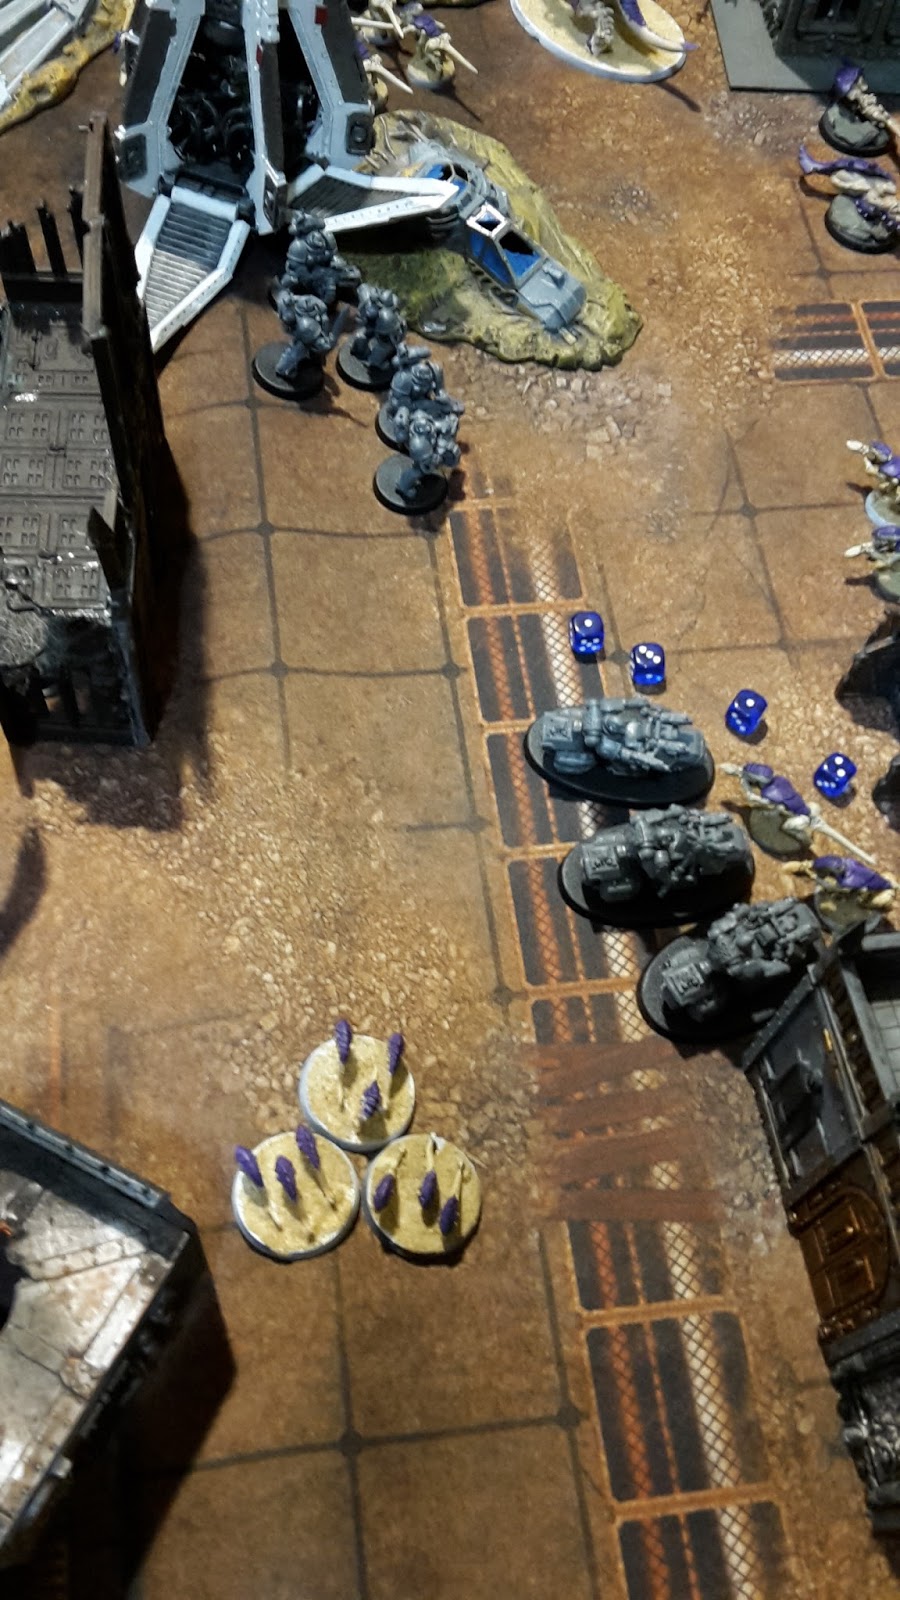
I put my sniper squad in the ruins in my centre, with one of my Vanguards in the ruins below them, the other on the left flank. The second Veteran squad with the Heavy Bolter went on the right flank with the Bikers. I put the close combat squad and Watch Master in the Corvus Blackstar.


I failed to seize the initiative and Adam took the first turn.
TURN 1- TYRANIDS

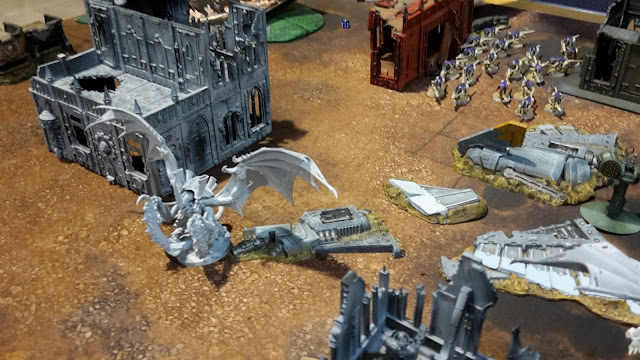
The Hive Tyrants launched themselves into the air, moving to engage the Deathwatch as the rest of the swarm advanced.


In the psychic phase, the Flyrant cast Warp Blast on one of the Vanguard Veterans, killing him. The Zoanthropes and a Hive Tyrant attempted to cast Dominion, but both failed. The second Hive Tyrant passed the roll for Dominon.
In the shooting phase, the Guants ran towards the centre of the battlefield. One Hive Tyrant fired at the Veterans in the ruins, killing three of the squad. Another Hive Tyrant targeted the unit, wiping them out after I failed 5 of my 7 saves! The final Hive Tyrant fired at the Bikes, killing two of the squad.
TURN 1- DEATHWATCH

Unsurprisingly, those Flyrants were pretty brutal. My aim was to get into combat as soon as possible so they couldn't shoot at me.


The Drop Pod arrived, landing besides the Relic as the Veterans emerged from the transport. The rest of the Deathwatch advanced on the Tyranids.
The Veterans opened fire on the Carnifex with their Frag Cannons, easily destroying the Tyranid monstrosity. The other Veteran squad opened fire on the Termagaunts with their Dragonfire rounds (ignores cover), killing 7 of the squad. The Heavy Bolter managed to miss with all three of its shots.
The Bikers assaulted the Gaunts in front of them, killing eight of the squad with their attacks for no loss in return. The Vanguard Veteran assaulted another unit of Gaunts, but he was cut down by the overwatch fire of the unit.


At the end of turn 1, things were not going well! The massive firepower of the Hive Tyrants had killed quite a bit of my army. In reply, I had managed to take out a few units, but didn't have a lot to deal with his flyers until my Corvus arrived.
TURN 2- TYRANIDS

The Tyranids continued their advance on the Relic. The Ripper Swarms arrived, deep striking on the left flank, as the Hive Tyrants landed to engage the Deathwatch. The surviving Carnifex moved to engage the Deathwatch Veterans from the Drop Pod.


In the psychic phase, the Hive Tyrants attempted to target the Drop Pod with their Warp Blasts, but two of them failed to manifest the power. The Zoanthropes cast Dominion, while the other Hive Tyrant failed.
In the shooting phase, the Termagaunts opened fire on the Frag Cannon Veterans, but failed to cause any harm. Two of the Hive Tyrants opened fire on the Heavy Bolter squad, easily wiping them out. The third Hive Tyrant fired on the Frag Cannon squad, killing one of the squad.
The Termagaunts assaulted the Veterans to soak up their overwatch fire and were easily dispatched by the Frag Cannons. The Carnifex charged the unit, killing one of the Veterans with his hammer of wrath attacks. The Carnifex struck at the unit, but the Storm Shield succeeded in soaking up the damage and no more Deathwatch died. The Veterans struck back, wounding the Carnifex once, but failing to get past its armour. The squad passed their morale test.

The Bikes struck at the Termagaunts, but failed to cause any damage. The Tyranids were unable to cause any harm in reply and remained locked in combat.
TURN 2- DEATHWATCH

The Corvus Blackstar arrived, moving on to engage the Warlord Hive Tyrant. It fired its weapons at the Tyranid creature, but failed to cause any damage.


In the assault phase, the Bikers wiped out the Termagaunts, while the Carnifex killed one of the Veterans.
TURN 3- TYRANIDS

The Hive Tyrants moved to the rear of the Corvus Blackstar, while the Tyranid forces advanced on the Bikers.


The warlord Hive Tyrant fired on the Corvus, hitting with eight of its snap shots! It glanced twice and one got through the jinking flyer. The other Hive Tyrant fired at the flyer, glancing it twice. I failed both my Jink saves and the flyer was brought down, killing all the Deathwatch inside.
With that, I decided to call the game there. There was nothing I could do to halt the rampage of the Flyrants and they would easily kill my Bikers the following turn. The game was over in less than an hour and there was no point trying to continue.
VICTORY POINTS:
Tyranids- 9
Deathwatch- 0
AFTER-BATTLE THOUGHTS
Not much I can say about that one. My run of terrible games seems to be continuing. There was very little that I could do about the Flying Hive Tyrants and they were able to decimate most of my army with ease.
I think that Adam could have just fielded the three Hive Tyrants and the result would have been the same, there was no need for the rest of his army.
Fortunately, I managed to get another game the same night at the club and will be writing that one up too. After that, I will talk about how I felt the Deathwatch performed in the two games (though not much to write about for this one). Sorry again for such a lacklustre battle report for the second time in a row, but sometimes that is just the way it goes!
Hive Tyrant- Wings, two twin-linked Devourers, egrubs
Hive Tyrant- Wings, two twin-linked Devourers, egrubs
10 Termagaunts
10 Termagaunts
10 Termagaunts
3 Ripper Swarm
Venomthrope
Venomthrope
2 Zoanthropes
Carnifex- 2 Devourers
Carnifex- 2 Devourers
Allied Detachment
Hive Tyrant- Wings, two twin-linked Devourers, egrubs
10 Termagaunts
3 Ripper Swarm
His warlord trait gave him +1 to seize and reserves re-rolls. His psychic powers were:
Tyrant 1- Warp Blast, Catalyst
Tyrant 2- Warp Blast, Psychic Scream
Tyrant 3- Warp Blast, The Horror
Zoanthropes- Warp Blast, Psychic Scream
Wow, three Flyrants. This should be tough!
Adam won the roll for deployment and chose to go first. He set up most of his army on his right flank, the big Tyranid creatures spaced in between the units of Termagaunts.
I put my sniper squad in the ruins in my centre, with one of my Vanguards in the ruins below them, the other on the left flank. The second Veteran squad with the Heavy Bolter went on the right flank with the Bikers. I put the close combat squad and Watch Master in the Corvus Blackstar.


I failed to seize the initiative and Adam took the first turn.
TURN 1- TYRANIDS

The Hive Tyrants launched themselves into the air, moving to engage the Deathwatch as the rest of the swarm advanced.


In the psychic phase, the Flyrant cast Warp Blast on one of the Vanguard Veterans, killing him. The Zoanthropes and a Hive Tyrant attempted to cast Dominion, but both failed. The second Hive Tyrant passed the roll for Dominon.
In the shooting phase, the Guants ran towards the centre of the battlefield. One Hive Tyrant fired at the Veterans in the ruins, killing three of the squad. Another Hive Tyrant targeted the unit, wiping them out after I failed 5 of my 7 saves! The final Hive Tyrant fired at the Bikes, killing two of the squad.
TURN 1- DEATHWATCH

Unsurprisingly, those Flyrants were pretty brutal. My aim was to get into combat as soon as possible so they couldn't shoot at me.


The Drop Pod arrived, landing besides the Relic as the Veterans emerged from the transport. The rest of the Deathwatch advanced on the Tyranids.
The Veterans opened fire on the Carnifex with their Frag Cannons, easily destroying the Tyranid monstrosity. The other Veteran squad opened fire on the Termagaunts with their Dragonfire rounds (ignores cover), killing 7 of the squad. The Heavy Bolter managed to miss with all three of its shots.
The Bikers assaulted the Gaunts in front of them, killing eight of the squad with their attacks for no loss in return. The Vanguard Veteran assaulted another unit of Gaunts, but he was cut down by the overwatch fire of the unit.


At the end of turn 1, things were not going well! The massive firepower of the Hive Tyrants had killed quite a bit of my army. In reply, I had managed to take out a few units, but didn't have a lot to deal with his flyers until my Corvus arrived.
TURN 2- TYRANIDS

The Tyranids continued their advance on the Relic. The Ripper Swarms arrived, deep striking on the left flank, as the Hive Tyrants landed to engage the Deathwatch. The surviving Carnifex moved to engage the Deathwatch Veterans from the Drop Pod.


In the psychic phase, the Hive Tyrants attempted to target the Drop Pod with their Warp Blasts, but two of them failed to manifest the power. The Zoanthropes cast Dominion, while the other Hive Tyrant failed.
In the shooting phase, the Termagaunts opened fire on the Frag Cannon Veterans, but failed to cause any harm. Two of the Hive Tyrants opened fire on the Heavy Bolter squad, easily wiping them out. The third Hive Tyrant fired on the Frag Cannon squad, killing one of the squad.
The Termagaunts assaulted the Veterans to soak up their overwatch fire and were easily dispatched by the Frag Cannons. The Carnifex charged the unit, killing one of the Veterans with his hammer of wrath attacks. The Carnifex struck at the unit, but the Storm Shield succeeded in soaking up the damage and no more Deathwatch died. The Veterans struck back, wounding the Carnifex once, but failing to get past its armour. The squad passed their morale test.

The Bikes struck at the Termagaunts, but failed to cause any damage. The Tyranids were unable to cause any harm in reply and remained locked in combat.
TURN 2- DEATHWATCH

The Corvus Blackstar arrived, moving on to engage the Warlord Hive Tyrant. It fired its weapons at the Tyranid creature, but failed to cause any damage.


In the assault phase, the Bikers wiped out the Termagaunts, while the Carnifex killed one of the Veterans.
TURN 3- TYRANIDS

The Hive Tyrants moved to the rear of the Corvus Blackstar, while the Tyranid forces advanced on the Bikers.


The warlord Hive Tyrant fired on the Corvus, hitting with eight of its snap shots! It glanced twice and one got through the jinking flyer. The other Hive Tyrant fired at the flyer, glancing it twice. I failed both my Jink saves and the flyer was brought down, killing all the Deathwatch inside.
With that, I decided to call the game there. There was nothing I could do to halt the rampage of the Flyrants and they would easily kill my Bikers the following turn. The game was over in less than an hour and there was no point trying to continue.
VICTORY POINTS:
Tyranids- 9
Deathwatch- 0
AFTER-BATTLE THOUGHTS
Not much I can say about that one. My run of terrible games seems to be continuing. There was very little that I could do about the Flying Hive Tyrants and they were able to decimate most of my army with ease.
I think that Adam could have just fielded the three Hive Tyrants and the result would have been the same, there was no need for the rest of his army.
Fortunately, I managed to get another game the same night at the club and will be writing that one up too. After that, I will talk about how I felt the Deathwatch performed in the two games (though not much to write about for this one). Sorry again for such a lacklustre battle report for the second time in a row, but sometimes that is just the way it goes!
To be honest, DW aren't competetive in any way. The whole codex lacks the feel of a 'Elite Force'. Some of the Killteams are boring and lackluster, missing rules like scout and/or infiltration and some dubious weapon options. This force is very disappointing as an stand alone army.
ReplyDeleteI have been struggling with them in my games. They die just as easily as regular marines, but at much more expense. I've only played two games so far and had very few survivors at the end of each game.
DeleteThe only time I've had success with them was using them alongside my IG. With a more solid base to hold the line while the DW do pinpoint strikes, they're rather better. Still not great, tho. Too expensive, and seriously lacking in mobility after Deep Striking/getting their Rhinos shot away.
DeleteMost people seem to be advocating the use of them as allies to another force. They seem pretty strong in that respect. I'll keep going with the army, see if I can get anywhere.
DeleteBad match up for a game. Keep at the Deathwatch though. With practice you'll make them into a force to be reckoned with.
ReplyDelete