

Want to know how I make the maps for my battle reports? Check out this tutorial and you will be able to make your own awesome maps to illustrate your battle reports.
A few people have asked recently for a tutorial on how to use Battle Chronicler, so I finally put something together while working on my recent battle reports. This was how I put together the maps for my first game at the recent North West Open tournament.
Battle Chronicler is a great, free online program that I use for making my the maps for my battle reports on the blog. It takes a little bit of effort to use and draw the maps, but I think it is completely worthwhile and really adds to the reports.
This first part of the tutorial will take you through the basics of creating your maps for a battle report, along with some tips that I have picked up over the years. Part 2 will show you how to input your own battlefield images to create more realistic maps of your games. Hopefully, these might encourage you to use the program yourself for your own battle reports, or simply be an interesting read to see how I go about making the maps for my own battle reports.
You can download Battle Chronicler from their website. You can also download the components to give you some terrain images to use in your own maps from the start.
Defining the Game
When you first open Battle Chronicler for the first time, it will ask you what kind of system you will be using your maps for. You can select either ranked square bases or round skirmish bases. Even though 40k is a round, skirmish game, I prefer to use the square ranked up representation. I think this looks neater on the maps, but you can choose whichever you wish.
With Battle Chronicler open, go to File and select New. This box should appear:

You can now fill in the details of your game and define the two armies that you will be using. You can set the board size, the number of turns and select the colour background you want for the battlefield (click on the green box to change the colour from the standard green).
You can fill in your army name and even select the colour you wish it to appear on the map. To change the colour, simply select "Edit Colour" and choose which you want. You can change the colour of the main box colour, text colour, border colour and can even have multiple colours in the main box.


If you select from the "Colour Scheme" drop down menu, can can choose two colours or a fade, allowing you to create units for your Howling Griffons Space Marine army.

With the colours complete, you can now define your armies. Click "Define" to bring up the following window:

You can now enter the information for your army. To create a new unit, click "New".

The default unit will be 10 models in files 5-wide. You can change the number of models in the unit, the width of each rank and the base to be used. You can also fill in the name of the unit.
As a general rule, I tend to double the unit size to create sufficiently sized boxes for the units. For example, if I have a unit of 3 Bikers. I will select the 25x50 mm base size and make the unit 6 models in a rank of 6. This gives the unit sufficient board coverage when on the map to represent a skirmished unit.
For my own battle reports, I tend to use the following unit sizes:
Infantry- 25 mm round base
Bike or Cavalry- 25x50 mm rectangular base
Characters- 40 mm round base
Larger monsters, Dreadnoughts, Drop Pods, etc- 60 mm round base
Vehicles- 50x65 rectangular base
You can use the custom base option to represent larger models such as Imperial Knights, Baneblades, etc. Just remember to select the correct measurement unit when inputting the data and to make sure you only have 1 model in the unit.
When you are making up your army, you can use the "Duplicate" button to repeat the selected unit. This makes it easy to create multiple units of the same type, such as Tactical Marines or Ork Boyz.

Don't worry if you make a mistake at this point, as it can be easily fixed when you are on the map layout. If you have made a mistake, you can simply select "Game Details" in the Edit menu on the map to change any features of your army or the game.
 |
| The Define button. |

You can now enter the information for your army. To create a new unit, click "New".

The default unit will be 10 models in files 5-wide. You can change the number of models in the unit, the width of each rank and the base to be used. You can also fill in the name of the unit.
 |
| Drop down menu to change base size. |
As a general rule, I tend to double the unit size to create sufficiently sized boxes for the units. For example, if I have a unit of 3 Bikers. I will select the 25x50 mm base size and make the unit 6 models in a rank of 6. This gives the unit sufficient board coverage when on the map to represent a skirmished unit.
For my own battle reports, I tend to use the following unit sizes:
Infantry- 25 mm round base
Bike or Cavalry- 25x50 mm rectangular base
Characters- 40 mm round base
Larger monsters, Dreadnoughts, Drop Pods, etc- 60 mm round base
Vehicles- 50x65 rectangular base
You can use the custom base option to represent larger models such as Imperial Knights, Baneblades, etc. Just remember to select the correct measurement unit when inputting the data and to make sure you only have 1 model in the unit.
When you are making up your army, you can use the "Duplicate" button to repeat the selected unit. This makes it easy to create multiple units of the same type, such as Tactical Marines or Ork Boyz.

Don't worry if you make a mistake at this point, as it can be easily fixed when you are on the map layout. If you have made a mistake, you can simply select "Game Details" in the Edit menu on the map to change any features of your army or the game.
In the example, I have entered the details for all the Tyranid units in the game.

If you are using the same army in several games, you can use the "Import" function to import an army from a previous Battle Chronicler file. For example, here I have imported one of my Deathwatch armies from a previous game.
 |
| Import button highlighted. |
When you have input the details for both armies, click OK and you will be taken to the main section of battle chronicler.
Making your map and Terrain
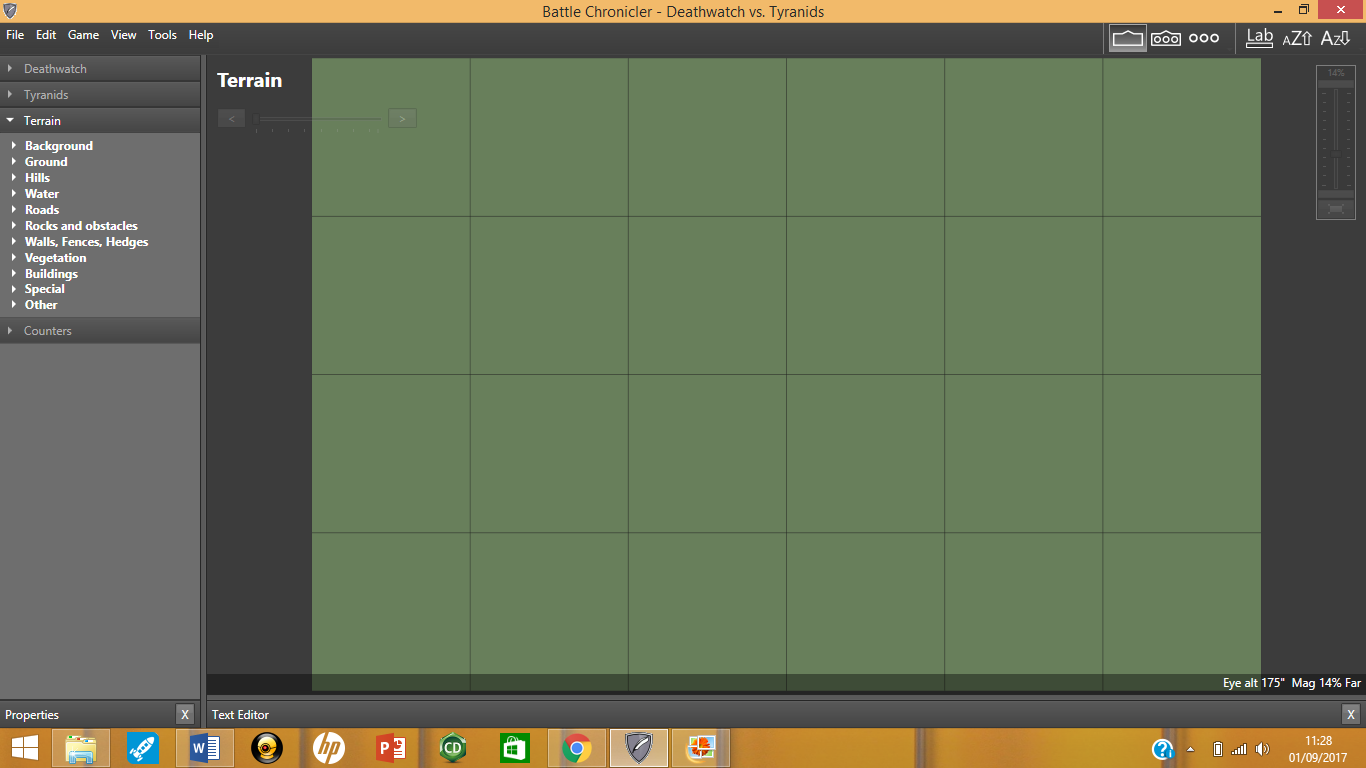
When you are ready to make up your map, you will be taken to a screen such as the one shown below:

Here you can see the blank battlefield. Your two armies will be listed on the left, along with all the terrain and counter options.
You can drag down the "Text Editor" bar to increase the size of the map and give you a bit more room to work with.

Here, I have made a mistake. The game would suit a grey background for the battle mat used, rather than a green background. You can fix this by going into the "Edit" menu and selecting "Game Details" to bring up the original screen.

From here, I can change the colour of the background of the map.


Now you need to fill the map with terrain to represent the battlefield. The next tutorial in this series will show you how to import your own terrain images into the program, but for the moment, lets just assume you have done that.
You want to start with the background that you wish to use. You can select one of the basic Battle Chronicler backgrounds or import your own to use. In this example, I am using one of the gaming mats I have played on as the background. Find the appropriate background in the tab on the left, then click on the main map to display it.
In this example, I have selected BW1 background and clicked on the main map to get it to appear.
From here, you can move the image around to make sure it is correctly lined up (just click on it and drag to the correct position). You can even rotate the image if the mat is not on the right side.
As you can see, the background image is a bit small. You can re-size it to fit the screen. Simply change the dimensions on the bottom left of the page to get it to the correct size.


With the background in place, you can now put in the terrain features for the game. Again, you can use the standard Battle Chronicler images, or input your own terrain for a more realistic representation.
Much like the background, simple click on the item you wish to use from the left hand column, then click on the map to make it appear.

As you can see, the terrain is a bit small on the map. You can change the size of the terrain piece, by clicking on the dimensions box on the bottom left, then entering the new size (much as with the background above). This part is mostly trial and error. I tend to pick a size that looks roughly right on the gaming mat, as opposed to the accurate size of the terrain piece in real life.
With the image re-sized, you can rotate it to fit an approximate position on the map. The one issue with the program is that the rotations are rather large and don't always accurately reflect the layout of the map. I haven't found a way to do manual rotations on the images, so just do the best you can at this stage.
Once all the terrain has been added, you can now add any objectives or text you want to appear. For objectives, I use the Battle Chronicler logo in the "Special" terrain section. I resize the logo to be 3 inches by 3 inches, as I feel this is a good size for it on the maps.

If you want to put text on the map, for example, to number the objectives as their maelstrom number, you can do this as well. I use the "Label 2" Red Bold" label for my text. Click on this and then click on the map to have the text "Sample" appear.

You can change the text in the "text" box highlighted below.

Note, however, that the text won't change on the map at this point. It will still read "Sample" until you go to the next step.
Once you have set up all the terrain, objectives, etc., you are ready to deploy your army. You can move to the deployment map by clicking on the forward arrow on the top left (highlighted below).

Deploying the Armies
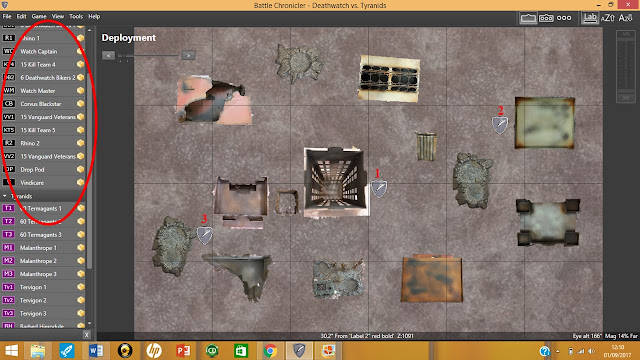
When you move on from terrain set up page, you will now be on the Deployment page. As you can see, the text on the objectives has now changed.

The units for both armies are now arrayed down the left hand side.
Deploying the two armies works very much like the terrain above. Simply click on the unit on the left hand menu, then click on the map to deploy it. If you have missed out any units, you can simply add them by selecting "Game Details" from the Edit menu and adding them in the "Define" tab as described earlier in the article. This also allows you to define whether the army deploys North (pointing down) or South (pointing up). I always deploy my own army facing South, as this matches my perspective from the table, as well as all the photos from my games. If you have not changed this definition at the start, you can always go back and change it in the "Game Details".
When you click on the unit on the table, you can move and rotate them using the cursor. Clicking on the unit and holding Ctrl will allow you to move the unit without it rotating.
I use my photos of the battle report to approximate the position of the units on the map.
When all the units are deployed, you are ready to go onto the first turn. Simply press the forward arrow (highlighted below) to move on.

The First Turn
Now you are ready to create the maps for each game turn. When making my own maps, I tend to do all the movements at the same time, then add the wound explosion. I generally find it easier to write up the battle report first and then draw the maps. This gives me a clearer picture when putting the maps together and helps cut down on errors.
To move a unit, simply click on it and drag it to its new position. In the turn maps, as you drag the unit, a white arrow appears to show the movement. Below we see all the Tyranid units moving to position.

You can change the colour of the arrow to indicate charging or remove it entirely (these will be covered below).
In the first turn of the game, the Vindicare Assassin was slain. I used the explosion symbols to represent damage or casualties. These can be found in the Counters menu on the left hand side.

I have resized the Kaboom 1 image to be 3 inches. I feel this is a good size for damage on the map. For larger areas of damage or for a destroyed unit, I will use a 5" image.
The counters work the same way as units, simply select the counter and then click on the map to make it appear. You can now move or rotate it as you wish.

When you have added all the moves and detailed that you want, simply click on the forward arrow to move to the next turn. When you move turn, all the movement arrows and counters will disappear to give you a map ready for the next army turn.
As you can see above, the slain Assassin is still on the board. To remove a unit, you simply select it and press "delete" on your keyboard to remove it.

On my first turn, I had some units come in from reserve. These can be selected from the menu on the left and added to the battlefield as you would in the deployment map. The difference this time is that when you move the unit to get it into position, a white move arrow will appear, as seen below.

I want to remove this arrow to make it look a bit neater. If you click on the unit, its details will appear on the bottom left.

In this menu, you can select "Hide Move Arrow" to remove the arrow. This is where you can also select if a unit is "charging" to change the arrow to red, or "routed" to change the arrow to yellow.

Now, I can add a few more explosions to show unit damage and the Deathwatch first turn is complete.

On to Tyranid turn 2, and one of the Tervigons charges my Kill Team. As with hiding the movement arrow, you can select charging in the same menu to denote when a unit is assaulting.

You can now go ahead and finish the rest of your game. For example, here is the final map of my battle report.

Exporting the Maps
Once you have completed your maps, you can now go back to the start of your maps and start exporting them.
Select "Export to Image File" from the File Menu. The following screen will appear.

You want to select the box highlighted below and save it to a new folder in the Exports folder.

If you don't select a new folder to save it to, it will create a new folder with the image for every turn. I just find it more convenient to save them all to the one folder, making it easier to transfer them.
When the folder is selected, click the "Export" button.

This will now create an image you can insert into your battle report. You can find the exports under Documents > Battle Chronicler > exports.

So that is it, the complete process for creating your own maps in Battle Chronicler. It does take a bit of getting used to, but if you play around with it for a while, you will get used to it and it becomes much easier over time.
I hope you have enjoyed this look behind the scenes of St Andrews Wargaming and the battle reports that I create.
If you have any questions about the tutorial or the program, please let me know in the comments below.
Making your map and Terrain
When you are ready to make up your map, you will be taken to a screen such as the one shown below:

Here you can see the blank battlefield. Your two armies will be listed on the left, along with all the terrain and counter options.
 |
| Terrain options highlighted. |
Here, I have made a mistake. The game would suit a grey background for the battle mat used, rather than a green background. You can fix this by going into the "Edit" menu and selecting "Game Details" to bring up the original screen.

From here, I can change the colour of the background of the map.


Now you need to fill the map with terrain to represent the battlefield. The next tutorial in this series will show you how to import your own terrain images into the program, but for the moment, lets just assume you have done that.
You want to start with the background that you wish to use. You can select one of the basic Battle Chronicler backgrounds or import your own to use. In this example, I am using one of the gaming mats I have played on as the background. Find the appropriate background in the tab on the left, then click on the main map to display it.
In this example, I have selected BW1 background and clicked on the main map to get it to appear.
 |
| Selected the desired background image. |
 |
| Click on the map to make it appear. |
As you can see, the background image is a bit small. You can re-size it to fit the screen. Simply change the dimensions on the bottom left of the page to get it to the correct size.


With the background in place, you can now put in the terrain features for the game. Again, you can use the standard Battle Chronicler images, or input your own terrain for a more realistic representation.
Much like the background, simple click on the item you wish to use from the left hand column, then click on the map to make it appear.

As you can see, the terrain is a bit small on the map. You can change the size of the terrain piece, by clicking on the dimensions box on the bottom left, then entering the new size (much as with the background above). This part is mostly trial and error. I tend to pick a size that looks roughly right on the gaming mat, as opposed to the accurate size of the terrain piece in real life.
With the image re-sized, you can rotate it to fit an approximate position on the map. The one issue with the program is that the rotations are rather large and don't always accurately reflect the layout of the map. I haven't found a way to do manual rotations on the images, so just do the best you can at this stage.
 |
| Rotation buttons highlighted. |

If you want to put text on the map, for example, to number the objectives as their maelstrom number, you can do this as well. I use the "Label 2" Red Bold" label for my text. Click on this and then click on the map to have the text "Sample" appear.

You can change the text in the "text" box highlighted below.

Note, however, that the text won't change on the map at this point. It will still read "Sample" until you go to the next step.
Once you have set up all the terrain, objectives, etc., you are ready to deploy your army. You can move to the deployment map by clicking on the forward arrow on the top left (highlighted below).

Deploying the Armies
When you move on from terrain set up page, you will now be on the Deployment page. As you can see, the text on the objectives has now changed.

The units for both armies are now arrayed down the left hand side.

Deploying the two armies works very much like the terrain above. Simply click on the unit on the left hand menu, then click on the map to deploy it. If you have missed out any units, you can simply add them by selecting "Game Details" from the Edit menu and adding them in the "Define" tab as described earlier in the article. This also allows you to define whether the army deploys North (pointing down) or South (pointing up). I always deploy my own army facing South, as this matches my perspective from the table, as well as all the photos from my games. If you have not changed this definition at the start, you can always go back and change it in the "Game Details".
When you click on the unit on the table, you can move and rotate them using the cursor. Clicking on the unit and holding Ctrl will allow you to move the unit without it rotating.
I use my photos of the battle report to approximate the position of the units on the map.
 |
| The Deathwatch units are deployed. |
 |
| The Tyranids are deployed. |

The First Turn
Now you are ready to create the maps for each game turn. When making my own maps, I tend to do all the movements at the same time, then add the wound explosion. I generally find it easier to write up the battle report first and then draw the maps. This gives me a clearer picture when putting the maps together and helps cut down on errors.
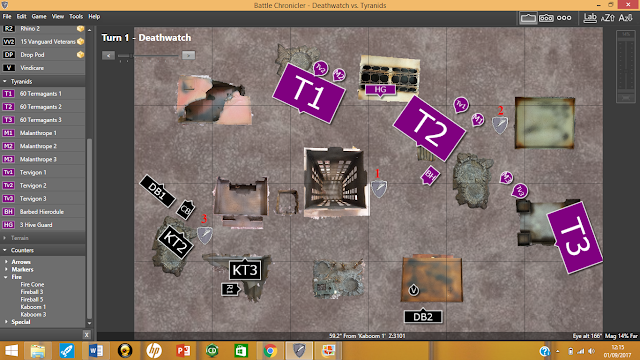
To move a unit, simply click on it and drag it to its new position. In the turn maps, as you drag the unit, a white arrow appears to show the movement. Below we see all the Tyranid units moving to position.

You can change the colour of the arrow to indicate charging or remove it entirely (these will be covered below).
In the first turn of the game, the Vindicare Assassin was slain. I used the explosion symbols to represent damage or casualties. These can be found in the Counters menu on the left hand side.

I have resized the Kaboom 1 image to be 3 inches. I feel this is a good size for damage on the map. For larger areas of damage or for a destroyed unit, I will use a 5" image.
The counters work the same way as units, simply select the counter and then click on the map to make it appear. You can now move or rotate it as you wish.

When you have added all the moves and detailed that you want, simply click on the forward arrow to move to the next turn. When you move turn, all the movement arrows and counters will disappear to give you a map ready for the next army turn.

As you can see above, the slain Assassin is still on the board. To remove a unit, you simply select it and press "delete" on your keyboard to remove it.

On my first turn, I had some units come in from reserve. These can be selected from the menu on the left and added to the battlefield as you would in the deployment map. The difference this time is that when you move the unit to get it into position, a white move arrow will appear, as seen below.

I want to remove this arrow to make it look a bit neater. If you click on the unit, its details will appear on the bottom left.

In this menu, you can select "Hide Move Arrow" to remove the arrow. This is where you can also select if a unit is "charging" to change the arrow to red, or "routed" to change the arrow to yellow.

Now, I can add a few more explosions to show unit damage and the Deathwatch first turn is complete.

On to Tyranid turn 2, and one of the Tervigons charges my Kill Team. As with hiding the movement arrow, you can select charging in the same menu to denote when a unit is assaulting.

You can now go ahead and finish the rest of your game. For example, here is the final map of my battle report.

Exporting the Maps
Once you have completed your maps, you can now go back to the start of your maps and start exporting them.
Select "Export to Image File" from the File Menu. The following screen will appear.

You want to select the box highlighted below and save it to a new folder in the Exports folder.

If you don't select a new folder to save it to, it will create a new folder with the image for every turn. I just find it more convenient to save them all to the one folder, making it easier to transfer them.
When the folder is selected, click the "Export" button.

A new box will appear and you want to select "Export Complete Image". 

This will now create an image you can insert into your battle report. You can find the exports under Documents > Battle Chronicler > exports.

So that is it, the complete process for creating your own maps in Battle Chronicler. It does take a bit of getting used to, but if you play around with it for a while, you will get used to it and it becomes much easier over time.
I hope you have enjoyed this look behind the scenes of St Andrews Wargaming and the battle reports that I create.
If you have any questions about the tutorial or the program, please let me know in the comments below.
Nice add to the community, Mike. I had no idea this tool was out there. Thank you for sharing this!
ReplyDeleteNo problem Dave!
DeleteThanks for doing this Mike - having downloaded it and given up after a few frustrated attempts it is nice to have an old hand walk you through it. Will definitely give it another crack now!
ReplyDeleteCheers. Hopefully it will give you some tips for using it in the future.
Deletethis is just 'the basics'? erm.. you are truly dedicated.
ReplyDeleteYeah, it started as the basics, but quickly turned into the lot!
DeleteSinging: 'Who do you think you are kidding, Mr. Hitler? If you think old England's done...'
ReplyDeleteThanks a lot for doing this! It was one of the "to do" projects but it is obviously quite time consuming with all the screenshots to show step-by-step process. I like BC, it takes a little to get used to it but it helps so much in battle reports writing! Hopefully, thanks to your post we will have more battle reporters using diagrams in their battles :)
ReplyDeleteI hope so, would be great to see a few more than just ours.
DeleteI think people use it as I have seen it a few times already. However, as you know very well, creating a full battle report with the maps for each turn takes time. People often do not dedicate as much and prefer to write a story with pictures. Which is perfectly fine but illustrates why BC may not be used on a regular basis.
DeleteI guess we just keep doing our thing and hopefully people will decide it is actually worth it to put extra time!
Hi Mike, I’m part of the Woffboot crew. I’ve used Battle Chronicler too for ages after Kraken showed me the light, but have just been forced to “upgrade” my home laptop to a Chromebook and now it no longer works. Have you come across any other mapping programmes that might work on a Chromebook?
ReplyDelete