
Our third and final game of the Clan Clash doubles tournament was against Aberdeen once again.
This scenario was called Line of March, a mixture of Maelstrom and objective grabbing. The objectives were set up in set positions around the board (two on each short side and two in the middle). Each turn, players would draw 3 secret maelstrom cards and have to complete them. At the end of the game, additional points would be awarded for controlling the objectives as well as additional points for table control and destroying enemy units in the final turn of the game.
I was paired up with Chris (from the Aberdeen store) and his Tau for this mission. As a reminder, my army consisted of:
Captain- Space Marine Bike, Power fist, Storm Shield
5 Bikers- 2 Grav guns, sergeant with Meltabombs
5 Bikers- 2 Grav guns, sergeant with Meltabombs
5 Bikers- 2 Meltaguns, sergeant with Meltabombs
5 Sternguard Veterans- 3 with combi-meltas in drop pod
Chris' Tau army consisted of:
Commander Farsight and two crisis suits with drones
Two units of Fire Warriors
A unit of Sniper Drones
Riptide
We were up against Craig and his Space Marines (who I faced in the first game) and Ricky with his Necrons. The army consisted of:
Librarian
3 Grav centurions in drop pod
10 Tactical marines- meltagun with drop pod
10 Tactical marines- meltagun with drop pod
Necron Lord
Two units of Necron Warriors
6 Wraiths
Night Scythe
A tough army to face. I knew from experience in the first game that the Centurions were going to be deadly and Necrons are always a tough proposition. Unfortunately, my Tau allies had no interceptor to try and take out the pods before they could cause much damage.
For our special cards this game, we took placing an enemy unit in reserve, Restrict movement to 6" and enemy weapons have "Get's Hot" for one turn.

 |
| Terrain and Objectives. |
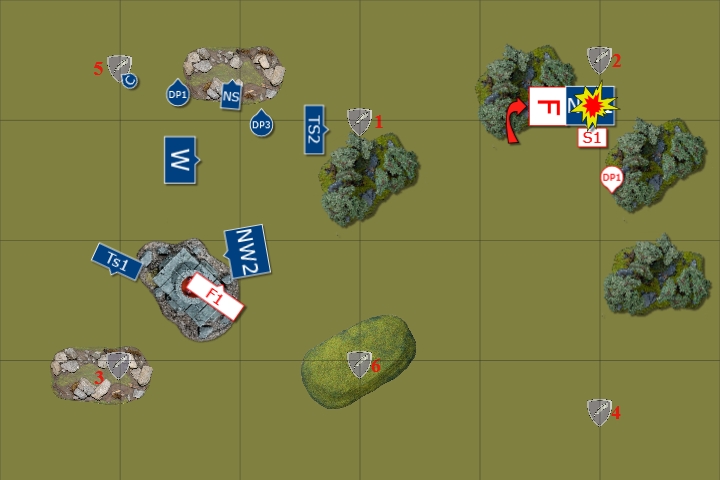
We won the roll for table edge and for deployment and chose to go first. I placed the bike units in the corners of our deployment zone to grab any objectives that came up. The Fire warriors deployed in the ruins in our deployment zone, with the sniper drones nearby and the Riptide in the shelter of the ruins.
Our opponents deployed one unit of Necron warriors at the back of their deployment zone next to one of the objectives and the Wraiths forward to rush at us.
 |
| Deployment. |


We played our Dirty Trick card to put the Wraiths in reserve, but our opponents countered with their own card that allowed them to redeploy them back on the table. They also played the card to put my Captain and his unit in reserve and once again made the Centurions super-powered (getting the maximum result).
TURN 1
At the start of our turn, we drew Hold the Line, Objective 4 and Psychological Warfare.
 |
| Turn 1- Dundee. |
After a quick discussion, Chris and I decided that I would put the Sternguard drop pod beside objective 4 to try and get the point for it. Just as I was about to roll for the scatter, Chris said "we'll be fine as long as it doesn't scatter off the table". Can anyone guess what happened next? Fortunately, the pod was not destroyed or lost to the warp, it merely went back into reserve.
 |
| Awaiting the Necron's advance. |
With little to do this turn but wait for the enemy to show up, I moved the White Scars bikers around our deployment zone. The Riptide attempted to fire at the Wraiths, but his super-charged shot failed its Get's Hot roll and could not fire this turn. The Fire Warriors managed to make up for this and wounded the Wraiths.
We scored only Hold the Line this turn and discarded objective 4.
 |
| Turn 1- Aberdeen. |
The drop pods carrying the Centurions and Tactical squad arrived this turn, both coming down in the middle of our deployment zone. The Wraiths moved forward towards our lines, but were fortunately too far away to engage this turn.
 |
| The drop pods arrive. |
 |
| The Space Marine forces mass in our deployment zone. |
We used our "Get's Hot" dirty trick to try and damage the enemy army.
The centurions opened fire on the Riptide, their grav cannons easily annihilating the Tau construct (12 wounds were caused thanks to the shooting) and causing one wound on themselves. The drop pods fired at the fire warriors, killing one. The tactical squad decided not to fire, not wanting to risk killing themselves with their bolters this turn.
At the end of their turn, Craig and Ricky scored a point for holding objective 2 and a point for First Blood.
VICTORY POINTS:
Dundee- 1
Aberdeen- 2
TURN 2
This turn we drew Big Game Hunter, destroy an objective secured unit and had psychological warfare from the previous turn.
 |
| Turn 2- Dundee. |
The Drop pod and Farsight's unit both arrived this turn, landing next to the Necron warriors in the back field. In our deployment zone, the Captain and his bike unit also arrived, moving into position next to the Centurions. The other bike squads advanced on the tactical squad and the drop pod they arrived in.
 |
| The Sternguard arrive (after a small mishap). |

The Fire warriors fired at the Centurions, killing one, while the other unit fired at the Wraiths, killing one of the Necrons. The Captain's squad fired at the Centurions, wounding the Librarian and one of the Centurions. The meltagun bikers penetrated the drop pod, shaking the vehicle. The Sternguard and Farsight fired at the Necron warriors, killing some of the squad.
In the assault phase, the meltagun bikers charged the drop pod, blowing it up in combat with the sergeant's meltabombs. The other bike squad assaulted the tactical marines, killing a few, but staying locked in combat with them. It was at this point I made a huge error. I forgot that units could not assault from reserve. My plan was to finish off the Centurions with a charge of the Captain's squad, but obviously I could not, leaving them out in the open and unlikely to survive the next turn.
 |
| The drop pod is destroyed. |
At the end of turn 2, we scored two points for destroying the drop pod (big game hunter and destroy an objective secured unit).
 |
| Turn 2- Aberdeen. |
Turn 2 began for Craig and Ricky moving the wraiths forward towards the White Scars. The Necron flyer arrived and moved to the middle of the board. The Librarian attempted to cast a power on the Centurions, but periled and ended up killing himself.
 |
| The Centurions retreat. |
 |
| While the Wraiths advance. |
The Centurions opened fire on the Captain's bike unit, easily killing all the bikers and wounding the Captain once. The Necrons opened fire on Farsight, killing several drones.
In the assault phase, the Wraiths charged the meltagun unit, killing two of the bikers and causing the survivors to flee. The combat between the second bike unit and tacticals ended in a stalemate, I was unable to hit and run out of combat, so remained locked.
At the end of their turn, Craig and Ricky scored two points for Objective 2 and for killing an objective secured unit.
VICTORY POINTS:
Dundee- 4
Aberdeen- 4
TURN 3
This turn, we drew Objective 2, Objective 2 and Harness the Warp. We were unable to discard impossible cards, but if we could clear off the Necron warriors, we could get objective 2.
 |
| Turn 3- Dundee. |
Farsight and the Sternguard advanced on the warriors, while the survivors of the meltagun unit joined up with the Captain.
In the shooting phase, the Fire warriors succeeded in killing one centurion and wounding another. The bike squad also put a wound on the Centurion. Farsight and the Sternguard shot at the Necron warriors, leaving 4 remaining.


In the assault phase, the Sternguard charged in to combat, Farsight proving to be just out of charge range when rolled. The Sternguard struck with 15 attacks and managed a whole one wound, killing the Necron warrior. They passed their morale and stuck around, preventing us from scoring.
 |
| The Sternguard fail to take out the Necron Warriors. |
The Captain's squad attacked the Centurions, the Captain taking the Centurion sergeant down to one wound.
In the ongoing combat between the bikes and tactical marines, the bikers took a wound for no loss in return. They failed their morale and fled from the combat, ready to be shot next turn.
 |
| The Bikers flee from combat. |
 |
| So close to killing the last Centurion. |
This turn we scored no points.
 |
| Turn 3- Aberdeen. |
We made our second big mistake of the game this turn. We forgot to play the Restricted Movement card at the start of this turn, which would have a huge impact on the game.
The Wraiths advanced to support the last Centurion as the third drop pod arrived and the tactical marines got out. The Necron flyer advanced, another unit of Necron warriors spilling out in front of the Tau.

The Tactical squad fired at the remnants of the grav bike squad causing 3 wounds. I managed to fail all three saves, leaving one survivor. The Necron flyer then targeted the lone survivor, wiping out the unit. The Necrons and other tactical marines fired on the Tau, wiping out a unit of fire warriors.
In the assault phase, the Wraiths charge the Captain's squad, wiping them out before they could finish off the Centurion. The Sternguard yet again failed to harm the Necron Warriors and failed their hit and run move out of combat.
 |
| I'd have sworn there was a squad there a second ago. |
In this turn, Craig and Ricky scored a special card (more models in our table half) and Slay the Warlord for 2 points.
VICTORY POINTS:
Dundee- 4
Aberdeen- 6
TURN 4
This turn we drew secure objective 1 to go with two secure objective 4 cards from last turn.
 |
| Turn 4- Dundee. |
With very little left, Farsight advanced on the Necron warriors in combat with the Sternguard. The remaining Fire Warriors killed a couple of tactical marines.
In the assault phase, Farsight managed to fail a 5" charge and the Sternguard once again failed to kill any of the Necrons and lost one in return.
 |
| Farsight fails to get in to combat for a second turn. |
Again we scored no points and discarded objective 1.
 |
| Turn 4- Aberdeen. |
Craig and Ricky moved their units around our deployment zone and the Necron flyer turned 90 degrees to move back towards our units in their deployment zone. The enemy units fired at the last unit of fire warriors, easily wiping them out.

In the assault phase, the Sternguard once again failed to do any damage against the Necron warriors.
At the end of turn 4, Craig and Ricky scored a point for No Prisoners.
VICTORY POINTS:
Dundee- 4
Aberdeen- 7
TURN 5
 |
| Turn 5- Dundee. |
With only three units remaining (one of them an immobile drop pod), Farsight and his unit moved up to the Necron warriors. In the assault phase, they charged in and the unit was finally wiped out.
 |
| The Necron Warriors were finally wiped out. |
We scored two points for objective 2.
 |
| Turn 5- Aberdeen. |
In their penultimate turn, Craig and Ricky moved their units to grab the objectives, while the flyer moved towards our units. The Flyer shot at the Sternguard, causing 4 wounds, all of which were saved.
They ended the turn scoring one point for objective 5.
VICTORY POINTS:
Dundee- 6
Aberdeen- 8
TURN 6
In our final turn, we drew No Prisoners, Objective 6 and a special card (have more models in enemy half than our opponents).
 |
| Turn 6- Dundee. |
There was little movement, we turned towards the flyer and tried to take it out, but were unable to caused any damage.
We scored the special card this turn.
 |
| Turn 6- Aberdeen. |
Craig and Ricky moved their forces to grab 4 of the objectives on the board. They scored 3 points for Objective 6 (x2) and Objective 3.


VICTORY POINTS:
Dundee- 7
Aberdeen- 10
After totalling up the points for secondary objectives, the main objectives and the special victory conditions, the final score was:
Dundee- 13
Aberdeen- 23
A decisive win for the Aberdeen team.
AFTER BATTLE THOUGHTS:
Thanks to Craig and Ricky for a great game and for Chris to helping the Dundee team out during the day.
There were several factors that helped contribute to our loss this game:
Number 1- I'm an idiot
Number 2- I'm an idiot and
Number 3- I'm an idiot.
If you want more specific examples, then:
1. My first big mistake was forgetting that units that arrive from reserve that turn cannot assault. This led me to put my Captain and his squad in the open, ready to be fired upon by the Centurions in the next turn. It was unlikely we would have been able to kill them in a turn of shooting. They had a 2+ save, 4+ invulnerable (thanks to psychic powers), 5+ feel no pain and 3 wounds each. They were a very hardy unit and would take a lot to kill. I would have been better putting them behind the ruins and out of line of sight to move forward and grab objectives with their mobility.
2. I shouldn't have relied on the Sterngurd to take out the Necron Warriors. As it charged them in first instead of Farsight, it meant the Tau had to go through cover to make their charge and they failed it. They also failed the following turn to make the combat and the Sternguard seemed incapable of causing any wounds on the Necrons. We lost out on scoring the two points for objective 2 for two turns because of this error. Had we killed the Necrons in the first round of combat, we would have scored the two points and freed up Farsight to hopefully grab more objectives in the following turn.
3. One of our biggest mistakes was forgetting to use the Restrict movement Dirty Tricks card in turn 3. If we played this card, the Wraiths would have been unable to charge the Captain and bike squad, the Captain would have most likely finished off the last Centurion and they could have moved away from the combat and gotten out of range in the following turn. In addition, the second unit of Necron warriors would not have got into rapid fire range of the Tau and wiped them out. By the time we remembered we still had this card, it was too late to go back and change things.
Again, taking Khan instead of the Captain may have made a big difference in this game. Odds are I would have used the unit to outflank to the enemy deployment zone and use them to grab objectives or take out the Necron warriors with little fear of them being wiped out as the enemy army was too far away. A landspeeder storm would have been useful again to prevent the drop pods from arriving too close to our army.
Once again, the super-powered Centurions were a huge thorn in our side, taking out most units with ease and proving next to impossible to take out by shooting them. I thought about taking a unit, but would have had to drop the Sternguard and a Bike squad to do so. This may have been a fair trade off in hindsight.
FINAL THOUGHTS:
Scott, Colin and I had a fantastic time at the doubles tournament, thanks to the guys from Games Workshop Aberdeen for putting on such a great event.
The three scenarios were quite different from what I am used to playing and provided a nice tactical challenge in all three games.
The Dirty Tricks and Benevolence cards were really good and helped win us some games and cost us some more in equal measure. These cards were really powerful and could swing the battle entirely depending on when and how they were used. I thought that the unit boosting card was very strong, it made the Centurions very difficult to take out from shooting and in combat without any dedicated combat units. We can't complain too much though as it also boosted the Deathwing Knights in all three games to give us a hard hitting counter unit.
The cards and missions made the games on the day fun and not overly competitive. It is hard to be highly competitive when your opponent can play a card to neuter your best unit or army for a turn, the games tended to be fun and tough, but still achievable.
I liked how my army performed, but it would have been much better to take Khan instead of the bike-mounted Captain, a change I only made the day before and wished I hadn't. Had I known the missions in advance, he would have definitely been included. It is tough to get a decent force in 750 pts, but I think it worked well in many of the missions. I was unlucky to come up against the super-powered Centurions in two games, they really made a mess of my army in the two games I faced them.
I plan to keep an eye out for the next tournament run in Aberdeen. It's not too far away for me and it is a great store to game in.
No comments:
Post a Comment