Showing posts with label how to. Show all posts

Thursday, 16 December 2021

Starting a Wargames Club: Experiences from Didcot Wargames Club

Last year, I started a new Wargames club in my local area, Didcot Wargames Club. A few readers asked me to put together my experiences of setting up the club, to hopefully provide some advice for those thinking of doing the same. 

Here are my thoughts on setting up the club, and how it has been going. 


Why Set Up the Club
Putting together my own gaming club has been something I have been thinking about for a while. For me, the catalyst came from changing personal circumstances. My partner was moving from about 30 mins journey away to over an hour journey away. As a result, we were going to be more restricted to meeting up at weekends for the forseeable future. This meant that I may not be able to attend my regular gaming club on a regular basis. 

I normally attend Spiky Club in Reading, which meets on a Friday night from 7-11 pm. This club is a good 45 mins drive from my current flat, which is a bit of a travel commitment. As it is a Friday, I can get away with this. On a regular weeknight, I would struggle, not getting back till Midnight and having to work the next day. There are even times when I cannot be bothered going on a Friday if I have had a long week at work (the curse of getting old!). 

Due to these factors, I was looking at setting something up that was more local and would be happening mid-week. 


After speaking with a few friends in the area who play 40k, I thought there would be enough interest in setting up a local club in Didcot to make the venture worth exploring. 

I would say that this would be the first thing to consider if you are setting up a club. Will there be enough interest in the local area to keep the club going? Most people setting up a wargames club will be taking on the financial obligation initially, at least until the club becomes self-sustaining. If you can share that among a group of people involved in the club, it is more likely to run for reasonable costs before you get a group of dedicated players.

Monday, 9 November 2020

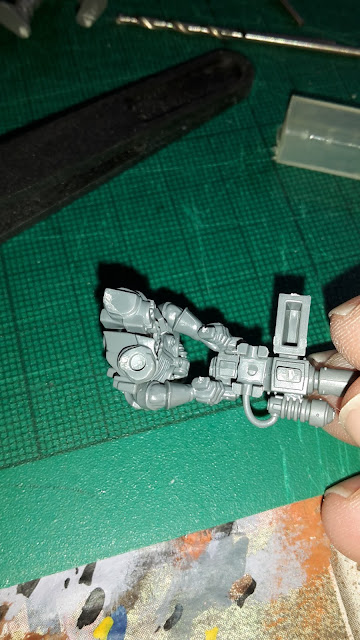
How to make a Chaplain on Bike from Indomitus

 Here is my how to guide on converting a Chaplain on Bike from the Indomitus boxed set. This will allow you to field your own Biker Chaplain to lead your Space Marine forces into glorious battle.


For this conversion, you will need:
  • Outrider Biker. The one with the pistol is the best choice, as this allows you to have the Chaplain wielding the Crozius arcanum. 
  • Chaplain from the Indomitus box. 
  • Book from the Ravenwing Upgrade sprue, or a suitable equivalent. The book on the Chaplain will also suffice. 
  • Other decorative elements, such as purity seals, chapter symbols, Imperial symbols, etc. 
The process was pretty straightforward and you should be able to complete it in under an hour. 

Step 1- Clip off the appropriate parts, and clean up the mould lines. Drill out the barrels on your Outrider Bolters, if you are so inclined. 

Step 2- Take Chaplain part G3 and outrider part E30. Cut off the arm section of G3 to give you the torso alone. Glue the two parts together. 


Friday, 17 January 2020

How to Magnetise the Space Marine Impulsor

This guide will show you how to magnetise the upgrade options for the Space Marine Impulsor, allowing you to equip it with either Ironhail Skytalon array, Bellicatus Missile Array, Shield Dome or Orbital Comms array.

To magnetise this kit, you will need:

  • 3 Large magnets (I use 5 mm)
  • 9 small magnets (I use 2 mm)
  • Pin vice or drill the size of both magnets
  • Spare plastic sprue (leftover parts of the model kit)
  • Other standard hobby supplies (superglue, knife, etc). 
Assembling the model
All of the magnetising points used in this guide are for section 59 of the model; the extra part of the hull that attaches to fit the different upgrade options. As such, you can pretty much assemble most of the model without having to worry about the magnets (parts 1-3 of the assembly instructions). 

Step 1- Hull Section
Drill a 5 mm hole in the centre circle section of part 59 (or a hole large enough for your magnet of choice). 

Monday, 9 April 2018

How to Magnetise the Goliath Truck/Goliath Rockgrinder

I magnetised my Goliath Truck and Goliath Rockgrinder crew, as well as the weapons options on the Rockgrinder for my Genestealers Cult army. This is a guide to how I carried this out.

For this, you will need:
  • 2 mm Magnets
  • 2 mm Pin vice
  • Paint (any bright colour is fine)
  • Spare sprue
Goliath Truck
It actually helps if you don't follow the assembly instructions fully on the Goliath Truck. It is easier to magnetise certain parts of the Truck before assembling the full chassis. 

Assemble the Heavy Stubber gunner (Part 2a in the instruction manual). Drill a 2 mm hole in one of the legs with your pin vice. 

Tuesday, 12 December 2017

How to Paint Genestealer Cult Acolytes

This article will show you how to paint up your Genestealer Cult Acolyte Hybrids in a similar fashion to the ones that have appeared on this blog. 


The credit for this scheme goes to the awesome "How to Paint" series from Warhammer TV for the Acolyte Hybrids. I use a simplified version of this scheme for my own units. 

Tuesday, 26 September 2017

How to use Battle Chronicler: Part 2- Importing your own terrain

Yesterday, I took you through the process of creating your own battle report maps using Battle Chronicler. Today, I will take you through the process of importing your own terrain into the maps to make them a bit more accurate. 

Creating the PNG
In order to use your terrain images in Battle Chronicler, you must first take some photos of your terrain. The best way to do this is to take an overhead image of each terrain piece. 

The easiest way to do this is to take a photo on a black background from above (the underside of a gaming mat is perfect for this). This is not ideal in every situation, especially at games at tournaments or other gaming stores. 

For example, here are some images of terrain from a recent game I played. 


With the images in hand, you are now ready to create the PNG image. For this, I use Photoshop, so will take you through the process that I use. 

Open Photoshop and open the file with your terrain image. 

Click on the "Select and Mask..." button shown below. 

Monday, 25 September 2017

How to use Battle Chronicler: Part 1- The Basics


Want to know how I make the maps for my battle reports? Check out this tutorial and you will be able to make your own awesome maps to illustrate your battle reports.

A few people have asked recently for a tutorial on how to use Battle Chronicler, so I finally put something together while working on my recent battle reports. This was how I put together the maps for my first game at the recent North West Open tournament. 

Battle Chronicler is a great, free online program that I use for making my the maps for my battle reports on the blog. It takes a little bit of effort to use and draw the maps, but I think it is completely worthwhile and really adds to the reports. 

This first part of the tutorial will take you through the basics of creating your maps for a battle report, along with some tips that I have picked up over the years. Part 2 will show you how to input your own battlefield images to create more realistic maps of your games. Hopefully, these might encourage you to use the program yourself for your own battle reports, or simply be an interesting read to see how I go about making the maps for my own battle reports. 

You can download Battle Chronicler from their website. You can also download the components to give you some terrain images to use in your own maps from the start. 

Defining the Game
When you first open Battle Chronicler for the first time, it will ask you what kind of system you will be using your maps for. You can select either ranked square bases or round skirmish bases. Even though 40k is a round, skirmish game, I prefer to use the square ranked up representation. I think this looks neater on the maps, but you can choose whichever you wish. 

With Battle Chronicler open, go to File and select New. This box should appear: