Wednesday, 30 March 2016

Confessions Adsense Entry 2- Facing the Horde

Yesterday, I posted my quick guide on how to construct one of the 40k Towers, the template of which is available for free over at Confessions of a 40k addict. The tower was quick and easy to put together, taking less than 48 hours to fully assemble and paint.
 
When I was planning the tower, I had in my mind an image of a squad of stoic guardsmen defending the tower from a rampaging horde of Orks. With the tower complete, I decided to set up my Guard and Orks for a little photoshoot.
 
My previous entry for the Confessions of a 40k addict AdSense competition was "Top Gun". This one is "Facing the Horde".
 
A stalwart unit of Imperial Guardsmen try to hold out against impossible odds with only the protection of their tower to keep them safe. One guardsman lies injured, tended to by a medic as the Commissar tries to keep the squad in order. The comms man is stationed at the top of the tower, desperately trying to call in reinforcements from his elevated position.

Tuesday, 29 March 2016

Building the Confessions 40k Tower

Dave from over at Confessions of a 40k addict has a range of free terrain kit downloads available on his blog. For a while now, I have been meaning to give them a go and try and make something. Last weekend, I had a free weekend to myself and decided it would be a perfect opportunity to download and print out the plans and try and make one of them myself (the fact that I could potentially win an Imperial Knight was some good motivation too!).

After looking through the available kits, I settled on the 40k tower as it looked good and would provide some great line of sight blocking terrain for the table top. I took some photos of the constructions to show how quick and easy they are to use. In fact, the entire thing, from construction to painting, took less than 48 hours to do (mine is a slightly simplified version of the tower).
 
What you will need to make the tower:
5 mm Foamboard
Thick card (I used the card from a cereal box)
5 mm balsa wood
masking tape
elastic bands
an old brush brush (for applying the glue)
sharp craft knife
metal ruler
marker pen

Monday, 28 March 2016

100,000 Views!

Hi everyone, I try not to double post in a single day, but at some point today the blog hit 100,000 views! Thanks to everyone who reads the blog who helped get me there in just under one year.


Battle Report 49- Battle Royale

Welcome to part 2 of my Special Character mini-tournament. Part 1 saw the competitors fight one on one to see who would emerge on top. Part two features a free for all on the one battlefield. As a reminder, our competitors are:
 
Hailing from the planet Urk, the Chosen One of Gork and Mork, the Prophet's Prophet, the Green Menace, Ghazgkull Mag Uruk Thraka! (Commanded by Seb).
 
She's lean, she's mean, she'll feed you your own spleen, please welcome the Storm of Silence, Jain Zar! (Commanded by Armel).
 
He's been around since before the Horus Heresy, but don't let this old timer fool you. He's here to eat your world, craving blood and skulls, its Kharn the Betrayer! (Commanded by Thomas).
 
He's the shadow on the breeze, the whisper in the night, he's Unforgiven, but not forgotten, give it up for Cypher! (Commanded by David).
 
Last but by no means least, the Angel in Black, the Ravenwing Master, he's pimped his ride and is ready to play, please welcome Sammael! (Commanded by me).
 
The rules for the battle royale were as follows:

- The battle will take place on a 4x4 table. The order of character deployment will be determined randomly (we did this by drawing the names of the character from a hat). The order of deployment will be the order of the Character's turns in turn 1 (i.e. the character that deployed first will get to go first, the character that deployed second will go second, etc).
- The order of the character's turns will be determined at random at the start of each turn after the first.
- During their turn, each character will get a full turn (movement, psychic, shooting and assault) to carry out their actions.
- In the psychic phase, the player whose turn it is rolls a D6 and adds their mastery level to the total to determine their warp charge dice. The player who had the last turn will get the D6 roll plus their mastery level to try and block any psychic powers. If another character is targeted by a psychic power, they will roll a D6 and get that many dice to try and block it (plus any mastery level).
- As this is a free for all, characters may shoot into a combat, but do so at BS2. Any successful hits are randomised between the combatants.
- Challenges may be issued. In the event of a combat involving 3 characters, a character must be specified as the target of the challenge. Both characters in the challenge can only attack one another until the challenge is resolved. Other characters in the combat can attack either of the challenge characters (this is to make challenging for any bonuses a bit more risky).
- All characters will have Hit and Run in the battle royale. Any character that already has hit and run may re-roll a failed Hit and Run test.
- All characters gain Feel no Pain (6+) in the battle royale, unless they have a better Feel no Pain already.
- Characters are subject to normal morale, so can flee from combat and get caught by a sweeping advance.

Hope that is all clear.

Friday, 25 March 2016

Confessions Adsense entry- Top Gun

A bit of a random post here today. Dave from Confessions of a 40k addict has been running a competition to win an Imperial Knight over on his blog for a while now. The rules are simple, take a photo that involves one of the awesome free downloads available on his blog for your entry.
 
I have been wanting to enter for a while now, but life has been getting in the way. I am planning to construct one of the free terrain pieces, but with less than a week remaining, I may be pushing it for getting it completed in time.
 
As I was looking through the downloads available, I came across the wound markers and vehicle damage markers (Dave was also kind enough to remind me of them during my special characters battle report).
 
If you are like me, wounds and damage in 40k are recorded by placing dice next to the model in question. In theory this works fine, but as the game goes on and dice are flying round the table, it is all too easy to lose track of these markers or roll them for another purpose. That leads to a lot of memory searching as I desperately try to remember how many hull points this tank had left or how many wounds my warlord has remaining.
 
The free counters are a great solution to this problem as I no longer need to worry about errant dice! I don't know why it has taken me so long to finally get round to getting something like this as I didn't even have to design my own! It took me less than an hour to print, glue and cut these out on Thursday night just before my games club meets and I intend to use them from now on to keep track during my games.
 
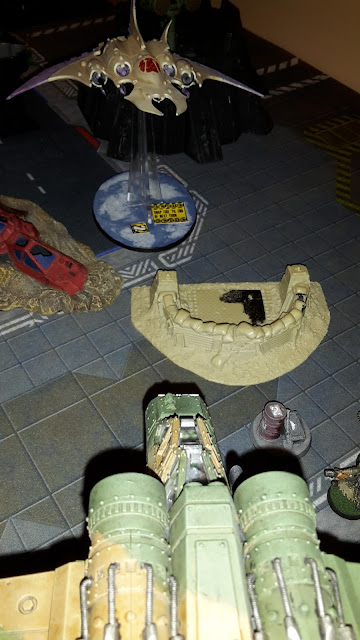
I took several photos during the night, but this one was my favourite. I call it Top Gun.
 
I like the image of the two elite flyers battling it out above the skies of the battlefield for aerial supremacy. I also like the ominous shadow of the Vendetta cast onto the tabletop (if you want to know if the Vendetta crew survived the encounter and got to play one more game of homo-erotic beach volleyball, you'll need to check out battle report 50 to see!).
 
There are a few more photos from the battle report using the new counters, hopefully they won't spoil too much of the action.


All that lovely damage!

 
As I said, I am hoping to construct one of the free terrain pieces over a very busy weekend and get another entry into the competition too.


Thursday, 24 March 2016

Battle Report 48- King of the Hill

Hi everyone, this week's battle report is something a little different. A few weeks ago at the Dundee Wargames club, I played a boardgame called Ultimate Warriorz. It was a gladiatorial combat game which saw players fighting it out to be the last one standing. It was a lot of fun and got me thinking about some of the old White Dwarf articles where they used to match special characters against one another.
 
So I put out the call to the members of the club and we decided to have our own little tournament at the club, where we would battle various 40k special characters to see who came out on top. I decided to have two different types of tournament. The first would be King of the Hill, where the Special characters would fight in a standard knock-out type game over various rounds to see who came out on top. The second would be a Battle Royale where it was every man (or woman) for themselves on one battlefield. Today is the battle report for the King of the Hill section (the Battle Royale will be posted later).
 
I put together some quick and easy rules for the tournament for players to use:
 
Character Selection:
- Only named Special Characters may be chosen.
- No vehicle mounted characters or vehicle characters may be used (bikes and jetbikes do not count).
- No Greater Daemons.
- Lords of War are permitted as long as they don't break any other rules.
 
Fights between characters will be drawn in a random fashion. For each fight, players start 12" away from one another and may not move further away than 12" from one another (no running from the fight!). The special character that costs the least number of points will get the first turn. The character will get a full turn (movement, psychic phase, shooting phase and assault phase), then their opponent and so on until one character is dead. If both characters are killed during the same combat phase, each player will roll for another turn of combat, whoever scores the most wounds from the roll off is declared the winner.
 
No flying is permitted during the fight. All characters can be wounded on the roll of a 6 in combat or in shooting (to prevent any invincible characters from winning easily).

Monday, 21 March 2016

Psyched Out!- The Evolution of the Psychic Phase in 40k

Welcome to my ongoing series looking at the evolution of various aspects of 40k over the years. This time round, I look at the evolution of the psychic phase. For the rest of the series of articles, check out the Evolution of 40k tab above.
The Warp, the parallel dimension that is a swirling maelstrom of energy, has been an integral part of the 40k lore for a long time now. It provides the basis of interstellar travel for many of the races of the 40k universe, and it is often said that without the Warp's ability to travel vast distances in (relative) safety, the Imperium of Mankind would crumble in no time. This chaotic dimension also provides energy to the psykers of the 40k universe, imbuing them with vast power to unleash their arts on the enemy.

Mondays, am I right?
The psychic phase has seen substantial changes over the various editions of 40k. Indeed, for several editions of the game, no such phase existed in the turn sequence. I don't tend to run psychic heavy armies, the reasons for which I will get to as the article proceeds, but there is no doubt that the addition of psykers to the 40k tabletop can have a dramatic effect on the course of the battle.
Second Edition (1993-1998)- Pick a Card, Any Card......
As with much of the game, the psychic phase was a very different beast in second edition.

The Main Book
A version of the rules for the psychic phase was included in the main rulebook for 2nd edition 40k- the Psionics section.

This section provided some simplified rules for using psykers in games of 40k. It gave the four different mastery levels for psykers and provided 6 psychic powers that they could choose from at the start of the game.
In order to cast a psychic power, the player had to roll above the casting value on the power and were able to add the mastery level of the psyker to the die roll. Rolls of a 1 always failed when casting, but with a highest casting level of 6, level 4 psykers has a 1 in 6 chance of successfully using a psychic power each turn. Each psyker could only use one power per turn, regardless of their mastery level.

One of the example psychic powers in the rulebook was psychic shield. Cast on a 3+, this power provided the psyker with the equivalent of a 3+ invulnerable save against shooting and close combat wounds. Against psychic attacks or powers, it provided a 4+ invulnerable save. The shield remained in effect until it was used to block a psychic attack.

Much like the close combat phase, both players took part in the psychic phase. The player whose turn it was could attempt to use a psychic power from one of their psykers, then their opponent could attempt to use a power from one of their psykers. This continued until no more psykers remained.

The psionics section also included the rules for Force weapons. In 2nd edition, the psyker got to add their mastery level to the strength of their attack in combat when using a force weapon. As armour saves were modified by the strength of the attacker, this meant that a powerful psyker could cut through power armoured models with ease.
Daemons were said to be especially vulnerable to Force weapons- any attack from a force weapon that hit a Daemon in combat automatically wounded and ignored their saving throw. This made psykers a very powerful unit for taking on daemonic units in combat.

Thursday, 17 March 2016

Battle Report 47- 1850 pts White Scars vs Tau

This week's battle report is another from the Medusa IV campaign that I am running. This campaign turn, Yans' Tau decided to attack my Guard's Shield Generator tile that had recently repelled an attack from Armel's Eldar.
As I had been playing my Guard the last few weeks, I asked if Yans wouldn't mind me using my White Scars, as I was keen to finally try out the new White Scars formations from the Kauyon supplement. Fortunately, he agreed and I was able to put together a Scarblade Strike Force for the game.

 
My army consisted of:
SCARBLADE STRIKE FORCE
HUNTING FORCE
Captain- Bike, Hunter's Eye, Glaive of Vengeance, Storm Shield (with CS)
5 Command Squad- Banner of the Eagle, Apothecary, 4 grav guns, 4 Storm Shields (CS)
8 Bikers- Sergeant with power axe and meltabombs, 2 Grav guns (B1)
8 Bikers- Sergeant with power axe and meltabombs, 2 Grav guns (B2)
3 Scout Bikers- Astartes grenade launcher, sergeant has meltabombs (SB)
Attack Bike- Multimelta (AB1)
Attack Bike- Multimelta (AB2)
 
STORMLANCE BATTLE DEMI-COMPANY
Chaplain- Bike, Auspex, Meltabombs (with CS)
5 Tactical Marines- Meltagun, sergeant has meltabombs (TM1)
Rhino (R1)
10 Tactical Marines- Grav gun, sergeant has meltabombs (TM2)
Rhino (R2)
10 Tactical Marines- Flamer, sergeant has meltabombs (TM3)
Rhino (R3)
5 Devastators- 4 grav cannons (D)
Rhino (R4)
Attack Bike- Heavy Bolter (AB3)

SPEARTIP STRIKE FORCE
5 Scouts- sergeant has meltabombs (S)
Landspeeder storm- Heavy bolter, Cerberus missile launcher (LS)
Landspeeder- Multimelta, Typhoon missile launcher (L)

My warlord trait initially gave me Deadly Ambush (+1 to my reserve rolls or -1 to my opponents), but I re-rolled and got Hammer of Khan, giving my warlord (the Captain) D3 hammer of wrath hits.

My force was led by a Captain wielding the Hunter's Eye and the Glaive of Vengeance for some close combat punch. He would be leading the Hunting Force, featuring two large 8-man bike squads, a scout bike squad and two attack bikes. The large bike squads were to take advantage of the formations rules, giving me double hammer of wrath hits if I had at least 5 models in the unit. The two attack bikes were armed with multimeltas to take on the heavier battle suits of the Tau.

The formation also allows me to choose a primary target (an enemy HQ) and secondary and tertiary targets. I get re-rolls to hit and to wound against the primary target, then the secondary once the primary is dead and so on. This should be very useful for my special weapons and multimeltas at taking on the Tau commander.

Next, I took a Stormlance to try out the formation. This consists of 4 units mounted in Rhinos and an attack bike. The units must start in the Rhinos, but get re-rolls to hit against units holding objectives and get to make a free move after shooting, even allowing them to get back in their transport if they can. This should be great for the Devastators, allowing me to deploy and fire all four grav cannons then get back in the relative safety of the squad's Rhino.

Finally, I took a Speartip strike force, allowing me to take one of my favourite units- the Scouts and Landspeeder storm. I also took an anti-tank Landspeeder for some more firepower. The Scouts are the only objective secured unit in my army, quite a big change as I normally like to take a lot of objective secured units.

On top of that, the Scarblade gives me re-rollable hammer of wrath wounds if I charge over 8" and, more importantly, gives me re-rolls to my Hit and Run tests (anyone who regularly reads my Ravenwing and White Scars battle reports will know that I have a tendency to fluff these at the most inopportune times).

EDIT: It has been pointed out that my army is above points (thanks to Nate for spotting this). My army comes in at around 2070 pts instead of 1850 pts. Apologies to Yans for this error, I must have missed out a squad when I was adding up the total.

Monday, 14 March 2016

Mike gives Stripping a Go!

Greeting brave adventurer of the internet. Kudos to you for clicking on the link to this article with what I imagine to be a mixture of fear, trepidation, curiosity and disgust. Fortunately for you, this is not an article detailing my forays into the art of exotic dancing (GW's prices have not yet forced me there yet). Instead, this post will detail my first attempts at stripping paint from models that I have purchased through ebay (for any of you misled by the title that are now bitterly disappointed, I can only apologise. Sorry Rob!).
The perfect image to go with the post's title in your blog listings.
 
Despite being a wargamer for close to two decades now, I have never before tried to remove paint from any of my models; either a paint job I would rather try again or any of the ebay "rescues" that I have bought over the years.

After looking online and chatting to a few of the people at Dundee Wargames club, I decided to try a couple of methods for stripping paint from my models; Fairy Power Spray and Dettol. Of the two methods, I found Fairy Power Spray performed much better than soaking overnight in Dettol, which barely removed any of the paint after 24 hours soaking.

Thursday, 10 March 2016

Battle Report 46- 1500 pts Astra Militarum vs Eldar

This week's battle report was one of my campaign games from my Medusa IV map campaign. Armel's Eldar (a powerful faction in the campaign) had decided to try and usurp the Shield Generator tile from my Planetary defence force, so we found ourselves in conflict for the first time during the campaign. I know how strong the Eldar are at the moment and was interested to see how the game would turn out.
 
Thanks to the campaign rules, I would have a 50 pts bonus to my army, hopefully it would make all the difference. My army consisted of:

COMBINED ARMS DETACHMENT
Company Command Squad- Vox, 2 plasma guns, Company Standard, Laurels of Command (CC)
Priest (with S1A)
Priest (with S2C)
Commissar (with LT)
Commissar (with MLT)
Primaris Psyker- Level 1 psyker (with S1A)

Platoon Command 1- 2 Flamers, Vox (PC1)
Infantry Squad 1A- Autocannon, Vox (S1A)
Infantry Squad 1A- Autocannon (S2A)
Infantry Squad 1B- Autocannon, Vox (S1B)
Heavy Weapons Team 1- Lascannons (LT)
Heavy Weapons Team 2- Heavy Bolters (HBT)

Platoon Command 2- 2 Flamers, Vox (PC2)
Chimera- Multilaser, Heavy Bolter, Extra Armour, Dozer blades (C1)
Infantry Squad 2A- Grenade Launcher, vox (S2A)
Infantry Squad 2B- Grenade Launcher, vox (S2B)
Infantry Squad 2C- Grenade Launcher (S2C)
Heavy Weapons Team 3- Missile Launchers (MLT)

Veterans- 3 Meltaguns (V)
Chimera- Multilaser, Heavy Bolter, Extra Armour, Dozer blades (C2)

Wyvern 1 (W1)
Wyvern 2 (W2)
Aegis Defence Line

Culexus Assassin (A)

For my army, I decided to focus on an infantry heavy force backed up by two Wyverns. The army was led by a company command squad with a Regimental standard to help keep my units in check and the Laurels of Command to give me more control over the closer units. I then took two large infantry platoons- one armed with Autocannons and the other with grenade launchers. Three heavy weapons teams were also added to the platoons; lascannons and missile launchers to deal with a Wraithknight or any vehicles, and heavy bolters to deal with jetbikes or fragile Eldar bodies.
A unit of veterans with meltaguns in a Chimera would be there to grab objectives and deal with any armoured threats. I also took 2 wyverns as these should hopefully make a mess of any jetbikes or foot units and an Aegis line to keep the bulk of my army safe.

I decided not to take any battle tanks in the army. Between D weapons and Bright Lances, I did not think that any tanks would survive long enough to be useful.

I also decided to take a Culexus assassin to try and shut down any Eldar psykers that Armel decided to field. I bought the Assassins game in order to get all 4 assassin models and this is the first time that I would be using any of them in a game.

My plan was to swamp the objectives with masses of Guardsmen to win the game through a war of attrition- hopefully I had more bodies than Armel could kill in a game.

My warlord trait was Draconian Disciplinarian. This would be useful, allowing me to ignore morale checks caused by the Eldar shooting within range of the Warlord. My Primaris got Prescience and Foreboding.