
Game two of a recent Warhammer 40k tournament would see my White Scars take on the Eldar once more, this time a combined force of Ynarri and Drukhari, commanded by Mark.

This game was four pillars. In this mission, there are four objectives on the diagonals of the board. Each objective can only be held by Troops units. At the end of the battle round (starting from turn 2), you score a point if you control more objectives than your opponent. If you control all the objectives, you score three points. We were also using the usual secondaries as well as kill points in this game. The deployment zone was Hammer and Anvil.
My White Scars army consisted of:
Battalion Detachment
Khan on Bike- Twin Bolter, Khan's Spear, Chogorian Storm, Master of Snares, Wrath of the Heavens
Librarian- Jump Pack, Force Stave, Mantle of the Stormseer, Ride the Winds, Storm-wreathed
5 Tactical Marines- Bolters, Heavy Bolter
5 Tactical Marines- Bolters, Plasma Cannon
5 Tactical Marines- Bolters, Power Sword, Flamer
5 Scouts Bikers- Twin Bolters, Shotguns, Combat Knives
5 Bikers- Twin Bolters, 2 Meltaguns, Force Stave
5 Devastators- 4 Grav-cannons, Combi-grav
Rhino- Storm Bolter
Rhino- Storm Bolter
Drop Pod- Storm Bolter
Battalion Detachment
Captain- Bike, Twin Bolter, Teeth of Terra
Lieutenant- Jump Pack, Power Axe, MC Bolter
5 Scouts- Bolters
5 Scouts- Bolters
5 Scouts- Bolt Pistol, Combat Knives
10 Vanguard Veterans- 5 with 2 Chainswords, 5 with Chainsword and Plasma Pistol
5 Sternguard Veterans- Special Issue Bolters
Thunderfire Cannon- Techmarine Gunner with Flamer, Plasma Cutter, 2 Servo-arms
A fast moving White Scars force with some strong buffing characters and some backfield support unit.
I took a couple of units of Tactical Marines for backfield objective holding, along with the Thunderfire Cannon for long ranged firepower. I took three units of Scouts for board control and grabbing objectives out of my deployment zone.
For the fast moving elements, I took two units of Bikers, a couple of squads in Rhinos and a unit of Vanguard Veterans. These could move out to take on the enemy units or go after the objectives. For the Characters, I took two Captains on Bike (one of which is a Khan), a Lieutenant with Jump Pack and Librarian with Jump Pack.
Mark's army consisted of:
Battalion Detachment (Harlequins, Aeldari, Ynarri)
The Yncarne- Word of the Pheonix, Ancestor's Grace, Warlord
Troupe Master- Fusion Pistol, Power Sword, Hungering Blade
5 Troupe Players- Fusion Pistols, Harlequin's Blades
5 Troupe Players- Shuriken Pistols, Harlequin's Blades
8 Troupe Players- Fusion Pistols, Harlequin's Caress
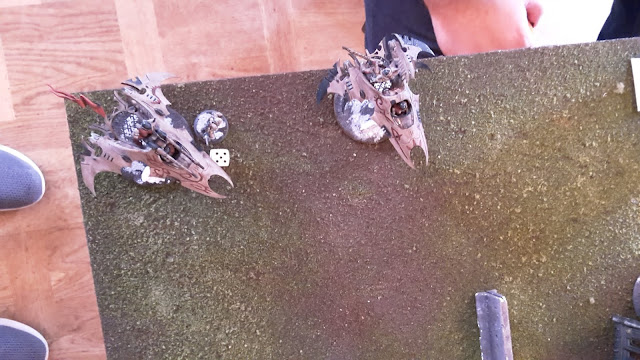
6 Skyweavers- Haywire Cannons, Zephyrglaives
Starweaver- 2 Shuriken Cannons
Battalion Detachment (Drukhari, Kabal of the Black Heart)
Archon- Splinter Pistol, Venom Blade
Archon- Splinter Pistol, Venom Blade
5 Kabalite Warriors- Splinter Rifles
5 Kabalite Warriors- Splinter Rifles
5 Kabalite Warriors- Splinter Rifles
Venom- 2 Splinter Cannons
Venom- 2 Splinter Cannons
Venom- 2 Splinter Cannons
Venom- 2 Splinter Cannons
Venom- 2 Splinter Cannons
A fast moving Eldar force. There were a number of troops unit that could go after the objectives, but fortunately they were quite squishy once they got out of the Venoms.
The Hammer and Anvil deployment would be useful for Mark, as he could afford to sit back from most of my guns on turn 1 and then push out to go after the objectives.
The battlefield featured a large, line of sight blocking terrain piece in the centre, thanks to the Fortress of Redemption. There were also several ruins on each flank for us to take advantage of.

Mark chose his deployment zone, taking the side with a couple of ruins set far back to hide his units behind. I then deployed first.
I put the Thunderfire Cannon in the centre ruins, supported by a unit of Scouts and a Tactical Squad. I put a second Tactical Squad in the ruins on the left, ready to sit on the objective. The bulk of my forces went on the left flank, ready to move up on the objective that was sitting in the open. I put two units of Scouts up front, ready to harass the enemy army from the start.
In reply, Mark deployed everything pretty deep in his deployment zone, out of range of charges of most of my army and most of my guns. He put the Venoms across his back line, with the Skyweavers hidden in the central ruins, along with one of the Troupe squads. The Yncarne, a Troupe squad and Archon went on the left flank in the ruins.


I chose to take the first turn. I made the mistake of thinking that you scored objectives at the end of the turn, rather than the end of the battle round, which my opponent initially confirmed. My plan was to rush ahead with my units and grab all four objectives with my Objective Secured units and go three points up on turn 1. However, we discovered the error as I moved my first units. It might have been better to choose to go second then!
TURN 1- WHITE SCARS

The Scouts on the right flank moved up towards the ruins sheltering the enemy forces, the central Scout squad moving up through the Fortress. On the left flank, the majority of the White Scars forces advanced on the enemy. I used Born in the Saddle and Skilled Riders on the Scout Bikers. On the right flank, the Scout squad moved out to secure the objective.


At the end of the phase, the Drop Pod landed on the left flank, the Devastators disembarking near the objective.
The Librarian cast Ride the Wind on the Khan on Bike, then failed to cast Storm-wreathed.
In the shooting phase, the Devastators opened fire on the Troupe Players in the ruins beside them. I played Gravitic Amplification, while Mark played Lightning Fast Reflexes. I scored only three hits, killing one of the Troupe. The Scout Bikers added their firepower, but failed to do any damage.
The Thunderfire Cannon fired at the other Troupe squad, spending 2CP to fire it twice, killing three with the two volleys. The Rhinos used their Smoke Launchers to obscure them from enemy fire.
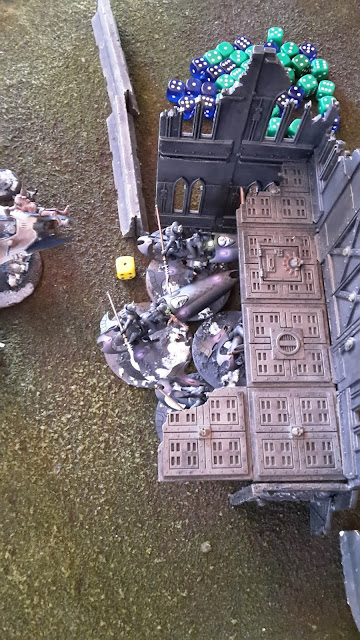
In the charge phase, the Scouts charged the Archon on the right flank, while the Devastators charged a Venom on the left flank.


In the fight phase, the Scouts managed three wounds on the Archon, but failed to get past his Shadowfield. The Devastators manged to do a single wound on the Venom.
The attacks back from the Archon did three wounds, but I made all my armour saves.
At the end of the turn, I scored no points, failing to kill a unit to secure First Strike or a kill point.
TURN 1- YNARRI

The Troupe on the left advanced towards the Scouts in the centre, while the Yncarne moved up on the Scouts on the left. The Skyweavers jumped out to the front of the ruins to target the White Scars forces.
The Starweaver moved up the centre, while the Venoms consolidated around the central ruins, the one in combat with the Devastators falling back. The Harlequin Troupe moved up on the objective in front of them.


The Yncarne cast Ancestors grace on the Skyweavers, while failing to cast Smite on the Scouts.
In the shooting phase, the Skyweavers fired their Haywire Blasters at one of the Rhinos, getting 28 shots with a CP re-roll. However, the vehicle only took 7 wounds after some poor wound rolls (only 5 mortal wounds caused). Mark then used Fire and Fade to move them back behind the ruins.
One Venom fired at the Devastators, wounding them 9 times, but I made all my saves. The second Venom fired at them, doing 9 wounds and slaying three. The third Venom was able to kill one more, while the fourth Venom finished off the squad. The final Venom targeted the Scout Bikers, wounding them once.
On the left flank, the Archon killed one Scout with his pistol.

In the charge phase, the Harlequins charged one unit of Scouts, cutting them down without mercy. The Yncarne charged the other unit of Scouts, cutting them down as well.
At the end of his turn, Mark scored three kill points and First Strike.
VICTORY POINTS:
White Scars- 0
Ynarri- 4
Not a great start for the White Scars. Mistakes with the mission had seen me commit a lot of my forces for no reward, while failing to do much damage on the Eldar forces.
TURN 2- WHITE SCARS

The Scout Bikers and Khan advanced on the enemy forces in front of them, the Scout Bikers using Born in the Saddle once more, while the rest of the White Scars moved up as well to support them. I switched to the Tactical Doctrine in this turn.
In the psychic phase, the Librarian cast Storm-wreathed on the Khan to protect him from enemy overwatch fire, passing it with a CP re-roll. He then cast Ride the Winds on the Khan.
In the shooting phase, the Rhinos and Drop Pod fired on the Harlequin Troupe on the objective, wiping them out. The Bikers fired at a Venom, doing one wound on it.

The Scout Bikers fired at the second Harlequin Troupe, Mark playing Lightning Fast Reflexes on them. They were able to kill only one of the squad. The Thunderfire Cannon fired at the central Troupe unit, killing two of the squad.
In the charge phase, the Khan on Bike assaulted the Skyweavers and three of the Venoms, hoping to lock several units in combat next turn. The Scout Bikers followed him in to the Skyweavers.


In the fight phase, Mark used Lightning Fast Reflexes on the Skyweavers. The Khan struck at the squad, doing four wounds. Mark passed three saves with a CP re-roll and only one perished. The Scout Bikers added their attacks, only managing to do two wound son the unit.
The Harlequins struck back, doing 7 wounds on the Scout Bikers after some great rolling and wiping out the squad.
At the end of my turn, I scored one Kill Point for the Harlequin Troupe and Mark scored a Kill Point for the Scout Bikers.
TURN 2- YNARRI

In the centre of the battlefield, the Starweaver and Troupe squad advanced towards the enemy lines. In the Ynarri deployment zone, the Khan stopped two of the Venoms from falling back thanks to his Master of Snares ability.


The Skyweaver Jetbikes moved to engage the White Scars characters, while the remaining Venoms moved away from the enemy forces. The Yncarne moved up towards the enemy forces. A unit of Kabalites disembarked and moved towards the Khan, joined by the second Archon.
The Yncarne attempted to cast Ancestor's Grace on the Jetbikes, but the Librarian was able to block the attempt.
In the shooting phase, the Starweaver fired at the Tactical Squad, killing one. He then used Fire and Fade to move up on the Scouts holding the objective. The Troupe inside fired their Fusion Pistols at the Scouts, killing four.
The Venoms fired on the Bikers, doing 9 wounds, but I made all my armour saves. Another venom fired at the squad, doing three wounds, but I made all my saves once more.
The Skyweavers fired at the damaged Rhino, finally destroying it, killing one of the Sternguard Veterans inside.
In the charge phase, the Skyweavers charged the Librarian and Lieutenant. The Archon charged the Khan.


Mark then used Inevitable Fate on the Librarian, killing him with the Skyweavers. The Archon did four wounds on the Khan, but failed to get past his armour.
The Lieutenant managed to kill one of the Harlequin Jetbikes, while the Khan put two wounds on the Venom in reply.
At the end of the turn, Mark scored two kill points and I scored a point for holding more objectives.
VICTORY POINTS:
White Scars- 2
Ynarri- 7
At the end of turn 2, things were not looking much better for the White Scars. I was losing by 5 points and had lost a number of units, to only one unit slain in Mark's army.
TURN 3- WHITE SCARS

At the start of my turn, I activated the Assault Doctrine.
In the backfield, the Tactical Squad moved up to support the Scout on the objective.
The Khan fell back from combat, the Bikers and Lieutenant advancing up to support him. I played Born in the Saddle on the Bikers. The Tactical Squad disembarked from the Rhino, moving up to target the Skyweavers, along with the Sternguard Veterans. The Rhino advanced towards the nearby Venom.


At the end of the phase, the Vanguard Veterans arrived. The unit with the Plasma Pistols landed on the left flank, while the Chainsword combat squad arrived near the centre of the battlefield.
In the shooting phase, the Thunderfire Cannon fired at the two Harlequin Players advancing on the White Scars lines, killing both. The Tactical Squad fired at the Starweaver, doing three wounds on it. The other Tactical Squad managed to do a wound on it as well.
The Sternguard Veterans fired at a Venom, killing it. The Bikers fired their Bolters at the Kabalite Warriors, wiping out the squad, while the Meltaguns failed to get past the invulnerable save of another Venom. The Tactical Squad fired at the Skyweavers, killing one.
The Vanguard Veterans overcharged their Plasma Pistols at the Venom, doing three wounds on it, for the loss of one Veteran. Mark passed two invulnerable saves, then made a Feel No Pain save to only take a single wound on the vehicle.
In the charge phase, the Captain, Tactical Squad and Sternguard Veterans assaulted the Skyweavers. The Khan, Bikers and Lieutenant charged the Venoms and Archon. The Pistol Vanguard Veterans managed to charge the Venom on the right, while the Rhino charged the central Venom, the second squad of Vanguard Veterans failing to make it in to combat.


In my deployment zone, the Scout and Tactical Squad assaulted the Starweaver.
In the fight phase, the White Scars struck, emboldened in the Assault Doctrine with their Devastating Charge.
The Captain struck at the Skyweavers, doing 6 wounds and killing the squad. The death brought in the Yncarne, who teleported to the White Scars' position.
Mark then spent 2CP to interrupt with the Starweaver, hoping to kill the final Scout and give his unit somewhere to deploy if their transport was destroyed. He did one wound on the Scout, but I made my armour save.
The Khan struck at the Venom, damaging it. The Bikers added their attacks, destroying the vehicle. The Lieutenant attacked the Archon, wounding him 5 times and killing him when his Shadowfield failed. The Vanguard Veterans were able to kill another Venom, one of the Kabalite Warriors dying before the Space Marines consolidated into them.
In my deployment zone, the Tactical Squad were able to finish off the Starweaver. The model positioning meant that three of the Harlequin Troupe could not be deployed and were slain.
The attacks back from the Eldar forces did no damage to the White Scars.

At the end of my turn, I scored 9 kill points! The assault phase had been devastating, allowing me to cut throw many of the Harlequin and Drukhari forces thanks to the bonus damage from charging.
TURN 3- YNARRI

The Kabalite Warriors fell back from combat, as did the Venom in combat with the Rhino.
In the White Scars deployment zone, the two Troupe Players moved up on the Thunderfire Cannon, while the Troupe Master moved to target the Tactical Squad. A Venom moved up on the Biker Captain.


The Yncarne cast Ancestor's Grace on itself, then a Smite to kill two of the Tactical Squad.
In the shooting phase, the Venom fired at the Sternguard, killing one. The Troupe Squad fired at the Scout, killing him.
In the charge phase, the Yncarne charged the Tactical Squad and Sternguard, taking one wound in overwatch. The Troupe Master charged the Tactical Squad, joined by the Troupe Players.
In the fight phase, the Yncarne struck at the Tactical Squad, killing the whole squad, as well as the Captain on Bike. The Troupe Players struck at the Tactical Squad, killing four. I was able to remove casualties to stop the Troupe Master from attacking and keeping one Marine alive.


The Sternguard Veterans were able to do two wounds on the Yncarne.
At the end of the turn, Mark scored three kill points. At the end of the battle round, we were both on one objective, so scored no ponits.
VICTORY POINTS:
White Scars- 11
Ynarri- 10
TURN 4- WHITE SCARS

In my deployment zone, the Tactical Marine moved off from the Harlequins, while the other Tactical Squad moved to engage the Eldar forces.
The rest of the White Scars forces converged on the Yncarne and remaining Drukhari.


In the shooting phase, the Rhino and Drop Pod fired on the Kabalite warriors, killing them. The Yncarne teleported to where the squad was located. The Vanguard Veterans fired their pistols at the Yncarne, doing two wounds but failing to get past his invulnerable save.
The Bikers fired their Bolters at the Yncarne and Meltaguns at the Venom, destroying the Venom and killing two of the squad inside and doing no damage to the Yncarne.
The Thunderfire Cannon fired at the Troupe Players, only doing one wound which was saved.
In the charge phase, the Khan on Bike, Bikers, Sternguard Veterans and Vanguard Veterans charged the Yncarne. The Rhino, Lieutenant and Chainsword Vanguard Veterans assaulted the Kabalite Warriors.
The Khan struck at the Yncarne, doing 5 damage to the Daemon. The Yncarne struck at the Bikers, only managing to kill four of the squad. Had the squad been wiped out, he could have teleported once more to out of range of the rest of my attacks.


The White Scars struck back at the Yncarne and was able to bring it down. The Lieutenant was able to wipe out the Kabalite Warriors.
At the end of my turn, I scored four kill points and Slay the Warlord.
TURN 4- YNARRI

The Archon broke cover to move away from the White Scars forces. The Troupe Players and Troupe Master moved up on the Thunderfire Cannon.

The Harlequins fired their Fusion Pistols at the Thunderfire Cannon, destroying it. They then charged the Techmarine and cut him down.

At the end of his turn, Mark scored two kill points. I scored a point for holding more objectives.
VICTORY POINTS:
White Scars- 17
Ynarri- 12
TURN 5- WHITE SCARS

The Lieutenant and Vanguard Veterans advanced on the Archon, charging into combat and killing him. The Tactical Marine moved up on the objective.
At the end of the turn, I scored one kill point.
TURN 5- YNARRI

The Troupe Players advanced on the Tactical Marine, while the Troupe Master advanced on the other Tactical Squad.
In the charge phase, the Harlequins charged the Tactical Squads. The Troupe Master took two wounds in overwatch, taking him down to one. The Harlequins cut down the two White Scars' squads to grab the objective.


At the end of the turn, Mark scored two kill points and a point for holding more objectives. At this point, the game ended and we each scored Linebreaker.
VICTORY POINTS:
White Scars- 19
Ynarri- 16

A win for the White Scars.
AFTER-BATTLE THOUGHTS
Thanks to Mark for a fun and tactical game.
That was not the result that I was expecting. After the second turn I was 7-2 down and had only killed a single enemy unit. Turn 3 was the change point in the game, once the Assault Doctrine was activated.
Going up to 2 damage on my basic Marines, along with the bonus attack for charging was a big shift in my damage output, allowing me to finally take care of all those skimmers that were shooting around the battlefield. After causing so much damage on turn 3, it was going to be hard for Mark to recover in the game.
I got very lucky in his 2nd turn, as I made a ton of armour saves on my Bikers to keep them in the game and allow me to stage a comeback attack on the enemy forces in my third turn.
There were a number of mistakes I made in this game.
Again, the Devastators were pretty wasted. I was too eager to try and get first strike, as Mark was almost guaranteed to score it in his turn. They did very poorly rolling against the Harlequin Troupe, as they were hitting on 5's. I also wasted a CP on the re-rolls, which was never going to do much damage. I also wasted 2CP on firing the Thunderfire Cannon twice, though the lack of damage was s combination of poor rolls from me and great saves from Mark.
I think another mistake was rushing out on turn 1 to go after the objective. I should have taken the second turn to allow me to jump on the objectives at the end of the battle round. Mark had deployed pretty deep and didn't have much in the way of long range weaponry. Giving him the first turn might have forced him to move up on my forces and allowed me to concentrate on the transport in mass to try and take them out.
To score the objective, Mark would have had to bring the weaker Kabalite Warriors onto the table, or gone after them with the Harlequins. My Thunderfire Cannon and Bolters may have been able to deal with them and take them off of the objective when they went for it.
By putting my Scouts and Tactical Squads in the Rhinos and Drop Pod, I would have had some faster moving elements to go out and threaten the enemy forces and objectives later in the game when the Assault Doctrine was active.
The Khan on Bike was great again. Thanks to the unit placement, I was able to charge four units to shut down their overwatch and keep a number locked in combat. I was hoping to do a lot of damage to the Skyweavers in turn 2, but a combination of terrible rolling for the Khan and great saves meant only one perished, enough to get them out of combat with the Khan. Then, some fantastic rolling from Mark meant the Scout Bikers were wiped out without really doing much.
I got very lucky in this game, which probably should have been a loss for my forces. Some good fortune with the dice and an incredible assault phase on turn 3 allowed me to cling on long enough to swing the game in my favour.
After 2 games, I was on a win and a draw. Fortunately, I would not be playing the Aeldari again in my third game, but would be facing off against the Necrons.
6 Skyweavers- Haywire Cannons, Zephyrglaives
Starweaver- 2 Shuriken Cannons
Battalion Detachment (Drukhari, Kabal of the Black Heart)
Archon- Splinter Pistol, Venom Blade
Archon- Splinter Pistol, Venom Blade
5 Kabalite Warriors- Splinter Rifles
5 Kabalite Warriors- Splinter Rifles
5 Kabalite Warriors- Splinter Rifles
Venom- 2 Splinter Cannons
Venom- 2 Splinter Cannons
Venom- 2 Splinter Cannons
Venom- 2 Splinter Cannons
Venom- 2 Splinter Cannons
A fast moving Eldar force. There were a number of troops unit that could go after the objectives, but fortunately they were quite squishy once they got out of the Venoms.
The Hammer and Anvil deployment would be useful for Mark, as he could afford to sit back from most of my guns on turn 1 and then push out to go after the objectives.
The battlefield featured a large, line of sight blocking terrain piece in the centre, thanks to the Fortress of Redemption. There were also several ruins on each flank for us to take advantage of.

Mark chose his deployment zone, taking the side with a couple of ruins set far back to hide his units behind. I then deployed first.
I put the Thunderfire Cannon in the centre ruins, supported by a unit of Scouts and a Tactical Squad. I put a second Tactical Squad in the ruins on the left, ready to sit on the objective. The bulk of my forces went on the left flank, ready to move up on the objective that was sitting in the open. I put two units of Scouts up front, ready to harass the enemy army from the start.
In reply, Mark deployed everything pretty deep in his deployment zone, out of range of charges of most of my army and most of my guns. He put the Venoms across his back line, with the Skyweavers hidden in the central ruins, along with one of the Troupe squads. The Yncarne, a Troupe squad and Archon went on the left flank in the ruins.


I chose to take the first turn. I made the mistake of thinking that you scored objectives at the end of the turn, rather than the end of the battle round, which my opponent initially confirmed. My plan was to rush ahead with my units and grab all four objectives with my Objective Secured units and go three points up on turn 1. However, we discovered the error as I moved my first units. It might have been better to choose to go second then!
TURN 1- WHITE SCARS

The Scouts on the right flank moved up towards the ruins sheltering the enemy forces, the central Scout squad moving up through the Fortress. On the left flank, the majority of the White Scars forces advanced on the enemy. I used Born in the Saddle and Skilled Riders on the Scout Bikers. On the right flank, the Scout squad moved out to secure the objective.


At the end of the phase, the Drop Pod landed on the left flank, the Devastators disembarking near the objective.
The Librarian cast Ride the Wind on the Khan on Bike, then failed to cast Storm-wreathed.
In the shooting phase, the Devastators opened fire on the Troupe Players in the ruins beside them. I played Gravitic Amplification, while Mark played Lightning Fast Reflexes. I scored only three hits, killing one of the Troupe. The Scout Bikers added their firepower, but failed to do any damage.
The Thunderfire Cannon fired at the other Troupe squad, spending 2CP to fire it twice, killing three with the two volleys. The Rhinos used their Smoke Launchers to obscure them from enemy fire.
In the charge phase, the Scouts charged the Archon on the right flank, while the Devastators charged a Venom on the left flank.


In the fight phase, the Scouts managed three wounds on the Archon, but failed to get past his Shadowfield. The Devastators manged to do a single wound on the Venom.
The attacks back from the Archon did three wounds, but I made all my armour saves.
At the end of the turn, I scored no points, failing to kill a unit to secure First Strike or a kill point.
TURN 1- YNARRI

The Troupe on the left advanced towards the Scouts in the centre, while the Yncarne moved up on the Scouts on the left. The Skyweavers jumped out to the front of the ruins to target the White Scars forces.
The Starweaver moved up the centre, while the Venoms consolidated around the central ruins, the one in combat with the Devastators falling back. The Harlequin Troupe moved up on the objective in front of them.


The Yncarne cast Ancestors grace on the Skyweavers, while failing to cast Smite on the Scouts.
In the shooting phase, the Skyweavers fired their Haywire Blasters at one of the Rhinos, getting 28 shots with a CP re-roll. However, the vehicle only took 7 wounds after some poor wound rolls (only 5 mortal wounds caused). Mark then used Fire and Fade to move them back behind the ruins.
One Venom fired at the Devastators, wounding them 9 times, but I made all my saves. The second Venom fired at them, doing 9 wounds and slaying three. The third Venom was able to kill one more, while the fourth Venom finished off the squad. The final Venom targeted the Scout Bikers, wounding them once.
On the left flank, the Archon killed one Scout with his pistol.

In the charge phase, the Harlequins charged one unit of Scouts, cutting them down without mercy. The Yncarne charged the other unit of Scouts, cutting them down as well.
At the end of his turn, Mark scored three kill points and First Strike.
VICTORY POINTS:
White Scars- 0
Ynarri- 4
Not a great start for the White Scars. Mistakes with the mission had seen me commit a lot of my forces for no reward, while failing to do much damage on the Eldar forces.
TURN 2- WHITE SCARS

The Scout Bikers and Khan advanced on the enemy forces in front of them, the Scout Bikers using Born in the Saddle once more, while the rest of the White Scars moved up as well to support them. I switched to the Tactical Doctrine in this turn.
In the psychic phase, the Librarian cast Storm-wreathed on the Khan to protect him from enemy overwatch fire, passing it with a CP re-roll. He then cast Ride the Winds on the Khan.
In the shooting phase, the Rhinos and Drop Pod fired on the Harlequin Troupe on the objective, wiping them out. The Bikers fired at a Venom, doing one wound on it.

The Scout Bikers fired at the second Harlequin Troupe, Mark playing Lightning Fast Reflexes on them. They were able to kill only one of the squad. The Thunderfire Cannon fired at the central Troupe unit, killing two of the squad.
In the charge phase, the Khan on Bike assaulted the Skyweavers and three of the Venoms, hoping to lock several units in combat next turn. The Scout Bikers followed him in to the Skyweavers.


In the fight phase, Mark used Lightning Fast Reflexes on the Skyweavers. The Khan struck at the squad, doing four wounds. Mark passed three saves with a CP re-roll and only one perished. The Scout Bikers added their attacks, only managing to do two wound son the unit.
The Harlequins struck back, doing 7 wounds on the Scout Bikers after some great rolling and wiping out the squad.
At the end of my turn, I scored one Kill Point for the Harlequin Troupe and Mark scored a Kill Point for the Scout Bikers.
TURN 2- YNARRI

In the centre of the battlefield, the Starweaver and Troupe squad advanced towards the enemy lines. In the Ynarri deployment zone, the Khan stopped two of the Venoms from falling back thanks to his Master of Snares ability.


The Skyweaver Jetbikes moved to engage the White Scars characters, while the remaining Venoms moved away from the enemy forces. The Yncarne moved up towards the enemy forces. A unit of Kabalites disembarked and moved towards the Khan, joined by the second Archon.
The Yncarne attempted to cast Ancestor's Grace on the Jetbikes, but the Librarian was able to block the attempt.
In the shooting phase, the Starweaver fired at the Tactical Squad, killing one. He then used Fire and Fade to move up on the Scouts holding the objective. The Troupe inside fired their Fusion Pistols at the Scouts, killing four.
The Venoms fired on the Bikers, doing 9 wounds, but I made all my armour saves. Another venom fired at the squad, doing three wounds, but I made all my saves once more.
The Skyweavers fired at the damaged Rhino, finally destroying it, killing one of the Sternguard Veterans inside.
In the charge phase, the Skyweavers charged the Librarian and Lieutenant. The Archon charged the Khan.


Mark then used Inevitable Fate on the Librarian, killing him with the Skyweavers. The Archon did four wounds on the Khan, but failed to get past his armour.
The Lieutenant managed to kill one of the Harlequin Jetbikes, while the Khan put two wounds on the Venom in reply.
At the end of the turn, Mark scored two kill points and I scored a point for holding more objectives.
VICTORY POINTS:
White Scars- 2
Ynarri- 7
At the end of turn 2, things were not looking much better for the White Scars. I was losing by 5 points and had lost a number of units, to only one unit slain in Mark's army.
TURN 3- WHITE SCARS

At the start of my turn, I activated the Assault Doctrine.
In the backfield, the Tactical Squad moved up to support the Scout on the objective.
The Khan fell back from combat, the Bikers and Lieutenant advancing up to support him. I played Born in the Saddle on the Bikers. The Tactical Squad disembarked from the Rhino, moving up to target the Skyweavers, along with the Sternguard Veterans. The Rhino advanced towards the nearby Venom.


At the end of the phase, the Vanguard Veterans arrived. The unit with the Plasma Pistols landed on the left flank, while the Chainsword combat squad arrived near the centre of the battlefield.
In the shooting phase, the Thunderfire Cannon fired at the two Harlequin Players advancing on the White Scars lines, killing both. The Tactical Squad fired at the Starweaver, doing three wounds on it. The other Tactical Squad managed to do a wound on it as well.
The Sternguard Veterans fired at a Venom, killing it. The Bikers fired their Bolters at the Kabalite Warriors, wiping out the squad, while the Meltaguns failed to get past the invulnerable save of another Venom. The Tactical Squad fired at the Skyweavers, killing one.
The Vanguard Veterans overcharged their Plasma Pistols at the Venom, doing three wounds on it, for the loss of one Veteran. Mark passed two invulnerable saves, then made a Feel No Pain save to only take a single wound on the vehicle.
In the charge phase, the Captain, Tactical Squad and Sternguard Veterans assaulted the Skyweavers. The Khan, Bikers and Lieutenant charged the Venoms and Archon. The Pistol Vanguard Veterans managed to charge the Venom on the right, while the Rhino charged the central Venom, the second squad of Vanguard Veterans failing to make it in to combat.


In my deployment zone, the Scout and Tactical Squad assaulted the Starweaver.
In the fight phase, the White Scars struck, emboldened in the Assault Doctrine with their Devastating Charge.
The Captain struck at the Skyweavers, doing 6 wounds and killing the squad. The death brought in the Yncarne, who teleported to the White Scars' position.
Mark then spent 2CP to interrupt with the Starweaver, hoping to kill the final Scout and give his unit somewhere to deploy if their transport was destroyed. He did one wound on the Scout, but I made my armour save.
The Khan struck at the Venom, damaging it. The Bikers added their attacks, destroying the vehicle. The Lieutenant attacked the Archon, wounding him 5 times and killing him when his Shadowfield failed. The Vanguard Veterans were able to kill another Venom, one of the Kabalite Warriors dying before the Space Marines consolidated into them.
In my deployment zone, the Tactical Squad were able to finish off the Starweaver. The model positioning meant that three of the Harlequin Troupe could not be deployed and were slain.
The attacks back from the Eldar forces did no damage to the White Scars.

At the end of my turn, I scored 9 kill points! The assault phase had been devastating, allowing me to cut throw many of the Harlequin and Drukhari forces thanks to the bonus damage from charging.
TURN 3- YNARRI

The Kabalite Warriors fell back from combat, as did the Venom in combat with the Rhino.
In the White Scars deployment zone, the two Troupe Players moved up on the Thunderfire Cannon, while the Troupe Master moved to target the Tactical Squad. A Venom moved up on the Biker Captain.


The Yncarne cast Ancestor's Grace on itself, then a Smite to kill two of the Tactical Squad.
In the shooting phase, the Venom fired at the Sternguard, killing one. The Troupe Squad fired at the Scout, killing him.
In the charge phase, the Yncarne charged the Tactical Squad and Sternguard, taking one wound in overwatch. The Troupe Master charged the Tactical Squad, joined by the Troupe Players.
In the fight phase, the Yncarne struck at the Tactical Squad, killing the whole squad, as well as the Captain on Bike. The Troupe Players struck at the Tactical Squad, killing four. I was able to remove casualties to stop the Troupe Master from attacking and keeping one Marine alive.


The Sternguard Veterans were able to do two wounds on the Yncarne.
At the end of the turn, Mark scored three kill points. At the end of the battle round, we were both on one objective, so scored no ponits.
VICTORY POINTS:
White Scars- 11
Ynarri- 10
TURN 4- WHITE SCARS

In my deployment zone, the Tactical Marine moved off from the Harlequins, while the other Tactical Squad moved to engage the Eldar forces.
The rest of the White Scars forces converged on the Yncarne and remaining Drukhari.


In the shooting phase, the Rhino and Drop Pod fired on the Kabalite warriors, killing them. The Yncarne teleported to where the squad was located. The Vanguard Veterans fired their pistols at the Yncarne, doing two wounds but failing to get past his invulnerable save.
The Bikers fired their Bolters at the Yncarne and Meltaguns at the Venom, destroying the Venom and killing two of the squad inside and doing no damage to the Yncarne.
The Thunderfire Cannon fired at the Troupe Players, only doing one wound which was saved.
In the charge phase, the Khan on Bike, Bikers, Sternguard Veterans and Vanguard Veterans charged the Yncarne. The Rhino, Lieutenant and Chainsword Vanguard Veterans assaulted the Kabalite Warriors.
The Khan struck at the Yncarne, doing 5 damage to the Daemon. The Yncarne struck at the Bikers, only managing to kill four of the squad. Had the squad been wiped out, he could have teleported once more to out of range of the rest of my attacks.


The White Scars struck back at the Yncarne and was able to bring it down. The Lieutenant was able to wipe out the Kabalite Warriors.
At the end of my turn, I scored four kill points and Slay the Warlord.
TURN 4- YNARRI

The Archon broke cover to move away from the White Scars forces. The Troupe Players and Troupe Master moved up on the Thunderfire Cannon.

The Harlequins fired their Fusion Pistols at the Thunderfire Cannon, destroying it. They then charged the Techmarine and cut him down.

At the end of his turn, Mark scored two kill points. I scored a point for holding more objectives.
VICTORY POINTS:
White Scars- 17
Ynarri- 12
TURN 5- WHITE SCARS

The Lieutenant and Vanguard Veterans advanced on the Archon, charging into combat and killing him. The Tactical Marine moved up on the objective.
At the end of the turn, I scored one kill point.
TURN 5- YNARRI

The Troupe Players advanced on the Tactical Marine, while the Troupe Master advanced on the other Tactical Squad.
In the charge phase, the Harlequins charged the Tactical Squads. The Troupe Master took two wounds in overwatch, taking him down to one. The Harlequins cut down the two White Scars' squads to grab the objective.


At the end of the turn, Mark scored two kill points and a point for holding more objectives. At this point, the game ended and we each scored Linebreaker.
VICTORY POINTS:
White Scars- 19
Ynarri- 16

A win for the White Scars.
AFTER-BATTLE THOUGHTS
Thanks to Mark for a fun and tactical game.
That was not the result that I was expecting. After the second turn I was 7-2 down and had only killed a single enemy unit. Turn 3 was the change point in the game, once the Assault Doctrine was activated.
Going up to 2 damage on my basic Marines, along with the bonus attack for charging was a big shift in my damage output, allowing me to finally take care of all those skimmers that were shooting around the battlefield. After causing so much damage on turn 3, it was going to be hard for Mark to recover in the game.
I got very lucky in his 2nd turn, as I made a ton of armour saves on my Bikers to keep them in the game and allow me to stage a comeback attack on the enemy forces in my third turn.
There were a number of mistakes I made in this game.
Again, the Devastators were pretty wasted. I was too eager to try and get first strike, as Mark was almost guaranteed to score it in his turn. They did very poorly rolling against the Harlequin Troupe, as they were hitting on 5's. I also wasted a CP on the re-rolls, which was never going to do much damage. I also wasted 2CP on firing the Thunderfire Cannon twice, though the lack of damage was s combination of poor rolls from me and great saves from Mark.
I think another mistake was rushing out on turn 1 to go after the objective. I should have taken the second turn to allow me to jump on the objectives at the end of the battle round. Mark had deployed pretty deep and didn't have much in the way of long range weaponry. Giving him the first turn might have forced him to move up on my forces and allowed me to concentrate on the transport in mass to try and take them out.
To score the objective, Mark would have had to bring the weaker Kabalite Warriors onto the table, or gone after them with the Harlequins. My Thunderfire Cannon and Bolters may have been able to deal with them and take them off of the objective when they went for it.
By putting my Scouts and Tactical Squads in the Rhinos and Drop Pod, I would have had some faster moving elements to go out and threaten the enemy forces and objectives later in the game when the Assault Doctrine was active.
The Khan on Bike was great again. Thanks to the unit placement, I was able to charge four units to shut down their overwatch and keep a number locked in combat. I was hoping to do a lot of damage to the Skyweavers in turn 2, but a combination of terrible rolling for the Khan and great saves meant only one perished, enough to get them out of combat with the Khan. Then, some fantastic rolling from Mark meant the Scout Bikers were wiped out without really doing much.
I got very lucky in this game, which probably should have been a loss for my forces. Some good fortune with the dice and an incredible assault phase on turn 3 allowed me to cling on long enough to swing the game in my favour.
After 2 games, I was on a win and a draw. Fortunately, I would not be playing the Aeldari again in my third game, but would be facing off against the Necrons.
Well salvaged mate!
ReplyDeleteCheers, Siph!
DeleteI agree about the first turn. Especially when you have a drop pod which can come in turn 1, going at the bottom of the round lets you protect the cargo (a rather killy cargo of Gravs at that!). His ability to screen for your deepstrike is a small comfort compared to knowing your gravs will be safe from his first round of shooting. If those darn venoms didn't have FLY, tying one up might have been the right idea, but as it was, that devastator squad was free points.
ReplyDeleteIt was a waste. I think I just wanted them to actually accomplish something on the turn they came in. As you said though, it was just a free kill.
DeleteI always find venoms annoying. The -1 to hit and invulnerable save can make them pretty tough.
Great write up. I also like the maps you pair with the photos. Only thing I disagree with is your saying it was a waste to fire the thunderfire cannon twice. The cannon is one of the best tools in the marine tool belt. firing twice combined with tremor shell would have cut down movement on the non fly units like the troupes you shot at. I would argue you should fire it twice every turn depending on what your cp needs are. I know as White scars you need cp for close combat. Glad you pulled it out though.
ReplyDeleteIn most situations it is better to fire the cannon twice. However, with the negatives to hit and invulnerable saves of this army, it really limited my damage output. I think the real waste of CP was all the points spent on the Bikers. I'm thinking of dropping them from the list in the future, as they really don't add too much to the army.
Delete