
The third game of the Warhammer World Grand Tournament would see my Deathwatch and Astra Militarum army take on Sean's Deathwatch in the Scorched Earth Eternal War mission.

In this mission, there are 6 objectives on the table. You get one point for each objective you hold at the end of your turn. In addition, you can choose to destroy an objective in your opponent's deployment zone. This gets you D3 victory points, but the objective is removed.


At the end of the turn, Sean scored four objective points.


VICTORY POINTS:
Deathwatch- 7
Deathwatch/Astra Militarum- 10
At the end of turn 2, things were looking good for me. I was ahead on points and had managed to take out one of the big enemy units. I was waiting to see what retribution would be in reply.
TURN 3- DEATHWATCH

The Aggressor Kill Team in the centre and Watch Master moved up on the objective, while the Biker fell back from combat towards the objective. The other Kill Team moved up on another objective, moving back to target the enemy reserves.


At the end of the phase, the Termintor Watch Captain arrived, landing between the Rhino and Assassin. He then used the Beacon Angelus to teleport the Deathwatch Terminators to his position. However, only 5 Terminators could fit, so Sean sacrificed two members of the squad to deploy the unit.

The Terminators split their fire between the Assassin and Rhino. The Meltaguns fired at the Rhino, wounding it 3 times and destroying it. The Bolter rounds hit the Assassin, wounding him once.
The central Kill Team fired at the Infantry Squad on the hill, killing 9 despite the Take Cover stratagem being employed.
The Bikers fired at the Company Commander, wounding him 9 times. I failed only four saves, but it was enough to slay him.


The second Kill Team fired at my Intercessors with the Furor Doctrine (+1 to wound) with their Kraken Bolts. They did 11 wounds and I failed 5, losing two Primaris Marines.
The Terminators tried to assault the Assassin, but failed to make the distance.
In the morale phase, the lone Lascannon Weapons team fled the field.
At the end of his turn, Sean scored three objective points.
TURN 3- DEATHWATCH/ASTRA MILITARUM

In the enemy deployment zone, the Intercessors and Kill Team moved up on the enemy unit and the objective. The Watch Captain moved up on the Biker once more. At the end of the phase, I brought in the Vanguard Veterans on the objective in my deployment zone.


The Razorback and Infantry Squad fired on the Deathwatch Bikers, but failed to do any damage. The Watch Captain and Assassin fired at the Bikers, but failed to do any damage.
The Intercessors used the Furor Doctrine to fire at the enemy Kill Team, killing four of the squad. The Storm Bolter Kill Team added their firepower, doing 17 wounds and killing three of the squad.


The Captain and Assassin assaulted the lone Biker. The Watch Captain struck at the Biker, wounding him once, but Sean made his 6+ save! Fortuantely, the Assassin was able to finish off the enemy Bike squad.
The Intercessors assaulted the lone surviving enemy Intercessor, easily killing him.

At the end of my turn, I scored three objective points.
VICTORY POINTS:
Deathwatch- 10
Deathwatch/Astra Militarum- 13
TURN 4- DEATHWATCH

The lone Intercessor moved up on the enemy Deathwatch. The other Kill Team and Watch Captain moved up on the Vanguard Veterans, while the Terminators moved up on the Assassin.
The Watch Captain and Kill Team in the centre fired on the Vanguard Veterans, killing three in total.


The Terminators fired at the Assassin. The Meltaguns hit once and wounded, but fortunately, I made my invulnerable save. The Storm Bolters did 3 wounds, the Culexus taking one wound.
The Bikers fired at the Infantry Squad, killing three.
In the charge phase, the Terminators assaulted the Assassin, my Watch Captain performing a heroic intervention to engage them. The Bikers charged the Razorback.
Sean's Watch Captain and Kill Team charged the Vanguard Veterans. They struck at the squad, wiping the out.


The Terminators attacked the Assassin, wounding him once and taking two damage to leave him on one wound. My Watch Captain attacked back, wounding three times, but Sean failed only one invulnerable save to lose a Terminator. The Assassin did no damage to the Terminators.
Sean used the Honour the Chapter Stratagem to attack again with the Terminators and was able to kill the Assassin.
At the end of his turn, Sean burned my objective for 3 points and got another 3 objective points. A great round for him and bringing it to 16-13.
TURN 4- DEATHWATCH/ASTRA MILITARUM
I needed to score three points this turn to bring the score level. The Watch Captain fell back from combat, as the Intercessors and Kill Team moved up on the Terminators. The Razorback fell back from combat.
The Infantry Squad and Company Commander advanced on the enemy Bikers.


In the shooting phase, the Commander ordered the Infantry Squad to Move, Move, Move and steal the objective from the enemy Bikers.
The Intercessors fired on the enemy Terminators, doing three wounds on them with their Vengeance Bolts. The Storm Bolter Kill Team fired at them with their Kraken Bolters, doing 10 wounds and wiping out the squad!
That was not what I was expecting and allowed my Captain to secure the objective.
At the end of my turn, I scored three objective points. With that, we ran out of time in the game and both scored Linebreaker.
VICTORY POINTS:
Deathwatch- 17
Deathwatch/Astra Militarum- 17

A hard-fought draw!
AFTER-BATTLE THOUGHTS
Thanks to Sean for a very tough game and a hard-fought draw on both sides. We actually talked through the fifth turn of the game and figured we would both score two points each in our turn, so the game would still end in a draw.
I think if I had got first turn, the game would have been very different. I would have pushed the Conscripts up ahead, advancing and using Move, Move, Move to get into range of the objectives and to pen Sean in his own deployment zone. I figure I could have got on 5 of the 6 objectives and might even have got first blood too. This would have put me up 5 or 6 points in the first turn. In his first turn, the Conscripts would have blocked Sean's move and only allowed him to score one objective, maybe a couple if he had charged into combat and consolidated onto the objectives.
I thought I was in real trouble with Sean's Storm Shield saves. It took him till about turn 3 to even fail one. Statistically, I should have wiped out both Bike squads by then, but at least one of them managed to survive to the end of the game and cause me problems on the left flank.
I think I made a mistake in burning Sean's objective on turn 2. However, I assumed that Sean would hit my reserves squads with everything he had, moving the two Kill Teams towards them and bringing in the Terminators to target them. As it was, he kept his eyes on the objectives. Maybe if I had not destroyed the objective, he would have gone after them to stop me scoring it for 3 turns. However, as it was gone, he made the smart play and ignored them in favour of going after the objectives.
Overall, a very tough game. I think had the game gone on for longer, I might have been able to scrape the win, as I had more firepower left to deal with the remnants of his army.
The game times were as follows:
Deployment- 15 mins
DW Turn 1- 15 mins
DW/AM Turn 1- 15 mins
DW Turn 2- 23 mins
DW/AM Turn 2- 22 mins
DW Turn 3- 15 mins
DW/AM Turn 3- 15 mins
DW Turn 4- 17 mins
DW/AM Turn 4- 15 mins
As you can see, pretty even turn splittings all round. However, the game still did not go to completion, so there is still work to be done on speeding up my game.
So, the end of day one had seen me take one win, one loss and one draw. I was hoping to get a couple of wins on day 2 to come out ahead and have a chance of qualifying.
Warhammer World GT Heat 1
Game 1- Deathwatch/Astra Militarum vs Astra Militarum/Adeptus Custodes/Imperial Knights
Game 2- Deathwatch/Astra Militarum vs Imperial Knights
Game 3- Deathwatch/Astra Militarum vs Deathwatch
Game 4- Deathwatch/Astra Militarum vs Necrons
Game 5- Deathwatch/Astra Militarum vs Astra Militarum

In this mission, there are 6 objectives on the table. You get one point for each objective you hold at the end of your turn. In addition, you can choose to destroy an objective in your opponent's deployment zone. This gets you D3 victory points, but the objective is removed.
My army consisted of:
Battalion Detachment (Deathwatch)
Watch Master- Guardian Spear (WM)
Watch Captain- Jump Pack, Thunder Hammer, Storm Shield (WC)
Kill Team 1: Watch Sergeant and 9 Veterans- 10 Storm Bolters, 2 Storm Shields, 8 Chainswords (KT1)
Kill Team 2: Intercessor Sergeant and 9 Intercessors- Bolt Rifles, Bolt Pistols, Auxiliary Grenade Launcher (KT2)
Kill Team 3: Watch Sergeant and 4 Veterans- 2 Frag Cannons, Storm Shield, 3 Shotguns, 2 Chainswords (KT3). 5 Vanguard Veterans- 4 Bolt Pistols, 3 Chainswords, Storm Shield, Pair of Lightning Claws (VV)
Rhino- 2 Storm Bolters (R)
Kill Team 4: Watch Sergeant and 4 Veterans- 3 Combi-Meltas, 2 Bolters, Storm Shield, 4 Chainswords (KT4)
Razorback- Twin Lascannons, Storm Bolter (Rz)
Battalion Detachment (Astra Militarum, Cadian)
Company Commander- Plasma Pistol, Chainsword, Grand Strategist Warlord Trait, Kurov's Aquila (CC1)
Company Commander- Laspistol, Chainsword (CC2)
Infantry Squad- Lascannon, Grenade Launcher (IS1)
Infantry Squad- Lascannon, Grenade Launcher (IS2)
Infantry Squad- Lascannon (IS3)
30 Conscripts- Lasguns (C)
Auxiliary Detachment (Assassins)
Culexus Assassin (A)
Sean's army consisted of:
Battalion Detachment (Deathwatch)
Watch Master- Guardian Spear, Lord of Hidden Knowledge Warlord Trait (M)
Watch Captain- Terminator Armour, Storm Bolter, Power Fist with inbuilt Meltagun, Tome of Ectoclades (Relic) (C1)
Kill Team 1- 5 Intercessors with Bolt Rifles, 5 Hellblasters with Plasma Incinerators (KT1)
Kill Team 2- 9 Intercessors with Auto Bolt Rifles, Aggressor with Auto Boltstorm Gauntlets and Fragstorm Grenade Launcher (KT2)
Kill Team 3- 9 Intercessors with Auto Bolt Rifles, Aggressor with Auto Boltstorm Gauntlets and Fragstorm Grenade Launcher (KT3)
7 Terminators- 5 Storm Bolters, 5 Power Fist with inbuilt Meltaguns, 2 Thunder Hammers, 2 Storm Shields (T)
Outrider Detachment (Deathwatch)
Watch Captain- Terminator Armour, Storm Bolter, Power Fist with inbuilt Meltagun, The Beacon Angelus (Relic) (C2)
3 Deathwatch Bikers- Twin Bolters, Sergeant with Storm Shield (B1)
3 Deathwatch Bikers- Twin Bolters, Sergeant with Storm Shield (B2)
3 Deathwatch Bikers- Twin Bolters, Sergeant with Storm Shield (B3)
An army that I was quite familiar with, although very different to the way that I normally play it. The Intercessor squads were tough, but I had the firepower to deal with them. They Agressor squads would be interesting, able to advance and fire to full effect with their Auto Bolt Rifles.
The Bikes were fast, but from experience, they should be easy enough to take out with massed firepower. The two Captains in Terminator Armour would most likely be deep striking in to cause me problems. The Terminators were an unknown quantity, but pretty expensive with the Meltaguns and Storm Bolters combination.
We placed the objectives as shown below:

We then rolled for deployment zone and got Vanguard Strike. This gave us each one objective in our deployment zone, so four objectives would remain in play for the game. The other objectives were pretty close to me.
We then deployed our forces.

On the left flank, I put two Infantry squads and my Commander Warlord. I put the other Infantry Squad on the objective in the centre of my deployment zone. I put the Conscripts in a line across the deployment zone, being sure to leave no room for the Deathwatch to teleport behind my lines.
I put the Razorback on the left flank, out of range of the Hellblasters. I put the Rhino and Watch Captain on the right flank, out of line of sight behind the building. The Vanguard Veterans and Assassin went in reserve, while the rest of the Deathwatch used the Teleportarium stratagem to go in reserve.
Sean put two units of Bikers on the left flank and the third on his right flank. The Hellblaster/Intercessor Kill Team went in the terrain at the back of his deployment zone on the objective. The other two Kill Teams went in the centre with the Watch Master. He put the two Captains and Terminators in reserve. I was surprised he didn't use the Teleportarium Stratagem on one of the Kill Teams.


Sean got the +1 to go first and won the first turn. I failed to seize the initiative. Annoyingly, I had yet to get the first turn in any of my three games so far.
TURN 1- DEATHWATCH
At the start of his turn, Sean chose the Troops Mission Tactics.

The front unit of Bikers on the left flank advanced onto the objective, while the other unit moved up to support them. The Bikers on the right moved up on the enemy army as well. Both Aggressor-containing Kill Teams advanced towards the objectives.


In the shooting phase, the Bikers on the left targeted the enemy Rhino, causing one wound.
The Intercessors opened fire on the Conscripts. I used the Take Cover stratagem. The Deathwatch did 13 wounds on the squad and nine Guardsmen perished. The other Kill Team opened fire on the Conscripts, killing another ten. The Bikers and backfield Kill Team added their firepower, killing 7 more in total, leaving only four remaining.
In the morale phase, I spent two command points on Insane Bravery to keep the Conscripts alive and deny Sean first blood.
TURN 1- DEATHWATCH/ASTRA MILITARUM
At the start of my first turn, I also chose the Troops Mission Tactics.

The Conscripts advanced on the central objective. On the left flank, the Kill Team disembarked from the Rhino, moving up on the Bikers, supported by the Watch Master, the Rhino moving around the ruins. On the left flank, the Kill Team disembarked from the Razorback and moved up on the Bikers.


At the end of the phase, I brought in the Assassin to my deployment zone, next to the Watch Captain.

In the shooting phase, the Kill Team on the right targeted the further away Bike Squad. The Frag Cannons bathed the Bikers in prometheum fury, wounding them 9 times, but only 3 got through their armour. The Shotguns managed to take another wound, leaving one Biker on one wound. The Assassin fired at the Biker, killing him and earning me First Blood.
In the centre, the Guardsmen opened fire on the Intercessors, killing two of the squad.
On the left flank, the two Infantry Squads fired on the Deathwatch Bikers in front of them, hitting twice, but I rolled a double 2 to wound, leaving them unharmed.


The Razorback and Combi-Melta Kill Team added their firepower, but the Biker Sergeant's Storm Shield blocked every wound!
In the charge phase, the Frag Cannon Kill Team charged the Bikers. The overwatch fire did four wounds and two of the Kill Team fell. They made it in though, along with the Watch Captain. The Assassin failed to make the charge distance.

In the assault phase, the Captain struck at the Bikers, hitting and wounding 3 times. Once more, the Storm Shield saves were amazing, as Sean passed every one. The Veterans managed to do 3 wounds on the squad, and Sean failed all three saves to lose a Biker. The attacks back did not damage on my Deathwatch units.
At the end of my first turn, I scored First Blood and four objective points.
VICTORY POINTS:
Deathwatch- 3
Deathwatch/Astra Militarum- 5
A good start for my Deathwatch. I had managed to grab a number of objective points and had some good control. However, Sean's Storm Shield saves had been incredibly, saving both Bike Squads from almost certain death at the hands of Lascannon and Thunder Hammer blows.
TURN 2- DEATHWATCH

On the left flank, the Bikers fell back from combat, while the Bikers on the right moved up on the objective, using the cover of the ruins to block line of sight to the Guard units.
The two central Kill Teams continued to advance on the enemy army. The backfield Intercessors moved up, while still holding the objective. At the end of the phase, the Terminators arrived in the centre to support the Bikers, with a Watch Captain teleporting nearby.


The Terminators opened fire at the enemy Combi-Melta Kill Team. The Meltaguns scored 2 wounds. I failed both Storm Shield saves, even with a command point re-roll. The Storm Bolters added to the barrage, wiping out the squad.


The Bikers fired on the Razorback, wounding it once. The Watch Captain fired at the Conscripts, killing three of them.
The Hellblasters on the left flank fired at the Frag Cannon Kill Team, wounding them twice. Once more, I failed both Storm Shield saves, while the Bolt Rifles killed the last member of the squad. There was quite a disparity in the Deathwatch, as Sean was yet to fail a Storm Shield save and I was yet to make one!
The central Intercessors of the Kill Team fired on the Infantry Squad holding the objective, killing 6 of them, despite using the Take Cover stratagem. The lone Aggressor targeted the last Conscript, easily killling him.


The other Kill Team fired at the Rhino, taking a single wound from it.
In the morale phase, the rest of the Infantry Squad fled the field. I didn't want to use the two command points to keep them alive, as I was running low.
At the end of the turn, Sean scored four objective points.
TURN 2- DEATHWATCH/ASTRA MILITARUM

The Razorback and Company Commander moved up on the objective on the left, while the Rhino moved to the central objective. The Watch Captain moved to engage the retreating Bikers, while the Assassin moved up to secure the objective.


At the end of the phase, I brought in the Storm Bolter Kill Team, Intercessors and Watch Master on the enemy deployment zone. Sean didn't use the Auspex Scan stratagem to target my units.
The Assassin fired at the Bikers, while the Watch Captain threw a Krak grenade, but neither managed to damage the enemy squad.
The Storm Bolter Kill Team fired on the enemy Kill Team with their Hellfire Shells, managing a fantastic 37 wounds on them! Five of the Primaris Deathwatch Marines fell to the volley. The Watch Master added his firepower, but failed to do any damage.


The Intercessors used the Furor Doctrine (+1 to wound Troops) and fired on the enemy Kill Team with their Vengeance rounds, wounding them 5 times and killing two. The Auxiliary Grenade Launcher managed to kill another with a Krak grenade.
The Infantry Squads on the hill fired at the central Intercessors, killing two. The Rhino managed to kill another one Primaris Marine.
The Razorback fired on the Bikers, but failed to wound them once more.
In the charge phase, the Watch Captain assaulted the Bikers. Both the Intercessors and Storm Bolter Kill Team charged the survivors of the enemy Intercessors, the Deathwatch Veterans making an 11" charge with a command point re-roll.
The Intercessors attacked their enemy counterpart, doing one wound on them. The Storm Bolter Kill Team did another wound, leaving one enemy Intercessor remaining.
The Watch Captain struck at the enemy Bikers, doing one wound with one command point re-roll. Finally, the Storm Shield Sergeant fell.
In the morale phase, the last enemy Intercessor fled the battlefield. At the end of my turn, I destroy the enemy objective for 2 points and scored three more objective points.
Deathwatch- 7
Deathwatch/Astra Militarum- 10
At the end of turn 2, things were looking good for me. I was ahead on points and had managed to take out one of the big enemy units. I was waiting to see what retribution would be in reply.
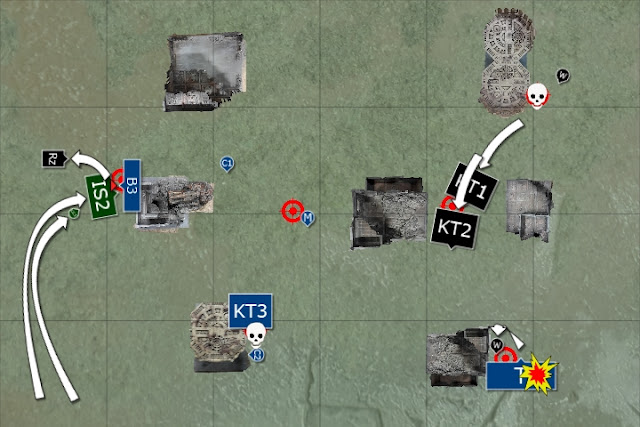
TURN 3- DEATHWATCH

The Aggressor Kill Team in the centre and Watch Master moved up on the objective, while the Biker fell back from combat towards the objective. The other Kill Team moved up on another objective, moving back to target the enemy reserves.


At the end of the phase, the Termintor Watch Captain arrived, landing between the Rhino and Assassin. He then used the Beacon Angelus to teleport the Deathwatch Terminators to his position. However, only 5 Terminators could fit, so Sean sacrificed two members of the squad to deploy the unit.

The Terminators split their fire between the Assassin and Rhino. The Meltaguns fired at the Rhino, wounding it 3 times and destroying it. The Bolter rounds hit the Assassin, wounding him once.
The central Kill Team fired at the Infantry Squad on the hill, killing 9 despite the Take Cover stratagem being employed.
The Bikers fired at the Company Commander, wounding him 9 times. I failed only four saves, but it was enough to slay him.


The second Kill Team fired at my Intercessors with the Furor Doctrine (+1 to wound) with their Kraken Bolts. They did 11 wounds and I failed 5, losing two Primaris Marines.
The Terminators tried to assault the Assassin, but failed to make the distance.
In the morale phase, the lone Lascannon Weapons team fled the field.
At the end of his turn, Sean scored three objective points.
TURN 3- DEATHWATCH/ASTRA MILITARUM

In the enemy deployment zone, the Intercessors and Kill Team moved up on the enemy unit and the objective. The Watch Captain moved up on the Biker once more. At the end of the phase, I brought in the Vanguard Veterans on the objective in my deployment zone.


The Razorback and Infantry Squad fired on the Deathwatch Bikers, but failed to do any damage. The Watch Captain and Assassin fired at the Bikers, but failed to do any damage.
The Intercessors used the Furor Doctrine to fire at the enemy Kill Team, killing four of the squad. The Storm Bolter Kill Team added their firepower, doing 17 wounds and killing three of the squad.


The Captain and Assassin assaulted the lone Biker. The Watch Captain struck at the Biker, wounding him once, but Sean made his 6+ save! Fortuantely, the Assassin was able to finish off the enemy Bike squad.
The Intercessors assaulted the lone surviving enemy Intercessor, easily killing him.

At the end of my turn, I scored three objective points.
VICTORY POINTS:
Deathwatch- 10
Deathwatch/Astra Militarum- 13
TURN 4- DEATHWATCH

The lone Intercessor moved up on the enemy Deathwatch. The other Kill Team and Watch Captain moved up on the Vanguard Veterans, while the Terminators moved up on the Assassin.
The Watch Captain and Kill Team in the centre fired on the Vanguard Veterans, killing three in total.


The Terminators fired at the Assassin. The Meltaguns hit once and wounded, but fortunately, I made my invulnerable save. The Storm Bolters did 3 wounds, the Culexus taking one wound.
The Bikers fired at the Infantry Squad, killing three.
In the charge phase, the Terminators assaulted the Assassin, my Watch Captain performing a heroic intervention to engage them. The Bikers charged the Razorback.
Sean's Watch Captain and Kill Team charged the Vanguard Veterans. They struck at the squad, wiping the out.


The Terminators attacked the Assassin, wounding him once and taking two damage to leave him on one wound. My Watch Captain attacked back, wounding three times, but Sean failed only one invulnerable save to lose a Terminator. The Assassin did no damage to the Terminators.
Sean used the Honour the Chapter Stratagem to attack again with the Terminators and was able to kill the Assassin.
At the end of his turn, Sean burned my objective for 3 points and got another 3 objective points. A great round for him and bringing it to 16-13.
TURN 4- DEATHWATCH/ASTRA MILITARUM

I needed to score three points this turn to bring the score level. The Watch Captain fell back from combat, as the Intercessors and Kill Team moved up on the Terminators. The Razorback fell back from combat.
The Infantry Squad and Company Commander advanced on the enemy Bikers.


In the shooting phase, the Commander ordered the Infantry Squad to Move, Move, Move and steal the objective from the enemy Bikers.
The Intercessors fired on the enemy Terminators, doing three wounds on them with their Vengeance Bolts. The Storm Bolter Kill Team fired at them with their Kraken Bolters, doing 10 wounds and wiping out the squad!
That was not what I was expecting and allowed my Captain to secure the objective.
At the end of my turn, I scored three objective points. With that, we ran out of time in the game and both scored Linebreaker.
VICTORY POINTS:
Deathwatch- 17
Deathwatch/Astra Militarum- 17

A hard-fought draw!
AFTER-BATTLE THOUGHTS
Thanks to Sean for a very tough game and a hard-fought draw on both sides. We actually talked through the fifth turn of the game and figured we would both score two points each in our turn, so the game would still end in a draw.
I think if I had got first turn, the game would have been very different. I would have pushed the Conscripts up ahead, advancing and using Move, Move, Move to get into range of the objectives and to pen Sean in his own deployment zone. I figure I could have got on 5 of the 6 objectives and might even have got first blood too. This would have put me up 5 or 6 points in the first turn. In his first turn, the Conscripts would have blocked Sean's move and only allowed him to score one objective, maybe a couple if he had charged into combat and consolidated onto the objectives.
I thought I was in real trouble with Sean's Storm Shield saves. It took him till about turn 3 to even fail one. Statistically, I should have wiped out both Bike squads by then, but at least one of them managed to survive to the end of the game and cause me problems on the left flank.
I think I made a mistake in burning Sean's objective on turn 2. However, I assumed that Sean would hit my reserves squads with everything he had, moving the two Kill Teams towards them and bringing in the Terminators to target them. As it was, he kept his eyes on the objectives. Maybe if I had not destroyed the objective, he would have gone after them to stop me scoring it for 3 turns. However, as it was gone, he made the smart play and ignored them in favour of going after the objectives.
Overall, a very tough game. I think had the game gone on for longer, I might have been able to scrape the win, as I had more firepower left to deal with the remnants of his army.
The game times were as follows:
Deployment- 15 mins
DW Turn 1- 15 mins
DW/AM Turn 1- 15 mins
DW Turn 2- 23 mins
DW/AM Turn 2- 22 mins
DW Turn 3- 15 mins
DW/AM Turn 3- 15 mins
DW Turn 4- 17 mins
DW/AM Turn 4- 15 mins
As you can see, pretty even turn splittings all round. However, the game still did not go to completion, so there is still work to be done on speeding up my game.
So, the end of day one had seen me take one win, one loss and one draw. I was hoping to get a couple of wins on day 2 to come out ahead and have a chance of qualifying.
Warhammer World GT Heat 1
Game 1- Deathwatch/Astra Militarum vs Astra Militarum/Adeptus Custodes/Imperial Knights
Game 2- Deathwatch/Astra Militarum vs Imperial Knights
Game 3- Deathwatch/Astra Militarum vs Deathwatch
Game 4- Deathwatch/Astra Militarum vs Necrons
Game 5- Deathwatch/Astra Militarum vs Astra Militarum
Great report.
ReplyDeleteIt is good to see 2 very different armies from the same codex look very balanced.
I think you played the mission correctly. And agreed that maybe holding off on a turn before burning that objective may have helped.
I did like your opponents list. I think I like the way he used the deathwatch special rules of mixing units to get special rules to them. That was going to be one of the bits of feedback on your list that I thought it didn’t make full use of the death watch rules, by having a few specialist members to each squad.
WHW still seems to suffer (like a lot of events) form bare tables. My games at home probably have at least twice as much as what i have seen in you reports.
Your game yesterday highlighted that in that you should have been able to hide your characters from those knights.
The game yesterday was brutal for you. I think picking list for events players need to understand the “meta”. It was going to be highly likely to face knights in at least 1 game and probably more. As such any army needs to be able to handle facing them.
In the past when I have gone to events I have normally based an army around marine killing as it was pretty much a certainty I would be facing one. Harder to do nowadays as there is a bigger spread in armies.
Final point on yesterday’s games is I think some knight weapons should be -1 hit infantry units. They just seemed to be able to point and remove any unit very easily.
Looking forward to the final 2. Will you be doing an overall review?
Thanks Toonboy!
DeleteYeah, I haven't really used the Kill Team rules to full effect in my army. I think they have some bonuses to the squad. However, against most tournament armies, they larger Kill Teams don't seem to survive long enough to make use of their rules (such as falling back from combat and still getting to shoot and charge). I do need to give them a go, but find that the singular squad words quite well for the purposes I use them for.
The terrain wasn't too bad for most of the games. The tables had some good line of sight blocking for infantry, but they were generally too small to block the view of things like Knights.
I think the table in the second game wasn't terrible, it was just the deployment zone type that didn't help, as well as the fact I didn't get to choose the side. Had we gone long board edge, I would have had a lot more options for hiding my units, or could have chosen the other table side with more cover and line of sight blocking.
Even then, the Knights have the special Missile Stratagem that allows them to target enemy characters out of line of sight and ignore invulnerable saves.
I will be doing a review of the army at the end, there is plenty to talk about!
Fun report! Who would have seen Deathwatch facing Deathwatch in a GT tournament setting?? Just cool to see. Also very interesting to get an account of two very different strategies for the army. Thank you for sharing your experiences.
ReplyDeleteI know, there was actually a few Deathwatch armies at the tournament. I was quite surprised.
DeleteMan that was hard to keep track of due to all the similar units. Sounds like a good tactical game though, depsite some lucky storm shield saves.
ReplyDeleteYeah, these are the most difficult ones to write up.
Delete