
My second game of the Warhammer World Grand Tournament (Heat 1) saw my Deathwatch take on Steve's Imperial Knights army.
With the release of the strong new codex for Imperial Knights, there were quite a few present at the tournament. In game 2, I would be facing a whole army of them. The randomly determined mission for game 2 was Ascension. In this mission, three objectives are placed centrally on the battlefield. You get a point for each objective you hold at the end of your turn. In addition, Characters get a a super "objective secured", able to hold an objective on their own and getting additional points for holding it for subsequent turns.

My army consisted of:
Battalion Detachment (Deathwatch)
Watch Master- Guardian Spear (WM)
Watch Captain- Jump Pack, Thunder Hammer, Storm Shield (WC)
Kill Team 1: Watch Sergeant and 9 Veterans- 10 Storm Bolters, 2 Storm Shields, 8 Chainswords (KT1)
Kill Team 2: Intercessor Sergeant and 9 Intercessors- Bolt Rifles, Bolt Pistols, Auxiliary Grenade Launcher (KT2)
Kill Team 3: Watch Sergeant and 4 Veterans- 2 Frag Cannons, Storm Shield, 3 Shotguns, 2 Chainswords (KT3). 5 Vanguard Veterans- 4 Bolt Pistols, 3 Chainswords, Storm Shield, Pair of Lightning Claws (VV)
Rhino- 2 Storm Bolters (R)
Kill Team 4: Watch Sergeant and 4 Veterans- 3 Combi-Meltas, 2 Bolters, Storm Shield, 4 Chainswords (KT4)
Razorback- Twin Lascannons, Storm Bolter (Rz)
Battalion Detachment (Astra Militarum, Cadian)
Company Commander- Plasma Pistol, Chainsword, Grand Strategist Warlord Trait, Kurov's Aquila (CC1)
Company Commander- Laspistol, Chainsword (CC2)
Infantry Squad- Lascannon, Grenade Launcher (IS1)
Infantry Squad- Lascannon, Grenade Launcher (IS2)
Infantry Squad- Lascannon (IS3)
30 Conscripts- Lasguns (C)
Auxiliary Detachment (Assassins)
Culexus Assassin (A)
Steve's army consisted of:
Imperial Knight Lance (House Raven)
Knight Castelan- Volcano Lance, Cawl's Wrath (Relic), two Shieldbreaker Missiles, two Twin Meltaguns, two Twin Shieldbreaker Cannons, Cunning Commander Warlord Trait. (Ca)
Knight Valiant- Conflagaration Cannon, Thundercoil Harpoon, Twin Seigebreaker Cannon, two Twin Meltaguns, four Shieldbreaker Missiles. (V)
Knight Crusader- Rapid Fire Battle Cannon, Endless Fury (Relic), 2 Heavy Stubbers, Stormspear Missile Pod, Heavy Flamer (Cr)
Steve spent three command points on the Heirlooms of the Household stratagem, meaning that all three Knights were now characters. This gave them a big bonus in the game, allowing them to take the objectives if they were near it.
I'm not sure I had the firepower to take out the Knights quickly. In addition, the Shieldbreaker Missiles stratagem could be used to target my characters, ignoring their invulnerable saves. This would give Steve a huge advantage if he could kill all my characters and have his own characters on the objective. This would be an incredibly tough game.
We rolled for the deployment zone and got Spearhead Assault again! This was not what I was hoping for, as the short deployment edge would mean the Knights would be compacted on my lines. With the long edge deployment zone, I might have had a chance to spread out the firepower of the Knights and save some of my units.
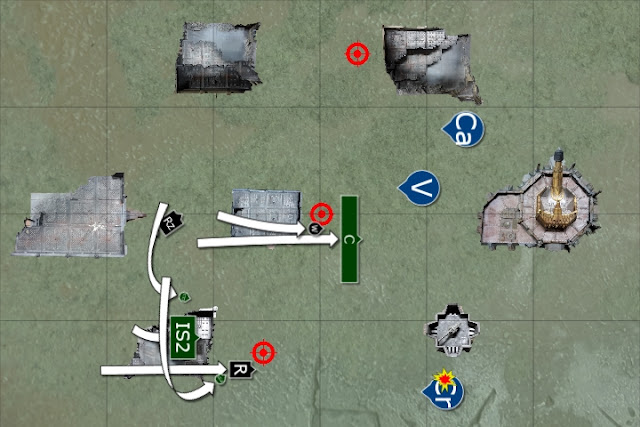
We set up the objectives as shown below:

We then deployed our forces, it obviously didn't take Steve that long!

I put one Infantry Squad in the ruins to the centre, with another on the right flank ruins. I put the third Infantry squad towards the centre with the two Commanders. The Rhino went on the right flank, while the Razorback went in the centre. I spread the Conscripts along the centre and had the Watch Captain behind them. I put the Vanguard Veterans, Assassin, Watch Master, Storm Bolter Kill Team and Intercessors in reserve.
Steve put the Knight Crusader on his left, the Knight Valiant in the centre and the Knight Castelan to the right.
If I could get the first turn, I may have a chance. My plan was to push the Conscripts forward again, using Move, Move, Move to pen in the Knights on their deployment zone. Hopefully, my Lascannons could cause some damage to the Knights. If I could pen in the Knights and carefully sacrifice units to keep them from moving far, I could perhaps rack up the victory points and get an early lead.
This was possibly the worst mission to play a Knight army in. The other missions had more objectives, which I could spread out and use my superior numbers to hold and score. Even with the kill point mission, I would most likely lose on Kill Points, but could go for objectives. In this mission, I couldn't afford to hide my army to spare kill points or go for end of game objective points.


Steve won the roll off for first turn (he rolled a 7!) and I failed to seize the initiative.
TURN 1- IMPERIAL KNIGHTS

All three Knights advanced, the Knight Crusader moving around the Bastion, while the two Dominus Knights moved up the centre. Steve actually deployed further back in his deployment zone, which was a surprise. If he set up on the edge of his deployment zone, he could have potentially been on all three objectives on his first turn.

In the shooting phase, the Knight Castellan opened fire. First, it targeted the two Infantry Squads, killing 8 in one squad and four in the other.
The Knight Valiant fired at the Conscripts. I used the Take Cover stratagem. The Conflaguration Cannon did 16 hits and 16 wounds, killing 12 of the squad. The rest of its weapons fired at the Infantry squad, wiping them out.


The Knight Crusader fired its Battle Cannon at the Infantry Squad on the ruins, killing them. It then fired the Endless Fury Gatling Cannon at the Conscripts, killing six. The Missiles hit the Razorback, taking two damage from it.


In the morale phase, I used two command points on Insane Bravery to keep the Conscripts alive, getting back both command points.
In the first turn, Steve scored First Blood.
TURN 1- DEATHWATCH/ASTRA MILITARUM
At the start of my turn, I chose the Lords of War Mission Tactics.
The surviving Conscripts moved towards the central objective, backed up by the Watch Captain and Company Commander. The Rhino moved up on the right flank objective, a Company Commander moving up behind him.


In the shooting phase, the Commander ordered the Conscripts with Move, Move, Move, advancing them to screen the objective. The Rhino used its Smoke Launchers.
On the right flank, the surviving Infantry Squad fired its Lascannon at the Knight Crusader, Stever using the Rotate Ion Shield stratagem to improve his invulnerable save. The shot hit and wounded, taking 6 damage from it. The Razorback added its firepower, hitting and wounding once, but the energy blast bounced off its shield.


At the end of my turn, I scored two points for holding two objectives.
VICTORY POINTS:
Imperial Knights- 1
Deathwatch/Astra Militarum- 2
TURN 2- IMPERIAL KNIGHTS

The Knight Castellan moved towards the right flank objective, while the Knight Crusader advanced on the left-hand objective. The Knight Valiant moved up the centre of the field towards the Conscripts.


Steve used the Order of Companions stratagem on the Knight Castellan to re-roll rolls of 1 (to hit, to wound, damage and number of shots). The warlord Knight opened fire on the Rhino, Razorback and Conscripts.
The Razorback was destroyed in a hail of fire, killing one of the Kill Team inside. The Rhino was also destroyed. The Conscripts took 8 casualties from the Knight's firepower.
The Knight Crusader fired its Battle Cannon at the Conscripts, wiping out the squad. It then fired at the Meltagun Kill Team, wounding them four times, but the squad's Storm Shield blocked the fire. It also fired at the Frag Cannon Kill Team. The Veteran with the Storm Shield held out to a swathe of firepower, eventually succumbing after one command point re-roll.


The Knight Valiant fired at the Watch Captain and Frag Cannon Kill Team. The Watch Captain was slain, but the Storm Shield of the Kill Team was able to tank the wounds.
At the end of his turn, Steve scored two objective points.
TURN 2- DEATHWATCH/ASTRA MILITARUM

The Frag Cannon Kill Team and Company Commander moved up on the objective, while the Combi-Melta Kill Team advanced on the Knight Crusader.
At the end of the phase, the reserves arrived. The Kill Team, Intercessors, Watch Master and Assassin landed on the right flank to target the Crusader. The Vanguard Veterans landed nearby to challenge the Knight Valiant.


In the shooting phase, the Frag Cannon Kill Team fired at the Crusader. Steve used the Rotate Ion Shield stratagem once more. The Frag Cannons managed 6 wounds, four of which went through the armour of the Knight.
The Kill Team fired their Combi-Meltas, hitting and wounding three times. One got through the Ion Shield, but Steve used a Command Point re-roll to pass it.
The Storm Bolter Kill Team used the Doctrine to get +1 to wound on the Knight. They opened fire on the Knight with their Kraken Bolts, managing a fantastic 16 wounds on it at AP-1. The Knight failed 9 wounds, taking it down to 6 remaining.
The Infantry Squad fired at the wounded Knight, hitting, but failing to wound. The Assassin and Watch Master added their firepower, but failed to do any damage.


Finally, the Intercessors fired at the Knight Crusader, only managing to do 3 wounds in total, of which the Imperial War Machine took 2. The Knight was down to only 4 wounds remaining.
At the end of my turn, I scored two objective points.
VICTORY POINTS:
Imperial Knights- 3
Deathwatch/Astra Militarum- 4
I had maintained the lead so far, but in two turns I had failed to take out a single Knights.
TURN 3- IMPERIAL KNIGHTS

At the start of his third turn, Steve used Machine Spirit Resurgence on the Knight Crusader, allowing it to act as if it was at full strength.
The three Knights moved up on the objectives.
The Knight Valiant began opening fire. It fired on the Frag Cannon Kill Team, slaying three. The Conflaguration Cannon opened up on the Intercessors, killing 9 of the squad in a single volley!


The Knight Castelan fired at the Storm Bolter Kill Team and Frag Cannon Kill Team, killing the Frag Kill Team. The Storm Shield Veteran in the other Kill Team managed to block four wounds with a single command point re-roll.
The Knight Crusader fired at the Storm Bolter Kill Team and Company Commander, easily killing both units with its massed firepower. It then charged the other Company Commander, crushing him under his Titanic Feet.
In the morale phase, the last Intercessor fled the field.
At the end of his turn, Steve scored Slay the Warlord, two objectives for one point each and one objective for two points (for holding it for two successive turns).
TURN 3- DEATHWATCH/ASTRA MILITARUM

The Meltagun Kill Team, Assassin and Watch Master moved up on the Knight Crusader. The Vanguard Veterans landed next to the central Knight.
The Kill Team targeted the Knight, Steve using the Rotate Ion Shield stratagem once more. The Combi-Meltas were able to destroy the Knight Crusader with one command point re-roll.

The rest of the army fired on the Knight Valiant, but failed to do any damage.
In the charge phase, the Vanguard Veterans launched a last ditch assault on the Knight Valiant, but were obliterated by the Conflaguration Cannon before they could reach their target.
At the end of my turn, I scored one objective point.
VICTORY POINTS:
Imperial Knights- 8
Deathwatch/Astra Militarum- 5

I decided to call the game there. It was unlikely any of my army would survive the following turn. I was so far behind on points, it would be next to impossible for me to win the game, as I didn't have enough firepower left to make a dent on the remaining Knights.
AFTER-BATTLE THOUGHTS
Thanks to Steve for a fun game. Unfortunately, I think the result was inevitable, based on the mission and his army.
My army simply did not have the firepower to trouble the large Imperial Knights in this game. If I had got the first turn, I think I may have had a shot, but Steve was able to take out a lot of my anti-tank firepower in the first turn. Once he was on the objectives, there was little I could do to shift him, and he would rack up the multiplying victory points each turn to outscore me easily.
One interesting issue came up during the game. By my reading of the mission, the Character rules overrides the "objective secured" type rules, such as Defenders of Humanity. This meant that characters could hold the objective, even though I had more Troops choices nearby.
The table next to us had the same query. When they asked for a rules clarification, they were told that the character rule in the scenario and Defenders of Humanity would cancel each other out, so the objective would go to the player with more models within range of the objective.
This may have changed the way I played the mission, as I had the superior numbers on the table. The other issue was that the table had no real useable line of sight blocking terrain for me. This meant there was simply nowhere to hide my units, meaning they were easy pickings for the Imperial Knights.
I really don't think there was much I could do to win this game, as it was a pretty poor match up for me and the worst possible mission to play the Imperial Knights in. Despite that, it was still a fun game. At least we got to finish early and have a break before the next game.
The game times were:
Deployment- 10 mins
IK Turn 1- 15 mins
DW/AM Turn 1- 7 mins
IK Turn 2- 19 mins
DW/AM Turn 2- 18 mins
IK Turn 3- 15 mins
DW/AM Turn 3- 5 mins
A fairly quick game overall that ended early.
With one win and one loss so far, I was keen to end the first day on a second win.
Warhammer World GT Heat 1
Game 1- Deathwatch/Astra Militarum vs Astra Militarum/Adeptus Custodes/Imperial Knights
Game 2- Deathwatch/Astra Militarum vs Imperial Knights
Game 3- Deathwatch/Astra Militarum vs Deathwatch
Game 4- Deathwatch/Astra Militarum vs Necrons
Game 5- Deathwatch/Astra Militarum vs Astra Militarum

In the shooting phase, the Knight Castellan opened fire. First, it targeted the two Infantry Squads, killing 8 in one squad and four in the other.
The Knight Valiant fired at the Conscripts. I used the Take Cover stratagem. The Conflaguration Cannon did 16 hits and 16 wounds, killing 12 of the squad. The rest of its weapons fired at the Infantry squad, wiping them out.


The Knight Crusader fired its Battle Cannon at the Infantry Squad on the ruins, killing them. It then fired the Endless Fury Gatling Cannon at the Conscripts, killing six. The Missiles hit the Razorback, taking two damage from it.


In the morale phase, I used two command points on Insane Bravery to keep the Conscripts alive, getting back both command points.
In the first turn, Steve scored First Blood.
TURN 1- DEATHWATCH/ASTRA MILITARUM

At the start of my turn, I chose the Lords of War Mission Tactics.
The surviving Conscripts moved towards the central objective, backed up by the Watch Captain and Company Commander. The Rhino moved up on the right flank objective, a Company Commander moving up behind him.


In the shooting phase, the Commander ordered the Conscripts with Move, Move, Move, advancing them to screen the objective. The Rhino used its Smoke Launchers.
On the right flank, the surviving Infantry Squad fired its Lascannon at the Knight Crusader, Stever using the Rotate Ion Shield stratagem to improve his invulnerable save. The shot hit and wounded, taking 6 damage from it. The Razorback added its firepower, hitting and wounding once, but the energy blast bounced off its shield.


At the end of my turn, I scored two points for holding two objectives.
VICTORY POINTS:
Imperial Knights- 1
Deathwatch/Astra Militarum- 2
TURN 2- IMPERIAL KNIGHTS

The Knight Castellan moved towards the right flank objective, while the Knight Crusader advanced on the left-hand objective. The Knight Valiant moved up the centre of the field towards the Conscripts.


Steve used the Order of Companions stratagem on the Knight Castellan to re-roll rolls of 1 (to hit, to wound, damage and number of shots). The warlord Knight opened fire on the Rhino, Razorback and Conscripts.
The Razorback was destroyed in a hail of fire, killing one of the Kill Team inside. The Rhino was also destroyed. The Conscripts took 8 casualties from the Knight's firepower.
The Knight Crusader fired its Battle Cannon at the Conscripts, wiping out the squad. It then fired at the Meltagun Kill Team, wounding them four times, but the squad's Storm Shield blocked the fire. It also fired at the Frag Cannon Kill Team. The Veteran with the Storm Shield held out to a swathe of firepower, eventually succumbing after one command point re-roll.


The Knight Valiant fired at the Watch Captain and Frag Cannon Kill Team. The Watch Captain was slain, but the Storm Shield of the Kill Team was able to tank the wounds.
At the end of his turn, Steve scored two objective points.
TURN 2- DEATHWATCH/ASTRA MILITARUM

The Frag Cannon Kill Team and Company Commander moved up on the objective, while the Combi-Melta Kill Team advanced on the Knight Crusader.
At the end of the phase, the reserves arrived. The Kill Team, Intercessors, Watch Master and Assassin landed on the right flank to target the Crusader. The Vanguard Veterans landed nearby to challenge the Knight Valiant.


In the shooting phase, the Frag Cannon Kill Team fired at the Crusader. Steve used the Rotate Ion Shield stratagem once more. The Frag Cannons managed 6 wounds, four of which went through the armour of the Knight.
The Kill Team fired their Combi-Meltas, hitting and wounding three times. One got through the Ion Shield, but Steve used a Command Point re-roll to pass it.
The Storm Bolter Kill Team used the Doctrine to get +1 to wound on the Knight. They opened fire on the Knight with their Kraken Bolts, managing a fantastic 16 wounds on it at AP-1. The Knight failed 9 wounds, taking it down to 6 remaining.
The Infantry Squad fired at the wounded Knight, hitting, but failing to wound. The Assassin and Watch Master added their firepower, but failed to do any damage.


Finally, the Intercessors fired at the Knight Crusader, only managing to do 3 wounds in total, of which the Imperial War Machine took 2. The Knight was down to only 4 wounds remaining.
At the end of my turn, I scored two objective points.
VICTORY POINTS:
Imperial Knights- 3
Deathwatch/Astra Militarum- 4
I had maintained the lead so far, but in two turns I had failed to take out a single Knights.
TURN 3- IMPERIAL KNIGHTS

At the start of his third turn, Steve used Machine Spirit Resurgence on the Knight Crusader, allowing it to act as if it was at full strength.
The three Knights moved up on the objectives.
The Knight Valiant began opening fire. It fired on the Frag Cannon Kill Team, slaying three. The Conflaguration Cannon opened up on the Intercessors, killing 9 of the squad in a single volley!


The Knight Castelan fired at the Storm Bolter Kill Team and Frag Cannon Kill Team, killing the Frag Kill Team. The Storm Shield Veteran in the other Kill Team managed to block four wounds with a single command point re-roll.
The Knight Crusader fired at the Storm Bolter Kill Team and Company Commander, easily killing both units with its massed firepower. It then charged the other Company Commander, crushing him under his Titanic Feet.
In the morale phase, the last Intercessor fled the field.
At the end of his turn, Steve scored Slay the Warlord, two objectives for one point each and one objective for two points (for holding it for two successive turns).
TURN 3- DEATHWATCH/ASTRA MILITARUM

The Meltagun Kill Team, Assassin and Watch Master moved up on the Knight Crusader. The Vanguard Veterans landed next to the central Knight.
The Kill Team targeted the Knight, Steve using the Rotate Ion Shield stratagem once more. The Combi-Meltas were able to destroy the Knight Crusader with one command point re-roll.

The rest of the army fired on the Knight Valiant, but failed to do any damage.
In the charge phase, the Vanguard Veterans launched a last ditch assault on the Knight Valiant, but were obliterated by the Conflaguration Cannon before they could reach their target.
At the end of my turn, I scored one objective point.
VICTORY POINTS:
Imperial Knights- 8
Deathwatch/Astra Militarum- 5

I decided to call the game there. It was unlikely any of my army would survive the following turn. I was so far behind on points, it would be next to impossible for me to win the game, as I didn't have enough firepower left to make a dent on the remaining Knights.
AFTER-BATTLE THOUGHTS
Thanks to Steve for a fun game. Unfortunately, I think the result was inevitable, based on the mission and his army.
My army simply did not have the firepower to trouble the large Imperial Knights in this game. If I had got the first turn, I think I may have had a shot, but Steve was able to take out a lot of my anti-tank firepower in the first turn. Once he was on the objectives, there was little I could do to shift him, and he would rack up the multiplying victory points each turn to outscore me easily.
One interesting issue came up during the game. By my reading of the mission, the Character rules overrides the "objective secured" type rules, such as Defenders of Humanity. This meant that characters could hold the objective, even though I had more Troops choices nearby.
The table next to us had the same query. When they asked for a rules clarification, they were told that the character rule in the scenario and Defenders of Humanity would cancel each other out, so the objective would go to the player with more models within range of the objective.
This may have changed the way I played the mission, as I had the superior numbers on the table. The other issue was that the table had no real useable line of sight blocking terrain for me. This meant there was simply nowhere to hide my units, meaning they were easy pickings for the Imperial Knights.
I really don't think there was much I could do to win this game, as it was a pretty poor match up for me and the worst possible mission to play the Imperial Knights in. Despite that, it was still a fun game. At least we got to finish early and have a break before the next game.
The game times were:
Deployment- 10 mins
IK Turn 1- 15 mins
DW/AM Turn 1- 7 mins
IK Turn 2- 19 mins
DW/AM Turn 2- 18 mins
IK Turn 3- 15 mins
DW/AM Turn 3- 5 mins
A fairly quick game overall that ended early.
With one win and one loss so far, I was keen to end the first day on a second win.
Warhammer World GT Heat 1
Game 1- Deathwatch/Astra Militarum vs Astra Militarum/Adeptus Custodes/Imperial Knights
Game 2- Deathwatch/Astra Militarum vs Imperial Knights
Game 3- Deathwatch/Astra Militarum vs Deathwatch
Game 4- Deathwatch/Astra Militarum vs Necrons
Game 5- Deathwatch/Astra Militarum vs Astra Militarum
Ouch... I remember seeing you mention the mission on facebook and that it was a bad matchup, meant to look up what the mission parameters were... ouch! That is a brutally bad matchup...
ReplyDeleteI would read it that obj sec counts as your tie breaker, the more important thing is characters, but if you BOTH had characters nearby, then model count could win it for you. However even then I can't imagine going toe to toe against Knights would be the best idea for your long term health...
Thanks Ginge. Yeah, it was possibly the worst mission of the weekend to face the Knight list. I think with any of the others I may have had a chance (i.e. hiding till the end of the game!).
DeleteMy army simply didn't have the firepower or combat ability to take out three Knights.
I have now personally had the same treatment... turned up at my local game club and whoops my opponent brought his knight army. Ah... ok then. Figured I may try to run round and outscore him (wasn't the same mission you played thankfully) but the gods were with my opponent for the maelstrom deck. Every obj he had to get was a ground floor one he placed. Even when he rolled one at random, gaining more points if he took an obj under my control, he happened to get the only ground floor obj I was in control of... the one my guys who had just survived a knight charge had fallen back to. Great!
DeleteTook out one of the buggers in combat. Probably could have taken a second, but the veil of timed squad failed their charge. They were wiped out for their failure. So in the end took out two armigers, a 24 wound knight (his warlord) took another 24 wound knight down to 9, took another down to 3... but there was one more unscathed (the one in his backfield that my veil of time guys were supposed to deal with!)
I felt my army had a fair to decent amount of anti tank in it, for an army where that is a known weakness. I had 8 missile launchers, 6 frag cannons, 6 heavy thunder hammers. But it was insufficient to the task. I miss the days when people had to warn you they were bringing that kind of thing... meant you could prepare for it a bit better. With a balanced list, with any balanced list, I never hope to beat a knight list, just contain and outscore it.
At a tournament, you have to play whatever you go up against. At a local club night, I would prefer to know in advance about facing Knights.
DeleteThey are one of the armies that you really need to be prepared to deal with. The new ones have so much firepower that you cannot simply ignore them as you could with Knights before. If you don't have some way to hurt them, they can decimate most of an army on their own.
Yikes, that was brutal...
ReplyDeleteYep! You get them sometimes at tournaments though. Don't worry, the rest of the games were awesome.
DeleteOuch, fair play to you weathering through it and continuing on. Glad you had fun despite it all.
ReplyDeleteYeah, he was a nice opponent to chat with, but the game felt like a foregone conclusion from the start.
DeleteThat was pretty much a perfect storm of poor factors for your Army to face. Well done taking down at least one of the Knights, and staying on the scoreboard.
ReplyDeleteHaha! Yeah, at least I can claim the moral victory for killing at least one of them off. I think a lot of armies are going to struggle against Knight armies.
DeleteThe fact that it is very difficult to tie them up in combat is also a blow for other armies, as the Knights can fall back over infantry models.