
A few weeks ago, I attended the North West Open tournament at Wargames in Southport. This was an ITC tournament and the first of its kind that I had attended. The tournament took place over 2 days and 5 games, where I would see if my Deathwatch could compete with the other armies in 8th edition.
The first mission was ITC scenario 3- No Mercy. This mission featured a mixture of maelstrom points and eternal war points with bonuses for tertiary objectives.
The Eternal war mission was kill points, with points being awarded for each enemy unit destroyed equal to their power level in the index. Maelstrom missions used the ITC maelstrom objective table. In this table, you roll three times at the start of each of your turns to generate three unique maelstrom objectives and choose which two of the options that you rolled you want to try and achieve. For this mission, the table was:
- Hold Maelstrom Objective 1
- Hold Maelstrom Objective 2
- Hold Maelstrom Objective 3
- Have more units further than 12" from your deployment table edge than your opponent does from theirs (Advance)
- Have a unit at least partially within 12" of the enemy deployment table edge (Hold the Line)
- Have at least 3 of your and none of your opponent's units within 12" of your deployment table edge (Behind Enemy Lines).
What is interesting about ITC maelstrom objectives is that you score them at the beginning of your following turn. For example, if you roll hold maelstrom objective 1 and 2 in turn 1, you have to be holding them at the beginning of your second turn in order to score them. This forces you to plan ahead and can allow your opponent to try to stop you scoring in their turn. In addition, if you roll two hold objective results, you have the option to exchange them to hold all three objectives and score 3 maelstrom points.
The tertiary objectives were First Strike (destroy a unit in the first turn, both players can score), Slay the Warlord and King of the Hill (have more units/models within 6" of the board centre than your opponent).
I hadn't played these missions before, so it would be interesting to see how I performed in them in 8th edition.
My Deathwatch army consisted of:
Battalion Detachment
Watch Master (W)
Watch Captain- Jump Pack, Pair Lightning Claws (W)
Kill Team 1- 5 Veterans, Vanguard Veteran with Pair Lightning Claws, 3 Frag Cannons, Storm Shield. (KT1)
Kill Team 2- 5 Veterans, 2 Missile Launchers, 3 Stalker Boltguns (KT2)
Kill Team 3- 5 Veterans, 2 Missile Launchers, 3 Stalker Boltguns (KT3)
Kill Team 4- 5 Veterans, Meltagun, 3 combi-Meltas (KT4)
Kill Team 5- 5 Veterans, 2 Frag Cannons (KT5)
Rhino (R)
Drop Pod- Storm Bolter (DP)
6 Vanguard Veterans- 2 Pairs Lightning Claws, Power Sword and Bolt Pistol, 3 with Bolt Pistols and Chainswords (VV1)
3 Deathwatch Bikers- Power Axe, Power Sword (DB1)
3 Deathwatch Bikers- two Power Swords (DB2)
Corvus Blackstar- Auspex Array, Hurricane Bolter, Twin Assault Cannons, 2 Blackstar Rocket Launchers (CB)
Vindicare Assassin (V)
6 Command Points
My Warlord was the Watch Master, who took the Tenacious Survivor warlord trait.
My first opponent in game 1 was Victoria with her Tyranid army. Her army consisted of:
Battalion Detachment
Tervigon- Adrenal Glands, Massive Scything Talons, Stinger Salvo, Toxin Sacs (Tv1)
Tervigon- Adrenal Glands, Massive Scything Talons, Stinger Salvo, Toxin Sacs (Tv2)
Tervigon- Adrenal Glands, Massive Scything Talons, Stinger Salvo, Toxin Sacs (Tv3)
30 Termagants- Fleshborers (T1)
30 Termagants- Fleshborers (T2)
30 Termagants- Fleshborers (T3)
3 Hive Guard (HG)
Supreme Command Detachment
Malanthrope (M1)
Malanthrope (M2)
Malanthrope (M3)
Lord of War
Barbed Hierodule- Massive Scything Talons (BH)
7 Command Points
Her warlord was one of the Malanthropes who also had the Tenacious Survivor warlord trait. The three Tervigons had Catalyst, The Horror and Onslaught as their powers (one on each Tervigon).
A lot of big beasties and a horde of smaller Tyranids to deal with. I was glad to see no Exocrines in the list, but the Barbed Hierodule was an unknown quantity for me. My Frag Cannons could hopefully deal with the Termagants and hopefully deal some damage on the bigger creatures.
The battlefield had a lot of buildings and line of sight blocking terrrain, including a huge tower block in the centre. This could severely shut down my firing lanes. We were using Vanguard Strike deployment). We set up the objectives as shown below:

The deployment order was as follows:
- Vanguard Veterans (reserve)
- Barbed Hierodule
- Drop Pod (reserve, Watch Master and Kill Team 4)
- Tervigon
- Kill Team 2 (missile launchers)
- Malanthrope
- Kill Team 3 (missile launchers)
- Tervigon
- Rhino (Kill Team 5)
- Malanthrope
- Bikers
- Tervigon
- Bikers
- Malanthrope
- Corvus Blackstar (Kill Team 1 and Watch Captain)
- Hive Guard
- Assassin
- Rest of Tyranids
I chose to deploy most of my army to my left flank, hoping to use the line of sight blocking terrain to keep the enemy shooting at bay and focus on one flank of Tyranids at at time. One unit of bikers and the Assassin went on the right flank to harass the enemy army. Victoria had chosen to spread out her forces across the deployment zone (she didn't really have much of a choice with such a large army). The Tervigons and Malanthropes spread out for maximum effect. She also hid the Hive Guard inside one of the ruins, out of line of sight. As they don't need line of sight to fire, they could harass my army with their firepower, while I would need to get in close to take care of them.


In this tournament, the ITC rules were in play, meaning that whoever set up first did not automatically go first, but got +1 to the roll to see who went first. We rolled off and Victoria won the roll. I failed to seize, so she took the first turn.
TURN 1- TYRANIDS
In turn 1, Victoria chose Maelstrom objective 1 and Behind enemy lines.

The Tyranids made their move, all the Termagants advancing to close range with the Deathwatch. This allowed the unit on the right flank to get into range to score Behind Enemy lines the following turn. The central unit of Termagants tried to advance onto the central objective, but failed to roll far enough (Victoria used a command point re-roll to try and make it, but unfortunately rolled a 1).


One of the Tervigons cast Catalyst on the Hierodule, allowing it to get in range of the objective.
In the shooting phase, a Tervigon opened fire on the Assassin (I had deployed him wrong, so he was the closest target). Even though it needed 6's to hit, she managed three hits and two wounds. One got through the Assassin's save, causing three wounds in damage. The Hive Guard then fired at the Assassin, wounding him twice. I failed both wounds, even trying a Command Point re-roll to keep him alive, but failed and the Assassin died to award first strike.
TURN 1- DEATHWATCH
In my first turn, I chose Objective 2 and Objective 3.

The Deathwatch decided to attack the Xenos threat in front of them with full force. The Kill Team and Captain disembarked from the Corvus Blackstar, moving up to target the Termagants. The Bikers on the left flank moved around the building to join the Watch Captain, the Corvus Blackstar remaining stationary to improve its firepower.


On the right flank, the Deathwatch Bikers edged around the ruins to target the Tyranids. The Drop Pod arrived in the enemy deployment zone, the Kill Team and Watch Master moving to target the giant Tyranid creature in front of them.
In the shooting phase, Kill Team 1 loosed their Frag Cannons on the Termagants, killing 17 with their powerful volley. The Bolters of the squad accounted for another two of the creatures. The Corvus Blackstar added its firepower, killing all but one of the squad.
The Bikers fired at the last Gaunt and killed him off to earn me First Strike. This was a bit of overkill, but unfortunately the last Termagant would survive his Morale test thanks to Synapse, so needed to be killed with the Bikers to earn me first strike.
The other squad of Bikers fired at the closest Tervigon, but were unable to do any damage, even with their poisoned 2+ shells.
Kill Team 4 fired their Meltaguns at the Tervigon, hitting and wounding with three of their shots. Unfortunately, some poor damage rolls only saw 7 wounds taken from the creature (even with the use of another Command Point re-roll). The Bolters of the squad Sergeant and Watch Master took another two wounds from the creature. The Drop Pod fired at the Tervigon, but was unable to cause any damage.
One of the Kill Teams fired their missile launchers at the Barbed Heirodule, hitting it twice but failing to wound. The Stalker Bolters of the rest of the squad managed to take a single wound from it.
The other Kill Team fired their missiles at the Tervigon on the left flank, hitting twice and wounding once. However, the might beast made its armour save. The Stalker Bolters failed to do any damage on the creature.
TURN 2- TYRANIDS
At the start of turn 2, Victoria scored Hold Objective 1 and Behind Enemy lines. This turn, she chose Behind Enemy Lines and Hold the Line from her rolls.

On the right flank, the Tervigon and Malanthrope moved up to engage the Kill Team from the Corvus Blackstar. In the centre, the Tervigon, Malanthrope and Termagants moved back to engage the Deathwatch that had appeared behind them, while the Barbed Heirodule continued to move up on the Deathwatch positions.


In the psychic phase, the wounded Tervigon cast Catalyst on itself. Another Tervigon cast Smite, killing one of the Deathwatch Bikers, while the other cast Smite and killed one of the Kill Team in front of it (that had deployed from the Corvus Blackstar).
In the shooting phase, one of the Tervigons opened fire on the Kill Team in front of it, but missed with all four of its shots. The wounded Tervigon in the centre fired at the Meltagun kill team, but failed to hit them. The Termagants opened fire on the same Kill Team and managed to slay two of the squad.

The other squad of Termagants opened fire at the Bikers on the left flank, hitting once and managing to wound one of the Bikers.
The Hive Guard fired at the Frag Cannon Kill Team, wounding them four times. The Storm Shield in the squad managed to block all the wounds (thanks to the use of one command point re-roll) and the squad were unharmed.

The Barbed Hierodule fired at the Corvus Blackstar, wounding it four times. Amazingly, I made all four 5+ armour saves and the flyer was also unharmed.

The Termagants charged the Meltagun Kill Team. Overwatch fire from the squad managed to bring down two of the creatures. Victoria then rolled a double 1 for the charge distance and the charge failed (her rolling this turn had been abysmal!). The Tervigon attempted to charge the two Bikers, suffering two wounds in overwatch, but fortunately, its armour held. Once more, the charge was failed, even with the use of a Command Point re-roll. The second Tervigon charged the Kill Team on the right flank. The Frag Cannons were a bit more subdued this turn, only doing a single wound from overwatch fire. Luckily, this time the charge was successful.
The Tervigon struck at the Kill Team, wounding them twice. Once more, the Veteran carrying the Storm Shield was on point, blocking both the wounds. The Kill Team were unable to harm the creature in reply.

Some absolutely terrible rolling from Victoria had really hampered her this turn, while my saving throws for my Storm Shield had blocked so many wounds on the Kill Team. A very unusual situation for me!
TURN 2- DEATHWATCH
At the start of turn 2, I scored Hold Objective 3 for one point. This turn, I selected Hold Objective 1 and Hold Objective 2 for my maelstrom objectives.

The Kill Team in combat fell back from the Tervigon, the Deathwatch Bikers and Watch Captain moving round to support them. The Rhino moved away to the cover of the nearby buildings. The Corvus Blackstar flew to the centre of the field to target the Termagant horde there, while the two Bikers moved up to the central objective.


The Watch Master and survivors of the Kill Team marched up towards the Tyranids in front of them, while the Vanguard Veterans arrived to support them.


In the shooting phase, the Meltagun Kill Team opened fire on the wounded Tervigon, hitting three times, but failing to roll a single wound. I used a Command Point re-roll to successfully wound and the Tervigon was slain. The resulting Synapse feedback killed one of the nearby Termagants. The Watch Master, Vanguard Veterans and Drop Pod opened fire at the Termagants, killing five of the squad.
The Corvus Blackstar fired at the Termagants, killing fourteen of the squad in total (I managed to roll the full 12 shots for my Rocket Launchers).
On the left flank, the Kill Team fired their Frag Cannons at the Tervigon, scoring 15 hits. Despite wounding on a 5+, I scored 9 wounds and the Tervigon took 6. The Bikers fired at the Tervigon, wounding it 7 times thanks to the poisoned shells and taking another 3 from it. The Captain threw a Krak grenade at it, taking another 2 wounds. Finally, the Stalker Bolter Marines fired at it, taking another wound from it.
One of the Kill Teams fired their Missile Launchers at the Hierodule, but failed to cause any damage. The Stalker bolters of the squad took 2 wounds from it, but it still had many more to go.
In the charge phase, the Watch Master, Kill Team and Vanguard Veterans all successfully charged the Termagants and Malanthrope in front of them. The Bikers and Watch Captain assaulted the Tervigon on the left flank.
In the fight phase, the Captain struck at the Tervigon, wounding it twice and killing it.


The Vanguard Veterans attacked the Termagants, killing 6 of the squad. The Kill Team managed to wipe out the rest of the Gaunt squad.
The Watch Master struck at the Malanthrope, wounding it twice. I then rolled two 6's for my D3 wounds, the Toxicrene Malanthrope taking 5 wounds after passing one tenacious survivor roll. The Malanthrope struck back, wounding once but failing to get past the armour of the Watch Master. He then used his toxic ability to kill one of the Kill Team against him.


MAELSTROM POINTS:
Tyranids- 2
Deathwatch- 1
TURN 3- TYRANIDS
At the start of turn 3, Victoria scored Behind Enemy Lines. This turn, she chose Advance and Hold Objective 1.

One of the Malanthropes moved towards the Bikers holding the central objective, using a command re-roll to advance into range of it. The Malanthrope was joined by the Hierodule, who moved up to engage the Bikers. The rest of the Tyranid force moved up on the Deathwatch army.


In the psychic phase, the Tervigon cast Smite, killing one of the Bikers on objective 1.
In the shooting phase, the Tervigon opened fire at the Corvus Blackstar, wounding it once. The Barded Hierodule fired at the flyer, wounding it twice and taking 4 damage from it.
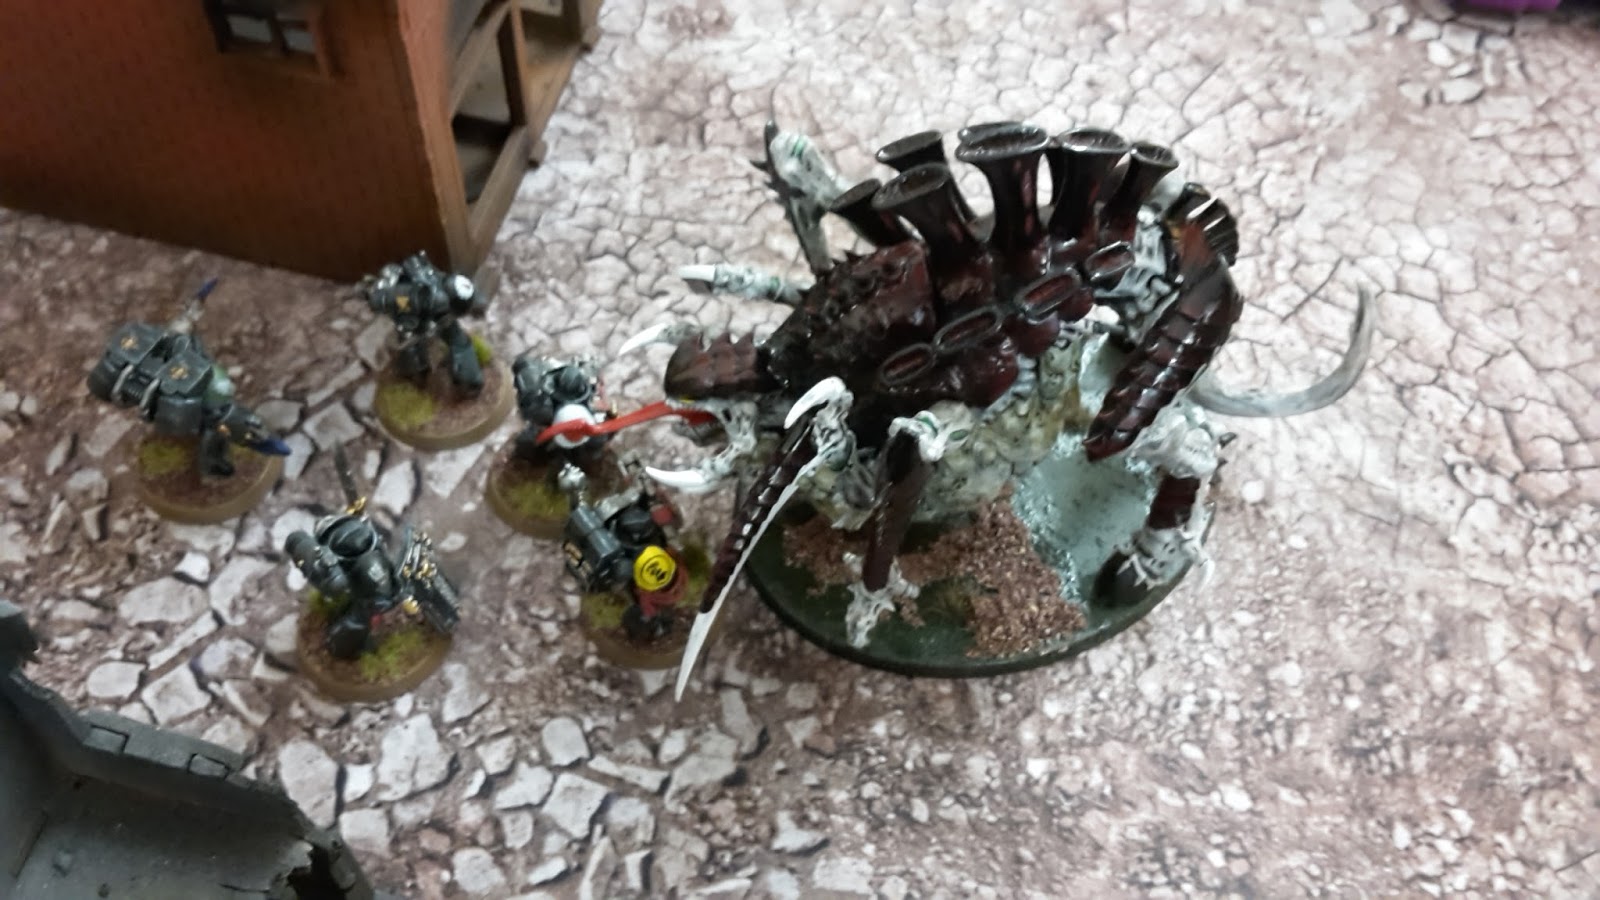
The Hierodule charged the last Biker in the centre, easily killing him. The Toxicrene struck at the Watch Master, but failed to do any damage. The Watch Master attacked the Tyranid beast, wounding him 6 times and killing him.


TURN 3- DEATHWATCH
This turn, I scored Hold Objective 2. For my maelstrom objectives, I chose Advance and Hold Objective 2.

The Vanguard Veterans moved into the ruins to target the Hive Guard, while the Bikers moved up towards the Malanthrope in the centre. The Kill Team advanced towards the action, joined by the Rhino, which also advanced.


On the right flank, the Corvus Blackstar moved up towards the last Termagant unit, as the remnants of the Meltagun Kill Team moved to engage the last Tervigon.
In the shooting phase, the Corvus Blackstar fired at the Termagants, killing six of the squad. The Kill Team fired their Meltaguns at the Tervigon, wounding once (after the use of a Command Point re-roll) and taking 3 wounds from it.
The Watch Master fired at the Malanthrope, wounding it twice, but Victoria made both her 6+ armour saves! The Bikers fired at the creature, wounding it twice.
The two backfield Kill Teams fired at the Tervigon. Of the four Missile Launchers fired, only one hit, which promptly failed to wound. The Stalkers failed to do any damage.
The Kill Team fired their Frag Cannons at the central Malanthrope, taking four wounds from it.
In the charge phase, the Vanguard Veterans and Watch Captain assaulted the Hive Guard, while the Bikers charged the Malanthrope.

The Vanguard Veterans struck at the Hive Guard, killing two of the squad. The Watch Captain then managed to kill the final member of the squad. The Bikers attacked the Malanthrope, wounding it twice for no damage in return.


MAELSTROM POINTS:
Tyranids- 3
Deathwatch- 2
TURN 4- TYRANIDS
Victoria scored no maelstrom points this turn and chose Hold Objective 1 and Linebreaker as her objectives for turn 5.

The Tervigon and Termagants moved up towards the Watch Master and Kill Team, while the Barbed Hierodule moved to engage the Bikers in front of it. The Tervigon managed to spawn back the slain Termagants from the unit beside it.


The Tervigon cast Smite, killing the last two members of the Kill Team in front of it with a Command Point re-roll.
The Termagants fired at the Corvus Blackstar, only managing a single wound with their 27 shots, which was then saved by the flyer's armour.
The Tervigon fired at the Watch Master, wounding him once, but he made his armour save. The Hierodule then split its fire between the Watch Master and Corvus Blackstar. The Tyranid creature hit the Watch Master three times, but Victoria rolled a triple one to wound! Her rolling this game had been terrible, pretty much at my normal level! Her luck continued when the Hierodule failed to hit the Corvus Blackstar. She used another Command Point re-roll to hit with one shot, but then failed to wound.
The Termagants and Tervigon assaulted the Watch Master, while the Hierodule assaulted the Deathwatch Bikers.


The Termagants attacked the Watch Master, but failed to do any harm. The Tervigon hit the Deathwatch warlord, but failed to wound (even with another Command Point re-roll). The Watch Master struck back, wounding the Tervigon twice and taking three damage in total.
The Barbed Hierodule attacked the Bikers, easily slaying them in combat.
TURN 4- DEATHWATCH
This turn, I scored Advance for one point. For next turns objectives, I chose Hold Objective 3 and Linebreaker.

The Frag Cannon Kill Team and Rhino both advanced towards the central objective, while the Corvus Blackstar moved towards the left flank to target the Tyranid forces. I decided to keep the Vanguard Veterans and Captain hidden for the moment, as they were simply another target for the Hierodule.


The Kill Team fired their Frag Cannons at the Malanthrope, wounding him 9 times and killing him. The Corvus Blackstar fired at the Hierodule, wounding it 6 times with its Assault Cannons, but Victoria made all her 4+ saves.
One of the backfield Kill Teams fired at the Hierodule. Both the Missile Launchers failed to hit, while the Stalker Bolters did a single wound. The second squad fired at the Tervigon. The two Missile Launchers hit, but failed to wound. I used a Command Point re-roll to do a single wound, but the shot bounced off the creature's armour.
In the fight phase, the Watch Master struck at the Tervigon, but failed to do any wounds. The Gaunts attacked the Watch Master, wounding twice, but failing to get past his armour. The Tervigon also wounded twice, but fortunately, I made both my invulnerable saves.

MAELSTROM POINTS:
Tyranids- 3
Deathwatch- 3
Some really poor rolling from Victoria (and uncharacteristic great rolling from me) had really hurt her during the game so far, as she struggled to damage most of my units from shooting.
TURN 5- TYRANIDS
At the start of turn 5, Victoria scored Hold Objective 1 and Linebreaker. For the following turn, she chose Hold Objective 1 and Linebreaker once more.

The last Malanthrope tried to advance on objective 1. Despite using her last Command Point re-roll, Victoria only rolled a 2 and failed to get into range. The Barbed Hierodule moved up on the nearby Kill Team.


In the psychic phase, the Tervigon cast Smite on the Watch Master, wounding him once, but I made my Tenacious Survivor save.
The Hierodule fired at the Kill Team in front of it, only managing to hit with three of its 12 shots (despite hitting on a 4+). The shots did manage to kill three of the squad though.
In the charge phase, the Hierodule assaulted the last two members of the Kill Team, taking two wounds from overwatch fire from the Frag Cannons. The Tyranid creature easily wiped out the squad.
The Tervigon attacked the Watch Master, wounding him once, but I made my invulnerable save. The Watch Master struck back, taking four more wounds from the Tervigon. The Gaunts were unable to harm the Watch Master.
TURN 5- DEATHWATCH
This turn, I was able to score Hold Objective 3 and Linebreaker for 2 points to tie up the maelstrom score. I chose Hold Objective 3 and Behind Enemy Lines for my next two objectives.

Given the time constraints, this was likely to be the last turn of the game. The Vanguard Veterans and Watch Captain came out of the ruins to target the last Tervigon. The Watch Master fell back as the Kill Team in the Rhino finally disembarked to bring their Frag Cannons to bear. The Corvus Blackstar went into hover mode to remain in place and target the enemy units.


The Kill Team fired their Frag Cannons at the Tervigon, wounding it five times, but only a single wound went through its armour. The squad's Bolters managed to take another wound from it. Finally, the Vanguard Veterans fired at the creature, managing to wound it a single time and slay it! Five Termagants died as the creature succumbed.
The Corvus Blackstar fired on the Termagants, killing 20 of the squad with its combined firepower.
One Kill Team fired its missile launchers at the Malanthrope. One hit and wounded, managing to take 6 wounds from the creature. The Stalker Bolters of the squad killed three more Termagants. The Drop Pod fired at the Malanthrope and managed to take one more wound.
My three squads attempted to charge the Malanthrope (Vanguard Veterans, Watch Captain and Kill Team 5), but no squad managed to make the charges.

With that, the game was over. The final scores were as follows:
Tyranids: Kill Points- 35 Power level. Maelstrom- 5, First Strike, King of the Hill.
Deathwatch: Kill Points- 67 Power level, Maelstrom- 5, First Strike, Slay the Warlord.
I won on the Primary mission and we drew on the Maelstrom and Tertiary missions. This gave me 14 tournament points to Victoria's 6 tournament points. A win for the Deathwatch.
AFTER-BATTLE THOUGHTS
Thanks to Victoria for a great game of 40k. I actually expected it to be a lot closer, which it may have been if not for her horrendous luck during the game.
Victoria was really unlucky with so many of her rolls during the game. After killing off the Assassin with some lucky shots in turn 1, it was really downhill from there, with a flurry of well below average rolling and some horrendous failed charges. This was slightly made up for by rolling up Behind Enemy Lines so often. We both had a unit in the enemy deployment zone from turn 1 onwards, but I was simply unable to roll this maelstrom objective more than once during the game.
I think that my plan worked well. I was able to use the Frag Cannons and Corvus Blackstar on one flank to eliminate the big unit of Termagants and cause some serious damage to the Tervigon. It was simply then a case of going after the rest of the army and trying to cause as much damage as possible.
With a win in game 1, but not at the full tournament points, I was hoping my opponent for game 2 would be a bit friendlier than some of the armies likely to be at the top of the tables.
Some really poor rolling from Victoria (and uncharacteristic great rolling from me) had really hurt her during the game so far, as she struggled to damage most of my units from shooting.
TURN 5- TYRANIDS
At the start of turn 5, Victoria scored Hold Objective 1 and Linebreaker. For the following turn, she chose Hold Objective 1 and Linebreaker once more.

The last Malanthrope tried to advance on objective 1. Despite using her last Command Point re-roll, Victoria only rolled a 2 and failed to get into range. The Barbed Hierodule moved up on the nearby Kill Team.


In the psychic phase, the Tervigon cast Smite on the Watch Master, wounding him once, but I made my Tenacious Survivor save.
The Hierodule fired at the Kill Team in front of it, only managing to hit with three of its 12 shots (despite hitting on a 4+). The shots did manage to kill three of the squad though.
In the charge phase, the Hierodule assaulted the last two members of the Kill Team, taking two wounds from overwatch fire from the Frag Cannons. The Tyranid creature easily wiped out the squad.
The Tervigon attacked the Watch Master, wounding him once, but I made my invulnerable save. The Watch Master struck back, taking four more wounds from the Tervigon. The Gaunts were unable to harm the Watch Master.
TURN 5- DEATHWATCH
This turn, I was able to score Hold Objective 3 and Linebreaker for 2 points to tie up the maelstrom score. I chose Hold Objective 3 and Behind Enemy Lines for my next two objectives.

Given the time constraints, this was likely to be the last turn of the game. The Vanguard Veterans and Watch Captain came out of the ruins to target the last Tervigon. The Watch Master fell back as the Kill Team in the Rhino finally disembarked to bring their Frag Cannons to bear. The Corvus Blackstar went into hover mode to remain in place and target the enemy units.


The Kill Team fired their Frag Cannons at the Tervigon, wounding it five times, but only a single wound went through its armour. The squad's Bolters managed to take another wound from it. Finally, the Vanguard Veterans fired at the creature, managing to wound it a single time and slay it! Five Termagants died as the creature succumbed.
The Corvus Blackstar fired on the Termagants, killing 20 of the squad with its combined firepower.
One Kill Team fired its missile launchers at the Malanthrope. One hit and wounded, managing to take 6 wounds from the creature. The Stalker Bolters of the squad killed three more Termagants. The Drop Pod fired at the Malanthrope and managed to take one more wound.
My three squads attempted to charge the Malanthrope (Vanguard Veterans, Watch Captain and Kill Team 5), but no squad managed to make the charges.

With that, the game was over. The final scores were as follows:
Tyranids: Kill Points- 35 Power level. Maelstrom- 5, First Strike, King of the Hill.
Deathwatch: Kill Points- 67 Power level, Maelstrom- 5, First Strike, Slay the Warlord.
 |
| End of the game. |
AFTER-BATTLE THOUGHTS
Thanks to Victoria for a great game of 40k. I actually expected it to be a lot closer, which it may have been if not for her horrendous luck during the game.
Victoria was really unlucky with so many of her rolls during the game. After killing off the Assassin with some lucky shots in turn 1, it was really downhill from there, with a flurry of well below average rolling and some horrendous failed charges. This was slightly made up for by rolling up Behind Enemy Lines so often. We both had a unit in the enemy deployment zone from turn 1 onwards, but I was simply unable to roll this maelstrom objective more than once during the game.
I think that my plan worked well. I was able to use the Frag Cannons and Corvus Blackstar on one flank to eliminate the big unit of Termagants and cause some serious damage to the Tervigon. It was simply then a case of going after the rest of the army and trying to cause as much damage as possible.
With a win in game 1, but not at the full tournament points, I was hoping my opponent for game 2 would be a bit friendlier than some of the armies likely to be at the top of the tables.
Good Win; great to see you get some dice luck at long last. Well earned. I look forward to reading about the rest of the tournament. The Watchmaster does real work it seems...he's going to be up next on my painting desk thanks to the tales of your results to date.
ReplyDeleteThe Watch Master does a lot of work in the list. He is very tough and provides some brilliant buffs to the rest of the army.
ReplyDeleteWell done buddy, nice to see your advanced tactics at work again :) The Hierodule looked impressive, but I guess that's a lot of points to sink into something that can most of the time only delete a small unit each turn if your opponent is as careful as you are. Congrats!
ReplyDeletehaha, cheers Chris! Don't worry, not too many Deathwatch reports left now. Got some great White Scars and Ravenwing reports due in the following weeks.
DeleteHehe, I'll simply cheer for the opponent most of the time ;) And your batreps are good no matter the army your play, I always look forward to them. White Scars sounds great! Ravenwing is on the same level as Death Watch for me though hahaha sorry. Genestealers!
DeleteGood stuff pal, sounds like you managed to turn the luck your way for once!
ReplyDeleteCheers Nick, for once things seemed to go my way!
DeleteHaving to move 100 models, only to have them fail the charge and get spanked by overwatch is deeply depressing.
ReplyDeleteGreat report mate and glad you enjoyed the tournament
ReplyDeleteCheers Martin! Tournaments at Wargames are always a blast, but I mostly come for the food ;)
Delete