
A brief break in my Genestealer Cults reviews to bring you this week's battle report, which sees my Orks take on Innes' Tyranids in the Crusade mission. Innes and I have fought one another a number of times, mostly in competitive practice games or tournament games. This time we decided to go for a game using slightly less competitive armies from our collections, me with my Orks and Innes with his Tyranids.

My army consisted of:
Warboss- Power Claw, Eavy Armour, Bosspole (with B2)
Painboy (with B2)
30 Shoota Boyz- Nob with Power Claw and Bosspole. (B1)
30 Slugga Boyz- Nob with Power Claw and Bosspole. (B2)
12 Slugga Boyz (B3)
12 Slugga Boyz (B4)
Trukk- Extra Armour (T1)
12 Shoota Boyz (B5)
Trukk- Extra Armour (T2)
15 Lootas (L)
Scorcha (S1)
Scorcha (S2)
Scorcha (S3)
3 Killa Kans- Grotzookas (KK)
Deff Dread- Scorcha, 3 Power Claws, Extra Armour (DD)
My Warlord trait was Prophet of the Waaagh, a nice bonus for my large mobs of boyz.
Innes' army consisted of:
The Swarmlord (with TG)
2 Tyrant Guard- Crushing Claws (TG)
Lictor (L)
Venomthrope (V)
3 Zoanthropes- Neurothrope (Z)
8 Genestealers- Broodlord, Scything Talons (G1)
20 Hormagaunts (H)
30 Termagaunts (T)
3 Ripper Swarms (RS)
10 Gargoyles (G2)
Carnifex- Crushing Claws, Scything Talons, Bio-plasma, Spine Banks (C)
Mawloc (M)
His psychic powers were:
Zoanthropes- Warp Blast, The Horror, Spirit Leech
Swarmlord- Warp Blast, Catalyst, Onslaught, The Horror
A nice big swarm of Tyranids to face my nice big mob of Orks. We rolled for the mission and got Crusade with 5 objectives. We decided to deploy the objectives in the middle half of the board to "encourage" a big fight in the centre.
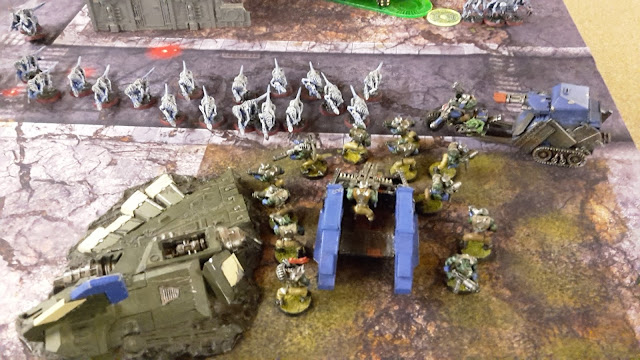
I won the roll for deployment and chose to go first. I deployed my two big mobs of Orks in the centre of the board, ready to advance, with the Killa Kans and Deff Dread in front of them. The Lootas went in the ruins to the left, with a Trukk and two of the Scorchas beside the ruins. The other trukk and scorcha went on the right flank.
Innes then deployed the Swarmlord and Tyrant Guard in the centre, shielded by the Gargoyles. The Zoanthropes, Venomthrope and Carnifex went beside them. The Gaunt units went on either side of the gargoyles.
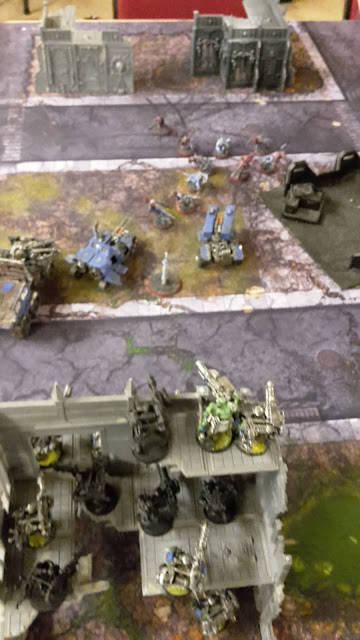
He chose to infiltrate the Genestealers towards the Lootas and the Lictor went in the ruins on his left flank.


Night Fighting was in effect in turn one and Innes failed to seize, giving me the first turn.
TURN 1- ORKS

The Ork hordes advanced, moving quickly towards their adversary. On the left flank, the Trukk and Scorchas moved up to engage the Genestealers.


In the shooting phase, a Scorcha opened fire on the Genestealers, killing one of the squad. The Killa Kans fired their Grotzookas at the alien menace, killing another three of the squad. The Shoota Boyz opened fire at the squad, but failed to cause any damage.
The Lootas fired their Deffguns at the Genestealers (with 3 shots each), wounding the squad 9 times and putting two wounds on the Broodlord after their saves. The Trukk opened fire with its Big Shoota, wounding once, but failing to get past their cover save.
TURN 1- TYRANIDS

A nice big swarm of Tyranids to face my nice big mob of Orks. We rolled for the mission and got Crusade with 5 objectives. We decided to deploy the objectives in the middle half of the board to "encourage" a big fight in the centre.
I won the roll for deployment and chose to go first. I deployed my two big mobs of Orks in the centre of the board, ready to advance, with the Killa Kans and Deff Dread in front of them. The Lootas went in the ruins to the left, with a Trukk and two of the Scorchas beside the ruins. The other trukk and scorcha went on the right flank.
Innes then deployed the Swarmlord and Tyrant Guard in the centre, shielded by the Gargoyles. The Zoanthropes, Venomthrope and Carnifex went beside them. The Gaunt units went on either side of the gargoyles.
He chose to infiltrate the Genestealers towards the Lootas and the Lictor went in the ruins on his left flank.


Night Fighting was in effect in turn one and Innes failed to seize, giving me the first turn.
TURN 1- ORKS

The Ork hordes advanced, moving quickly towards their adversary. On the left flank, the Trukk and Scorchas moved up to engage the Genestealers.


In the shooting phase, a Scorcha opened fire on the Genestealers, killing one of the squad. The Killa Kans fired their Grotzookas at the alien menace, killing another three of the squad. The Shoota Boyz opened fire at the squad, but failed to cause any damage.
The Lootas fired their Deffguns at the Genestealers (with 3 shots each), wounding the squad 9 times and putting two wounds on the Broodlord after their saves. The Trukk opened fire with its Big Shoota, wounding once, but failing to get past their cover save.
TURN 1- TYRANIDS

The Tyranids saw the Ork lines surge towards them and followed suit, moving up to engage the Greenskins.


In the psychic phase, the Zoanthropes cast Spirit Leech on the Slugga Boyz, slaying 6 of the squad. They then fired a Warp Blast at the Deff Dread, penetrating it twice. The Night Fighting saved one of the shots, but the Deff Dread was shaken by the attack.
The Swarmlord cast The Horror on the Lootas, pinning the squad (after I rolled a one on the Mob rule table). The Zoanthropes attempted to cast The Horror on the Slugga Boyz mob, but failed to manifest the power.
The Hive Mind cast Catalyst on the Hive Guard and Genestealers and Onslaught on the Termagaunts.
The Termagaunts opened fire on the nearby Trukk, glancing the enemy vehicle once. The rest of the Tyranid swarm ran forward to close with the enemy.
The Hormagaunts attempted to assault the Scorcha, but failed to make the distance.
Turn 1 has seen few casualties on both sides, but the forces were getting closer to one another and were ready to clash.
TURN 2- ORKS

The turn began with the Ork Warboss bellowing a great Waaagh to urge his troops forward (my own Waaagh was deemed utterly pathetic by Innes).
The Ork mobs in the Trukks disembarked to target the Gaunt units in front of them, while the main lines moved up to engage the enemy.


The Scorcha on the right flank opened fire on the Termagaunts, killing 6 of the squad. The Shoota boyz from the trukk fired at them, killing another 4.
The other two Scorchas fired on the Genestealers, killing the rest of the squad and leaving only the Broodlord. The mob of Shoota Boyz opened fire on the Broodlord. Despite firing 60 shoota shots, they only took a single wound from the Broodlord, but it was enough to kill him. The Lootas opened fire on the Venomthrope (once more with 3 shots each), but only managed a single wound from the attack.

In the assault phase, the Ork Mob on the right flank charged the Termagaunts. The Gaunts struck first but failed to cause any wounds. In reply, the Orks brought down a futher 12 of the Termagaunts, killing enough for them to no longer be locked in combat.

The Killa Kans failed a 3" charge on the Gargoyles, while the Deff Dread also failed a charge on the Zoanthropes.
The Slugga Boyz charged the Gargoyles. The Gargoyles brought down one Ork before being wiped out by the charging Orks.


The Slugga Boyz on the left flank charged the Hormagaunts. Four Orks were slain in the assault, while the Orks succeeded in killing eight of the Hormagaunts. Both sides remained locked in combat.

TURN 2- TYRANIDS

The Mawloc arrived, bursting from the ground beneath the Slugga Boyz, slaying two of the squad in the process. The Tyrant Guard and Swarmlord advanced on the Warboss' unit, while the Lictor moved up to engage the shoota boyz on the left flank.


The Zoanthropes cast Spirit Leech on the slugga boyz, killing two of the squad. The Swarmlord cast catalyst on the Carnifex and his own squad. The Zoanthropes fired their Warp Blast at the Deff Dread, destroying the enemy walker.
The Carnifex fired at the Killa Kans, destroying one of the squad and shaking the rest. The Lictor and Termagaunts fired at the Shoota Boyz, killing one of the squad.
The Termagaunts charged the Shoota Boyz, losing two of the squad to overwatch fire, causing them to fail the charge. The Lictor joined them in the assault. The Lictor struck at the Orks, killing three of the squad. The Orks struck back at the Lictor, wounding it three times, but his 5+ save held and it was unharmed. The Orks failed their morale check and were cut down as they fled from combat.

The Hormagaunts struck at the Slugga Boyz, killing 5 Orks and losing 3 when the greenskins struck back. The Orks failed their morale test and were cut down. (It was only in the following turn I realised that both squads were Fearless thanks to the Waaagh being called, but it was too late to correct then).

The Swarmlord led the Tyrant Guard in an assault on the Slugga Boyz mob in the centre. The Swarmlord issued a challenge that the Nob accepted. He was easily cut down along with two other boyz. The Orks struck at the Tyrant Guard, wounding 3 times, but failing to get past their armour. The Tyrant Guard struck down another 4 Orks. The Warboss struck at the Tyrant Guard, wounding them 3 times with his power claw. The Orks lost the combat, losing another 2 from the squad thanks to the Mob Rule.


The Carnifex attempted to charge the Killa Kans, but failed the 3" charge.
The Orks had caused some damage on the Tyranid lines, but the reply from the Hive Mind had been equally brutal. Annoyingly, I don't play my Orks too often and forgot that I should have been Fearless that turn thanks to my Warlord Trait. That cost me two units of boyz.
TURN 3- ORKS

The two Scorchas on the left flank advanced on the Hormagaunts, while the Scorcha on the right moved after the Termagaunts. The Killa Kans advanced on the Carnifex.


The two Scorchas opened fire on the Hormagaunts, killing eight of the squad and forcing the survivors to flee. The third Scorcha wiped out the Termagaunt unit. The Lootas fired at the Mawloc, wounding it three times. The Shoota Boyz then opened fire on the monstrous creature, killing it.

The Killa Kans assaulted the Carnifex, wounding it once with their attacks. The Carnifex struck back, penetrating one of the Kans and immobilising it.
In the main assault, the Swarmlord struck down the Painboy and three more Orks. The Orks failed to cause any damage and the Warboss struck down one of the Tyrant Guard. The Orks lost the combat, losing another boy to mob rule.

TURN 3- TYRANIDS

The Rippers failed their Instinct role and began eating themselves, while the Hormagaunts fled from the battlefield. The Lictor and Zoanthropes advanced on the Ork vehicles on the left flank.


In the psychic phase, the Swarmlord cast Catalyst on the Carnifex and himself. The Zoanthropes failed to cast The Horror and Spirit Leech on the Shoota Boyz.
In the assault phase, the Lictor charged the Scorcha, wrecking it. The Zoanthropes assaulted the Trukk, but failed to cause any harm.


The Swarmlord struck down the Warboss and two of the Orks, for no loss in return. The Ork mob fled and was brutally cut down as they ran.
The Killa Kans failed to harm the Carnifex and were destroyed in return.

TURN 4- ORKS

The fragile Ork vehicles retreated from the Tyranid creatures, while the Shoota Boyz advanced on teh Swarmlord.


The Lootas opened fire on the Swarmlord (getting three shots each once more). They caused 12 wounds on the Tyranid warlord, four of which made it through his armour. The Shoota Boyz opened fire on the Swarmlord, wounding it twice with their 60 shots, but both were saved.
The two Trukks fired at the Venomthrope, wounding it twice, but Innes made both his 5+ saves.
The Shoota Boyz assaulted the Swarmlord. They only hit 8 times with their 33 attacks and caused no wounds. In reply, the Swarmlord cut down 4 boyz. The Orks failed their morale check, but the Mob Rule kept them fighting for the loss of one Ork.

TURN 4- TYRANIDS

The Carnifex advanced on the Lootas, while on the left flank, the remaining Tyranids moved up on the surviving Orks. The Ripper Swarm failed their instinctive behaviour once more.


The Zoanthropes launched Spirit Leech at the Slugga Boyz, killing the rest of the squad. The then fired a Warp Blast at the Trukk, blowing it up. The Swarmlord then cast Catalyst on himself and the Carnifex.
The Carnifex fired on the Lootas, killing 2 of the Squad. It then attempted to charge the squad, failing to make the distance, but taking a wound in overwatch fire.
The Swarmlord killed another four Orks. The greenskins struck back, wounding it once but failing to get past its armoured hide. The Orks lost combat and lost another boy to the mob rule.
At the end of turn 4, things were very close. We both had a few units left to grab the objectives, but the Swarmlord and Carnifex were still running around to cause me problems.
TURN 5- ORKS

The two Scorchas moved to take the objectives, while the Trukk moved to secure Linebreaker.


The Lootas opened fire on the Carnifex, wounding it once.
In the assault phase, the Swarmlord killed three Orks and the Greenskins were finally able to take its last wound.

TURN 5- TYRANIDS

The Carnifex continued its advance on the Lootas, while the Lictor and Zoanthropes moved up on the Shoota Boyz.

In the psychic phase, the Zoanthropes attempted to cast Spirit Leech on the Shoota Boyz, but the attempt was blocked. They then tried a Warp Blast on the nearby Scorcha, but failed to manifest the power.
The Carnifex fired on the Lootas, killing three of the squad. It then assaulted the unit, killing four of the squad. The Lootas broke and were cut down as they tried to flee.
The Lictor charged the Shoota Boyz, taking two wounds from overwatch fire. The Zoanthropes attempted to charge, but failed to make the distance. The Lictor struck at the Orks, killing 5 of the squad. The Orks struck back, killing the Lictor and consolidating onto the nearby objective.

We rolled to see if the game would continue and it did not. I had scored 4 objectives and three secondaries. Innes had scored one objective, Slay the Warlord and Linebreaker.
 |
| End of the game. |
VICTORY POINTS:
Orks- 12
Tyranids- 5
AFTER-BATTLE THOUGHTS
Thanks to Innes for a fun and close game. It was certainly a lot more casual than our regular games, but no less exciting.
Our big brawl in the middle didn't really come to pass, as the two big Gaunt mobs went to either flank while my mob in the centre had little issue with the Gargoyles. However, things came apart for the Slugga Boyz when they met the Swarmlord. His instant death attacks slaughtered the three characters in the mob in short order over 3 turns of combat. This meant my mob turned and fled and were cut down by the Swarmlord alone, despite there still being about 20 models in the unit. It took a lot of firepower from the Lootas to take off his wounds and about 3 turns for the Shoota Boyz to take his final wound in combat.
Annoyingly, I lost my two trukk boyz mobs after I forgot that they were Fearless on turn 2 thanks to my warlord trait. I don't think it would have made too much difference to the game, it might have allowed me to kill the Lictor a bit earlier.
Overall, a very fun game with two armies that we rarely use.
See everyone? Turns out I can write a reasonable list! This game was great fun, although the fearless mistake put a bit of a damperner on it. Still had a great time, and proved conclusively that the Swarmlord is a true Beast!
ReplyDeleteI fear facing a Swarmy! It always kicks butt. I'd make it my long range firepower target priority!
DeleteYeah Innes, you can write a reasonable list, but I bet a bit of you died inside when you did ;)
DeleteAlso Siph- "long range firepower target priority"?!? My Orks don't recognise these alien words.
DeleteHow many Skyfire Mek Guns did the original list have Mr Fair Player? And yes. Physical pain was involved when writing the list.
DeleteLove it! Just about everyone dies is a great way to have a battle report. Hope all enjoyed it. Thanks for writing it up and sharing.
ReplyDeleteThe bonus of this kind of game is that I have less and less to write as the report goes on!
DeleteGreat battle report, loads of photos thanks, love reading these and appreciate the effort of putting these together for us.
ReplyDeleteNo problem Siph, hopefully I'll sort out a new club soon and can keep them coming.
Deletebest reports are when theres no one left on either side lol
ReplyDeleteAwesome batrep. That swarmlord put in some major work! It sounds like a brutal and fun game. Lots of casualties on either side and close til the end. Those are the best games in my opinion.
ReplyDeleteThis is an awesome report! Had a lot of fun reading it. what software did you use to design the maps? I love them!
ReplyDeleteCheers, glad you enjoyed it. The maps were made using a program called Battle Chronicler.
Delete