
Game 2 of the London GT saw my Dark Angels take on a mixed force of Space Marines, including Blood Angels, Raven Guard and Adeptus Custodes, commanded by Phil. This was my first time taking on the dreaded Custodes Shield Captains, so I was interested to see what they could do.

The Eternal War mission was No Mercy, so kill points for each enemy unit destroyed. The Maelstrom of War mission was Spoils of war. This gives you three tactical objective cards per turn, you cannot discard "Secure Objective X" cards and can steal your opponent's "Secure Objective X" cards. We were using Dawn of War deployment.

The Eternal War mission was No Mercy, so kill points for each enemy unit destroyed. The Maelstrom of War mission was Spoils of war. This gives you three tactical objective cards per turn, you cannot discard "Secure Objective X" cards and can steal your opponent's "Secure Objective X" cards. We were using Dawn of War deployment.
My army consisted of:
Battalion Detachment
Azrael (Az)
Primaris Lieutenant- Master-crafted Auto Bolt Rifle (L)
Primaris Ancient- Bolt Rifle (An)
5 Intercessors- Bolt Rifle (I1)
5 Intercessors- Bolt Rifle (I2)
5 Devastator Squad- Heavy Bolter, Bolters, Armorium Cherub (D)
5 Scouts- Bolters, Heavy Bolter, Chainsword (S1)
5 Scouts- Bolters, Chainsword (S2)
5 Scouts- Bolt Pistols, Shotguns (S3)
10 Hellbalsters- Plasma Incinerators (H)
Outrider Detachment
Sammael (S)
5 Black Knights- Plasma Talons, Corvus Hammers (BK)
4 Ravenwing Bikers- Flamer, Twin Bolters, Storm Bolter (RB1)
4 Ravenwing Bikers- Meltagun, Twin Bolters, Storm Bolter (RB2)
3 Ravenwing Bikers- Twin Bolters, Storm Bolter, Plasma Gun (RB3)
3 Ravenwing Bikers- Twin Bolters, Storm Bolter, Plasma Gun (RB3)
Ravenwing Darkshroud- Assault Cannon (D)
10 Command Points


Phil's army consisted of:
Battalion Detachment (Blood Angels)
Captain- Angels Wings (Relic Jump Pack), Thunder Hammer, Storm Shield, WARLORD (C1)
Lemartes (L)
5 Scouts- Bolters, Sergeant has Chainsword (S1)
5 Scouts- Bolters, Sergeant has Chainsword (S2)
5 Scouts- Bolters, Sergeant has Chainsword (S3)
15 Death Company- Jump Packs, Bolt Pistols, 8 Chainswords, 7 Power Swords (DC1)
9 Death Company- Jump Packs, Bolt Pistols, 5 Chainswords, 4 Power Swords (DC2)
5 Death Company- Jump Packs, Bolt Pistols, 3 Chainswords, 2 Power Axes (DC3)
Supreme Command Detachment (Adeptus Custodes)
Shield Captain- Dawneagle, Hurricane Bolter (SC1)
Shield Captain- Dawneagle, Hurricane Bolter (SC2)
Shield Captain- Dawneagle, Hurricane Bolter (SC3)
Vanguard Detachment (Raven Guard)
Captain- Jump Pack, Storm Shield, Thunder Hammer (C2)
3 Aggressors- Auto Boltstorm Gauntlets, Fragstorm Grenade Launchers (A1)
3 Aggressors- Auto Boltstorm Gauntlets, Fragstorm Grenade Launchers (A2)
3 Aggressors- Auto Boltstorm Gauntlets, Fragstorm Grenade Launchers (A3)
A very assault-heavy army backed up with a lot of S4 firepower. This would be an interesting list to face with my army.
Phil spend a command point to give one of his Shield Captains an extra Relic (I forget which one it was).
My best plan was to use my Scouts to keep the deep striking units back from the bulk of my army. There were a number of kill points I could gain and hoped that I could use my mobile force to steal the maelstrom objectives.
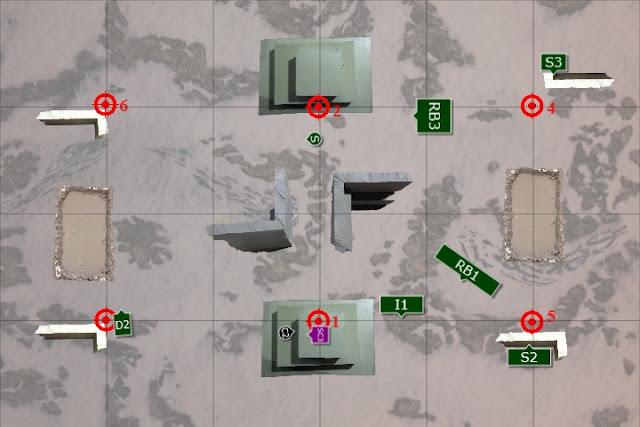
The placement of the objectives was set as shown below:

We then deployed our forces.
Phil got to deploy first, so put one unit of Scouts behind the ruins in the centre of the field. I countered with my own unit of Scouts next to them. I was hoping to cut down the area that enemy deep strikers could arrive. I put one unit of Scouts in the centre, with the other two units just ahead of my main line on each flank.
I put the Hellblasters towards the back of my deployment zone, with the Characters, Black Knights and Darkshroud next to them. The Intercessors went out in front on the right and held an objective on the left. The Devastators held an objective on the left. I spread the Bikers out on the two flanks.
Phil spent three command points on Strike From the Shadows and placed the three units of Aggressors in reserve. He also put two units of Death Company in reserve, along with Lemartes and the two Captains. He deployed the three Shield Captains in the centre, put the Death Company behind the ruins to the right and one unit of Scouts behind the ruins to the left. Another unit of Scouts went in the crater on the left.


I won the roll off for first turn, despite Phil getting the +1. He also failed to seize. Before I started, he deployed the three units of Aggressors. One unit went behind the ruins on the right flank, while the other two went on the left flank. I also spent a command point on Secret Agenda, which I managed to keep thanks to Azrael's warlord trait.
TURN 1- DARK ANGELS
In my first turn, I drew Secure Objective 6, Domination and Hold the Line. Not the best hand to start with, as I would be unlikely to score any of them.

On the left flank, the Ravenwing Bikers used the Speed of the Raven stratagem to advance on the Blood Angels Scouts in the centre, a unit of Dark Angels Scouts moving up to support them.
On the right flank, the Ravenwing Bikers and Black Knights moved up on the Scouts in the crater, while the Intercessors moved up to block off more of the battlefield and the Shotgun Scouts moved to support the Ravenwing on the right.


In the shooting phase, the Ravenwing Bikers and Scouts on the left fired at the Blood Angels Scouts, wiping out the squad.
On the right flank, the Ravenwing fired at the other unit of Blood Angels Scouts, wiping them out as well.


The Hellblasters used Weapons of the Dark Age stratagem and targeted two of the Shield Captains (the whole squad could not see just one of them). The Primaris Marines caused three wounds on one and one wound on another, but the mighty warriors passed all their invulnerable saves.

At the end of my turn, I scored First Blood and two kill points. I discarded Domination. Not the best first turn in terms of score, but I had spread out to make it more difficult for the enemy reserves to land close to my firebase.
TURN 1- BLOOD ANGELS
In his first turn, Phil drew Secure Objective 1, Defend Objective 2 and Defend Objective 3.

On the left flank, the two Aggressor squads advanced to close the distance with the Ravenwing. On the left, the Death Company moved towards the Ravenwing in the centre, accompanied by two of the Shield Captains. The other went to secure the objective. The last squad of Aggressors moved up on the objective beside them.


The Aggressors on the right fired at the Scouts in front of them, killing two of the squad. The Custodes Captains and Death Company fired on the Scouts, killing the other three.
On the left flank, the two units of Aggressors fired at the Bike squad, causing 10 wounds in total. I failed three saves and one Biker perished.


Two of the Shield Captains assaulted the Ravenwing Bikers, accompanied by the Death Company. The overwatch fire did three wounds that failed to get past the armour of the Custodes. The two Captains were easily able to dispatch the Ravenwing Bikers.


At the end of his turn, Phil scored 2 kill points and my Secure Objective 6. I also scored his Secure Objective 1.
VICTORY POINTS;
Dark Angels- 4
Blood Angels- 3
Turn 1 was a close affair. I was only ahead by one point, but there was a lot of the enemy army still to come in.
TURN 2- DARK ANGELS
In my second turn, I drew Secure Objective 1 and Secure Objective 4 to go with Hold the Line.

The Black Knights advanced into the crater, using the Speed of the Raven stratagem to fight to full effect. They were joined by Sammael to further boost their effectiveness. One unit of Bikers and the Shotgun Scouts moved up on the Aggressors, while the Meltagun Bikers moved up into firing range as well.


The Intercessors and Hellblasters in the middle moved up on the hill in front of them.
In the shooting phase, the Meltagun Bikers fired at the Aggressors in front of them, killing two with their firepower. The other unit of Ravenwing Bikers fired on the squad, killing the last member.
The Black Knights used the Weapons From the Dark Age stratagem and fired on the second squad of Aggressors, killing them outright with their Plasma Weaponry.

The Intercessors opened fire on the Death Company, killing one of the squad. The Devastators fired at the Death Company with the Hellfire Shells stratagem, using the armorium cherub as well to wipe out the unit.
The Hellblasters overcharged and fired at the last unit of Aggressors, killing two of the squad.

On the right flank, the Bikers and Scouts assaulted the Blood Angels Scouts. The Dark Angels struck at the squad, killing two of them. The Blood Angels struck back, but were unable to do any damage. Unfortunately, enough of the Scouts survived to claim the objective.

At the end of my turn, I scored three kill points, Secure Objective 1 and Hold the Line. Phil also scored his Defend Objective 2 and my Secure Objective 4. A good round of scoring by both players had put the score at 9-6 to me, but Phil still had a turn in hand. The rest of his reserves were due to come in, could they turn the tide in the battle?
TURN 2- BLOOD ANGELS
In his turn, Phil drew Overwhelming Firepower, Secure Objective 6 and Secure Objective 6.

The lone Aggressor moved behind the cover of the ruins, but still held the objective. The two Shield Captains moved up on the Hellblasters on the hill, while the other Shield Captain moved towards the centre of the battlefield.


At the end of the turn, the reserves arrived. The two Captains and Lemartes landed on the other side of the ruins in the centre, while the two squads of Death Company landed on the right flank.
In the shooting phase, one Shield Captain fired at the Intercessors on the left, killing one of them. The other fired at the Darkshroud, wounding it once. The final Shield Captain fired at the Devastators, killing two of the squad with his Hurricane Bolter.

In the charge phase, the Blood Angels Captain used the Descent of Angels stratagem and charged the Hellblasters. He was joined by Lemartes (who rolled an 11" charge) and the two Shield Captains. Both Death Company units were able to make their 9" charges into the Intercessors and Devastator Squad.
The Shield Captain attacked the Ancient, wounding him 5 times. I made three invulnerable saves to leave the Ancient on a single wound. Lemartes attacked the Hellblasters, killing two of the squad. One Hellblaster got to fight back (thanks to the Ancient) and was able to wound Lemartes. The other Characters had to wait to fight because of the Eye of the Unseen Relic the Lieutenant carried.


The Death Company struck at the Dark Angels, wiping both squads out with a savage fury.
The Blood Angels Scouts then struck, killing one of the Ravenwing Bikers. The Ravenwing Biker and Dark Angels Scouts struck back, but could not finish off the Blood Angels Scouts.
Azrael then attacked the Blood Angels Captain, wounding him four times. He passed three saves (thanks to a command point re-roll) and took 2 damage. The Ancient then attacked the Shield Captain, wounding him once, while the Hellblasters took another wound from Lemartes.


The Custodes Shield Captain struck at the Hellblasters, killing one of them. The Blood Angels Captain attacked Azrael, only hitting and wounding once, but I made my save. Phil then used a Stratagem (and the last of his command points) to attack again with the Shield Captain and he killed three more Hellblasters.
At the end of his turn, Phil scored Secure Objective 6 twice and two kill points. He discarded Overwhelming Firepower.
VICTORY POINTS;
Dark Angels- 9
Blood Angels- 10
A good second turn had seen Phil go ahead in points. I was going to have to have a good next turn to bring the score back.
TURN 3- DARK ANGELS
In my turn, I drew Secure Objective 1, Secure Objective 3 and Assassinate.

The Lieutenant, Ancient and Hellblasters fell back from combat towards the Death Company, the Darkshroud moving over to support them. I used the Intractable stratagem on the Hellblasters to allow them to shoot.


The Black Knights, Sammael and the Intercessors moved back to help Azrael. The Ravenwing Biker and Scout fell back from combat with the Blood Angels Scout, while the Meltagun Bikers moved up to target them.
In the shooting phase, I used the Weapons of the Dark Age stratagem on the Black Knights and overcharged their shots at the Shield Captain. I managed to do 6 wounds with a command point re-roll and the Custodes Captain was slain.


Sammael opened fire on Lemartes, wounding him once. The Intercessors added their firepower, slaying him.
The Hellblasters overcharged their Plasma Interceptors at the Death Company, killing four of the squad. The Darkshroud killed one more in the squad.
The Ravenwing Bikers fired at the Blood Angels Scouts, killing the squad.
In the fight phase, Azrael struck at the Blood Angels Captain, wounding him four times and killing him.
At the end of my turn, I scored four kill points, Slay the Warlord, 2 points for Assassinate and Secure Objective 1. Phil scored my Secure Objective 3.
TURN 3- BLOOD ANGELS
In his third turn, Phil drew Defend Objective 4, Secure Objective 5 and Kingslayer.

The Death Company moved up on the Dark Angels lines, one squad leaping over to get to the Ancient, while the Raven Guard Captain moved over to the Lieutenant. The two Shield Captains moved up on the Black Knights and Sammael.


In the shooting phase, the Death Company fired at the Intercessors, taking a wound from them. The other unit of Death Company fired at the Ancient, but failed to do any damage.
The two Shield Captains fired their Hurricane Bolters at the Black Knights, killing two of the squad.
The Shield Captain charged the Black Knights. I overcharged the Plasma Talons, the Shield Captain was unharmed, but the two Black Knights died to the overheating shots. The other Shield Captain charged Sammael.


The Death Company assaulted Azrael and the Hellblasters, two of the Blood Angels dying to overwatch fire. The Raven Guard Captain charged the Lieutenant, while the other Death Company unit charged the Ancient.
The Death Company attacked the Azrael and the Hellblasters. Two of the Primaris Marines fell, while Azrael took four wounds after using his free save re-roll. The other unit of Death Company killed the Ancient.
The Shield Captain attacked Sammael, wounding him four times. I failed one save and the Ravenwing Master took one wound.


I attacked back. Azrael killed the unit of three Death Company. The Lieutenant managed to put a single wound on the Raven Guard Captain. Sammael then struck at the Shield Captain, wounding him four times. Phil failed three saves and left the Captain on one wound.
At the end of the phase, the Raven Guard Captain struck at the Lieutenant, easily dispatching him.
At the end of his turn, Phil scored three kill points. I also scored one kill point and his Secure Objective 5. He discarded Defend Objective 4.
VICTORY POINTS;
Dark Angels- 19
Blood Angels- 14
A good third turn for me had seen me take the lead once more. I had some good fortune in killing off the three characters in my third turn, taking out much of the punch of the enemy army. However, there was still a big unit of Death Company rampaging in my lines.
TURN 4- DARK ANGELS
In my fourth turn, I drew Secure Objective 6, Defend Objective 3 and Blood and Guts. A bad round, as I would be unlikely to score any of these in my turn.

The Ravenwing Bikers used the Speed of the Raven stratagem to advance on the Shield Captain beside the Intercessors, while Sammael fell back towards the enemy deployment zone. The Ravenwing Bikers moved up to support him. The Darkshroud moved over to secure the objective.


In the shooting phase, Sammael fired at the Aggressor, wounding him once. The Darkshroud added its firepower, killing him.
The Bikers and Intercessors fired on the wounded Shield Captain, wounding him six times, but he made all his armour saves. Both Meltaguns hit and wounded, but failed to get past his invulnerable save. The Scouts added their firepower and were fortunately able to take his final wound.
In the fight phase, Azrael struck at the Death Company, killing four of the squad. The Death Company survivors killed the last of the Hellblasters in combat. They also did 3 wounds on Azrael, but failed to get past his invulnerable save.
I then spent 3 command points on Honour the Chapter to allow Azrael to attack again. He dispatched another 5 of the Death Company. In the morale phase, the rest of the Death Company squad were destroyed.
At the end of my turn, I scored three kill points and discarded Blood and Guts. Phil also scored a kill point.
TURN 4- BLOOD ANGELS
In his turn, Phil drew Kingslayer, Secure Objective 4 and Psychological Warfare

The Shield Captain and Raven Guard Captain moved up on Azrael. They opened fire on the Dark Angels Warlord, wounding him four times and failing to get past his armour.

They then assaulted him. The Raven Guard Captain struck at Azrael, hitting and wounding three times. I failed all three saves and Azrael perished.

I used the Only In Death stratagem to attack with Azrael. He put two wounds on the Raven Guard Captain, but Phil made both invulnerable saves.

At the end of his turn, Phil scored one kill point, Slay the Warlord and Kingslayer for 2 points. I also scored Defend Objective 3 and Phil's Secure Objective 4.
VICTORY POINTS;
Dark Angels- 25
Blood Angels- 19
With that, we ran out of time for the game. I also scored Linebreaker, putting the score at 26 to 19 for the Dark Angels. Another win for the Unforgiven.
AFTER-BATTLE THOUGHTS
Thanks to Phil for a fun and very tactical game. I really did not know how this one was going to turn out at the start of the game.
I think had Phil got the first turn, things could have gone very differently. He would not have been able to assault me on turn 1, but he could have been much more aggressive with his Aggressor squads and did a lot of damage with their firepower. As it was, he said he just wasted three command points to deploy them in his own deployment zone.
Even though I won the game, there were a few things I could have done better. In my second turn, I should have pushed the unit of Intercessors on the left flank towards the ruins in the centre of the battlefield. This would have forced his reserves to deploy further back and may have stopped them going after the Hellblasters on turn 2.
Phil also got lucky with his charges on turn 2. The Blood Angels Captain was fair enough, rolling a charge on 3D6. However, he made three out of four 9" charges on turn 2, with only the Raven Guard Captain failing. Even with Lemartes' re-rolls, that was still above average and meant he could decimate my left flank.
The Eye of the Unseen was a key Relic in this game. Forcing the enemy characters to strike last when within 3" of the Lieutenant was great and helped contribute to keeping Azrael alive for a bit longer. I underrated this Relic, but in the right circumstances it is very effective.
Had the game gone on another turn, I'm not sure how it would have played out. I probably would have lost another unit or two to the two enemy characters. I'm not sure I had enough firepower left to deal with them. Maybe if the Meltagun Bikers got lucky and Phil had some poor invulnerable saves, I might have killed another. Depending on the maelstrom cards drawn, I might have been able to score a few more points.
The game times were as follows:
Game Start- 14.50
Deployment- 30 mins
DA Turn 1- 11 mins
BA Turn 1- 15 mins
DA Turn 2- 18 mins
BA Turn 2- 37 mins
DA Turn 3- 9 mins
BA Turn 3- 25 mns
DA Turn 4- 8 mins
BA Turn 4- 8 mins
Excluding deployment, my turns totalled about 45 mins, compared to 85 mins for the Blood Angels turns. Turn 2 was particularly long, with so many reserves arriving and so many combats to fight. Had I lost the game, I might have been a bit annoyed after totalling up the turns, as my opponent had almost double the game time that I had for my turns.
So, I was two wins for two games on day 1. Unfortunately, as I have detailed elsewhere, I was unable to play my third game of the day thanks to the huge delays in starting the tournament. Unfortunately, that meant a 20-0 loss on the third game, which would tank my placement in the standings. I had no hope of winning the event, but had hoped to do well with my army.
As it was, my first day of the tournament ended earlier than expected, but at least I could relax and get some food (which many people struggled with at lunch, myself included).
Great battle report Mike. Thanks for taking the effort to put together.
ReplyDeleteThanks, Siph!
DeleteGreat battle report. It was interesting to see the shield captains and jump captains in action, they appear as nasty as I've read.
ReplyDeleteI'm also considering using Raven Guard Aggressors but they seem very dependent on going first, what did you think of them ?
Cheers Rathstar!
DeleteI think the Aggressors can be strong, but they are quite short ranged. That's why the Raven Guard stratagem helps for getting them in close to the enemy army. The risk is that you go second and don't get to use them properly. They didn't do a huge amount of damage in this game though. That's the first time I've come up against them.