
This article will show you how to paint up your Genestealer Cult Acolyte Hybrids in a similar fashion to the ones that have appeared on this blog.


The credit for this scheme goes to the awesome "How to Paint" series from Warhammer TV for the Acolyte Hybrids. I use a simplified version of this scheme for my own units.
The paints you will need for this process are:
- Standard Mechanicus Grey Undercoat
- Administratum Grey
- Pallid Wych Flesh
- Agrax Earthshade
- Jokaero Orange
- Troll Slayer Orange
- Fire Dragon Bright
- Abaddon Black
- Standard Mechanicus Grey
- Dawnstone
- Leadbelcher
- Runelord Brass
- Stormhost Silver
- Nuln Oil
- Kantor Blue
- Alaitoc Blue
- Hoeth Blue
- Pink Horror
- Daemonette Hide
- Druchii Violet
- Slannesh Grey
- Yriel Yellow
- Evil Sunz Scarlet
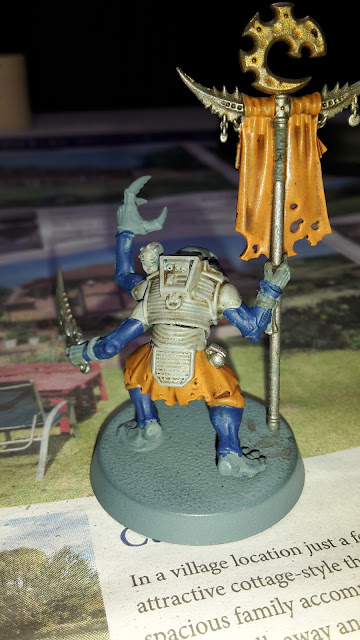
The first step (after cleaning and assembling your models of course) is to undercoat the model with Standard Mechanicus Grey.
Once undercoated, paint the cloth areas/jump suit with a couple of thin coats of Joekero orange. I use a roughly 1:1 mixture of water with the paint. Don't worry about being too neat, any mistakes will be covered up by the next layers. Just ensure that you don't paint over previous layers, or clean them up when you do.


Then, paint the armour sections with a couple of thin coats of Administratum Grey.


Paint the metal parts with Leadbelcher. This includes weapons, chains, the respirator mask, etc.

 Paint the holsters and any tubing you want to pick out with Abaddon Black. Generally only one coat of this is required. Paint the Cult symbol with Runelord Brass.


When all the initial layers are dry, give the model a wash with Agrax Earthshade. Focus on the armour panels and jump suit on the models. Allow the wash to completely dry before moving on (this generally takes much longer than a normal layer).


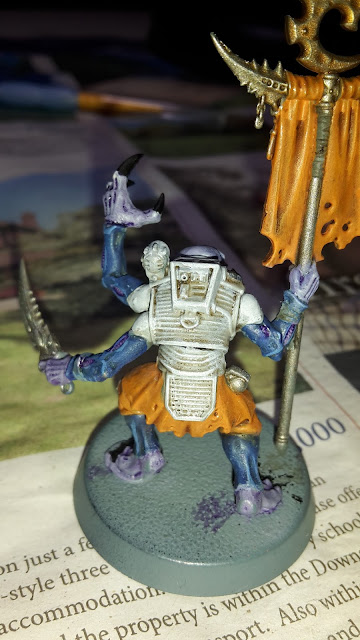
With the base layers done, you can now move on to the chitin plates and skin. Paint the chitin parts of the model with Kantor Blue. Remember to include the ridges on the forehead.

When this is dry, give the chitin sections a wash with Nuln Oil.

 When this is dry, give the chitin sections a drybrush with Alaitoc Blue.


Give the chitin a final highlight with Hoeth Blue. Focus on the raised areas on the chitin, such as the ridges on the underside of the arm, the edges when the chitin meets the skin and the edges of the "oval" sections running down the arm.

 Now you can paint the purple skin on the model. Paint the skin with a couple of thin layers of Daemonette Hide.

 Once complete, give the skin a wash with Druchii Violet.


Highlight the skin with a drybrush of Slannesh Grey.

 Then give a final highlight of Pallid Wych Flesh. Focus only on the bone structure on the face and where the flesh meets the claws on the hands and feet. The teeth can also be painted with Pallid Wych Flesh.


 You can then highlight the armour. Drybrush the armour plates with Administratum grey. Be sure not to get paint in the recesses of the armour or your wash layer will be covered.

 Give the armour a final highlight of Pallid Wych Flesh, focusing on the raised areas of the armour.

You can now finish off the final highlights on the model. Paint the claws on the arms and feet with Abaddon Black. I find it easier to leave the claws till last, as painting the flesh and highlighting them tends to cover the claws, so you would need to repaint them anyway. Once they are dry, you can give them a highlight with Eshin Grey. You can also highlight the black parts of the model (tubing and pouches) with Eshin Grey.

Paint the light on the model with Yriel Yellow. You can also paint the eyes of the model with Yriel Yellow.
Paint the tongue with Pink Horror. Paint the teeth of the model with Pallid Wych Flesh. You can then pick out any additional details you want to. I paint some of the buttons on the armour with Evil Sunz Scarlet.


And that is the model complete. You can now add whatever basing material you want to finish off the model.


I hope you have found this guide useful.
Once undercoated, paint the cloth areas/jump suit with a couple of thin coats of Joekero orange. I use a roughly 1:1 mixture of water with the paint. Don't worry about being too neat, any mistakes will be covered up by the next layers. Just ensure that you don't paint over previous layers, or clean them up when you do.


Then, paint the armour sections with a couple of thin coats of Administratum Grey.
 |
| First coat of Administratum Grey. |


Paint the metal parts with Leadbelcher. This includes weapons, chains, the respirator mask, etc.


When all the initial layers are dry, give the model a wash with Agrax Earthshade. Focus on the armour panels and jump suit on the models. Allow the wash to completely dry before moving on (this generally takes much longer than a normal layer).


With the base layers done, you can now move on to the chitin plates and skin. Paint the chitin parts of the model with Kantor Blue. Remember to include the ridges on the forehead.


When this is dry, give the chitin sections a wash with Nuln Oil.


Give the chitin a final highlight with Hoeth Blue. Focus on the raised areas on the chitin, such as the ridges on the underside of the arm, the edges when the chitin meets the skin and the edges of the "oval" sections running down the arm.


Highlight the skin with a drybrush of Slannesh Grey.


It's now time to highlight the jump suit. Drybrush the cloth with Troll Slayer Orange. Then a final highlight of Fire Dragon Bright, focussing on the raised areas of folds in the fabric.


You can now finish off the final highlights on the model. Paint the claws on the arms and feet with Abaddon Black. I find it easier to leave the claws till last, as painting the flesh and highlighting them tends to cover the claws, so you would need to repaint them anyway. Once they are dry, you can give them a highlight with Eshin Grey. You can also highlight the black parts of the model (tubing and pouches) with Eshin Grey.

Paint the light on the model with Yriel Yellow. You can also paint the eyes of the model with Yriel Yellow.
Paint the tongue with Pink Horror. Paint the teeth of the model with Pallid Wych Flesh. You can then pick out any additional details you want to. I paint some of the buttons on the armour with Evil Sunz Scarlet.


And that is the model complete. You can now add whatever basing material you want to finish off the model.


I hope you have found this guide useful.
Great tutorial, man!
ReplyDeleteCheers Mordian! I thought it would be easy enough to put one together seeing as I take tons of photos of the models anyway. They may not be perfect when up close, but I think it is a really nice scheme on the tabletop.
Delete