My fourth game of the Caledonian Revolution tournament began nice and early on the Sunday morning. I found myself on table 20, going up against Mark and his unholy alliance of Imperial Knights, Ultramarines and Chaos Daemons.
The mission was Emperor's Will (one objective each) with Conact Lost as the maelstrom mission (one card for each objective held).
My army consisted of:
Scarblade Strike Force
Hunting Force
Khan- Moondrakken (with CS)
Command Squad- Bikes, Apothecary, 4 grav guns, 4 storm shields, Banner of the Eagle (CS)
6 Bikers- 2 grav guns, sergeant with power axe and meltabombs (BS1)
6 Bikers- 2 grav guns, sergeant with meltabombs (BS2)
Attack Bike- Multimelta (AB)
6 Scout Bikers- 2 Grenades launchers, sergeant with meltabombs and homing beacon (SB)
Stormbringer Squadron
5 Scouts- bolt pistols, combat weapons, sergeant with meltabombs (S1)
Landspeeder Storm- Heavy Bolter, Cerberus Launcher (LS1)
Landspeeder- Multimelta, Typhoon Missile Launcher (L)
Combined Arms Detachment
Chaplain- Bike, Hunter's Eye, Meltabombs (with CS or C2)
5 Scouts- Bolters, sergeant with meltabombs (S2)
Landspeeder Storm- Heavy Bolter, Cerberus Launcher (LS2)
3 Bikers- 2 meltaguns, sergeant with meltabombs (BS3)
3 Centurions- Grav cannons and grav amps, hurricane bolters (C)
Drop Pod (DP)
Stormhawk Interceptor- TL assault cannon, Skyhammer missile launcher, Las-talon (SI)
Khan was my warlord.
Mark's army consisted of:
Librarius Conclave (LC)
Chief Librarian Tigirius
Librarian- Terminator Armour, Force Stave, Mastery Level 2
Librarian- Terminator Armour, Force Stave, Mastery Level 2
Tripartite Lance
Knight Warden- Gatling cannon (K1)
Knight Gallant- Ionstorm missile pod (K2)
Knight Crusader- Ionstorm missile pod, rapid fire battle cannon, heavy stubber, Gatling Cannon (K3)
Combined Arms Detachment
The Masque of Slannesh (M)
3 Nurglings (N1)
3 Nurglings (N2)
Void Shield Generator- two additional shields. (VSG)
His warlord (one of the Librarians, I think) made me use my lowest Ld when within 12". His psychic powers were:
Tigirius (Geokinesis)- Scorched Earth, Phaseform, Warp Quake
Librarian 1 (Telepathy)- Invisibility, Terrify, Psychic Shriek
Librarian 2- Summoning, Prescience
I was really hoping not to go up against a multiple Knight army in this tournament. To make matters even worse, they would be invisible and have ignores cover shots (thanks to phaseform), so the battle cannon and two Gatling Cannons would shred my bikers without their Jink saves. Fortunately, the three Knights were a single unit, which would limit them somewhat.
I decided that my plan would be one of avoidance. I doubt I could take out the three knights while they were deleting my units each turn. I would go for the maelstrom points to try and match his kill points totals and try and stay out of range of his guns as long as possible. I would take on the Daemons for some easier kill points when they arrived on the board.
We placed the objectives as shown below:
 |
| Objectives for the game. My Emperor's will objective was number 5, William's was number 6. |
Mark won the roll for deployment zone. I won the roll for deployment and chose to go first. I deployed the Command Squad in the centre, with one of the 6-man bike squads on either side. The three man bike squad went to the right flank, with the other units spread out in between.
Mark deployed his army in his right flank. The Void Shield Generator went at the back of the board with the Librarius Conclave deployed on the ramparts. The three Knights deployed in front of the void shield, but still in range. The Daemons remained in reserve.
I infiltrated the Scout Bikers near the forest on my right flank.
For the Hunting Force, my targets were:
Primary- Warlord Librarian
Secondary- Void Shield Generator
Tertiary- Knight 1


Mark failed to seize and I took the first turn.
TURN 1- WHITE SCARS
In the first turn, I drew Demolitions (destroy an enemy building).

The drop pod landed on target in front of the woods, guiding on target by the homing beacon of the Scout Bikers. The rest of the White Scars army moved away from the approaching Knights, only the attack bike moving up to engage.
The Attack Bike fired on the Knights, the multi-melta impacting on one of the void shields and collapsing it.
At the end of my turn, I scored no points and discarded Demolitions.
TURN 1- IMPERIAL KNIGHTS/SPACE MARINES
In his first turn, Mark drew objective 5.
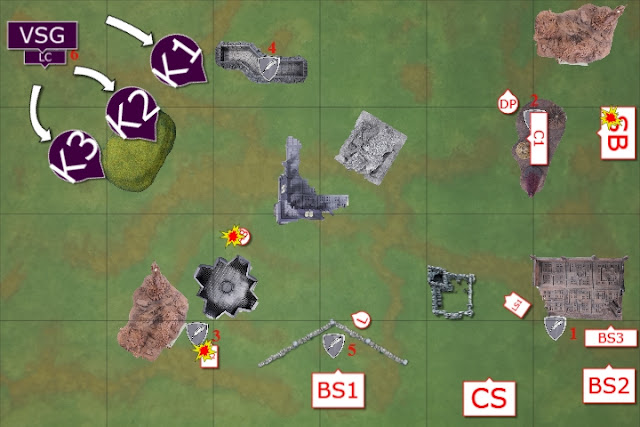
The Imperial Knights advanced on the retreating White Scars.
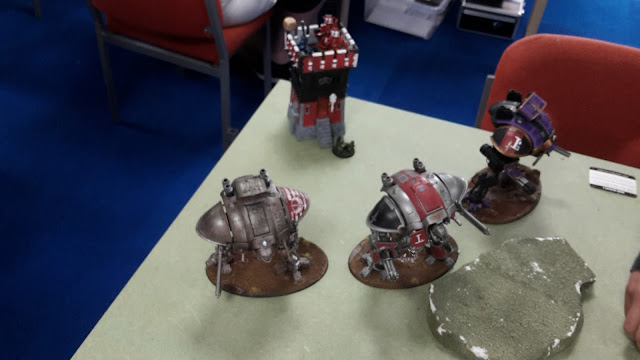
In the psychic phase, the Librarius Conclave summoned the powers of the warp. They cast Invisibility on the Knights, perilling on the process. Mark rolled a 1 on the table, but passed the Leadership test. They then cast Phase Form and Prescience on the Knights.
One Knight fired its missiles at the Scout Bikers, killing two of the squad. The middle Imperial Knight fired at the attack bike with its Gatling Cannon, obliterating the unit. Another Knight fired its missiles at the Scout Bikers, but failed to cause any wounds. The Avenger Gatling Cannon fired at the Landspeeder Storm, destroying the enemy vehicle. The Battle Cannon fired at the Command Squad, killing one of the elite warriors.
At the end of his turn, Mark scored two kill points and First Blood.
VICTORY POINTS:
White Scars- Maelstrom 0, Kill Points 0
Imperial Knights/Space Marines- Maelstrom 0, Kill Points 2
TURN 2- WHITE SCARS
This turn, I drew Assassinate (kill a character), Supremacy (hold 3 objectives), Overwhelming Firepower (kill 3 enemy units in the shooting phase) and Objective 5.

The Stormhawk Interceptor arrived, moving up on the Void Shield Generator, moving inside the range of the shields. The rest of the White Scars stayed away from the Knights.
The Stormhawk fired on the building, penetrating the Generator with is las-talon. The shot detonated the Void Shield Generator, wounding Tigirius twice and one of the Librarians.
At the end of my turn, I scored Supremacy and Objective 5 for three points.
TURN 2- IMPERIAL KNIGHTS/SPACE MARINES
This turn, Mark drew Objective 5 and Big Game Hunter (destroy an enemy vehicle).
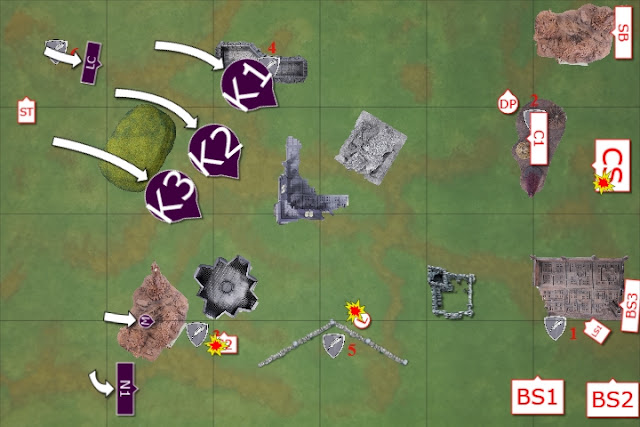
The Masque of Slannesh and one unit of Nurglings arrived from the warp, manifesting near the Scouts on the right flank. The Imperial Knights continued their advance. The Librarius Conclave moved up to support the Knight.
In the psychic phase, the Librarius Conclave cast Invisibility on itself, while casting Phaseform on the Knights.
In the shooting phase, the Masque did a little dance at the nearby Scouts, giving them -5BS (must have been the safety dance).
A Knight fired its missile pod at the Scouts, killing 2 of the squad. The middle Knight fired its Gatling Cannon at the nearby Landspeeder. Amazingly, only one of the 12 shots penetrated, stunning the White Scars skimmer.
The third Knight fired its missiles at the Scout squad, killing another 2. The lone survivor passed his morale test. It's Avenger Gatling Cannon fired on the Centurions, but their armour saved them from harm. It's battle cannon fired at the Command Squad, killing another one of the elite warriors.
At the end of his turn, Mark scored no points. I got off lucky that round. By all accounts, the Gatling Cannon should have shredded the Landspeeder, but some poor rolls from Mark saw it survive.
VICTORY POINTS:
White Scars- Maelstrom 3, Kill Points 0
Imperial Knights/Space Marines- Maelstrom 0, Kill Points 2
TURN 3- WHITE SCARS
This turn, I drew Objective 1, Objective 4, Objective 6, Assassinate, Blood and Guts (kill 3 units in assault) and Overwhelming Firepower.

Khan decided that now was the time to engage, the White Scars units surging forwards to tackle the foe. The Centurions were slowed as they advanced through the forest, only managing to move 2" so that only one warrior could bring his grav cannon to bear on the approaching Knights. The Stormhawk moved to target the exposed rear armour of one of the Knights.
The Landspeeder snap fired at the Masque of Slannesh and managed to slay the warrior outright with its krak missiles.
One of the Centurions fired on the Knight, but failed to cause any damage with its grav cannon. The Flyer fired at the Knight, its las-talon hitting, but failing to get past the Knight's armour. The assault cannon penetrated, but was saved by the Ion Shield of the superheavy walker.
At the end of my turn, I scored Assassinate and Objective 1, as well as one kill point. I discarded Overwhelming Firepower.
TURN 3- IMPERIAL KNIGHTS/SPACE MARINES
This turn, Mark drew Hungry for Glory (issue a challenge), Objective 4, Objective 6 and Big Game Hunter.
The Knights continued to advance on the White Scars, while the Nurglings moved up to the cover of the nearby forest.
The Conclave cast Invisibility on themselves and Phaseform on the Knights once more. They also cast Prescience on the Knights.
One Knight fired its missiles at the Scout Bikers, killing three of the squad. The lone survivor passed his morale test. The second missile pod fired at the Command Squad, but failed to cause any harm.
Another Knight fired its Battle Cannon at the three man bike squad, eliminating them in a hail of fire.
The third Knight fired its Gatling Cannon at the Centurions, killing 2 of the squad (thanks to the rending shots). The second Gatling Cannon also fired at the Centurions, finishing the squad off.
At the end of his turn, Mark scored Objective 4 and one kill point.
VICTORY POINTS:
White Scars- Maelstrom 5, Kill Points 1
Imperial Knights/Space Marines- Maelstrom 1, Kill Points 3
TURN 4- WHITE SCARS
This turn, I drew Objective 3, Objective 4, Objective 6, Ascendency (hold at least 2 objectives and twice as many as your opponent), Witchhunter (kill an enemy psyker) and Blood and Guts (kill 3 units in assault).
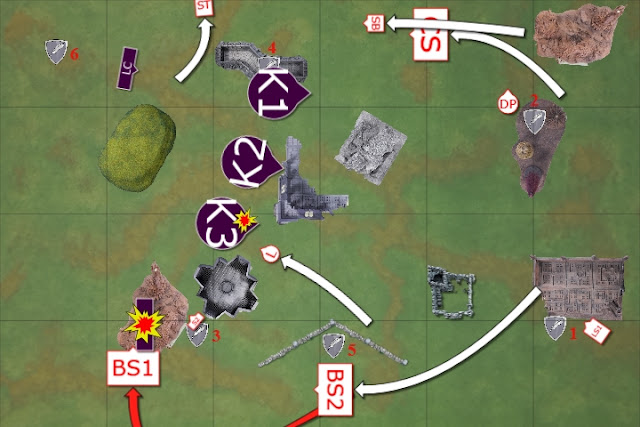
The Bikers continued to advance on the Knights and Nurglings, as the Stormtalon left the airspace of the battlefield.
The Command Squad fired its grav guns at the Knights, but failed to cause any wounds. The Landspeeder fired at the closest knight, penetrating it twice, but only one shot got through its shield and took a single hull point from it.
The lone Scout and bikers fired on the Nurglings, wounding them only 5 times after some terrible to wound rolls (I failed over half of my 3+ to wound rolls), but their cover saved them from harm.
The Bikers charged the Nurglings, inflicting 7 hammer of wrath wounds. The attacks from the bikers soon finished off the squad.
At the end of my turn, I scored Ascendency and Objective 3, as well as one kill point. I discarded Blood and Guts.
TURN 4- IMPERIAL KNIGHTS/SPACE MARINES
This turn, Mark drew Objective 5, Big Game Hunter, Hungry for Glory, Supremacy (hold 3 objectives) and Blood and Guts.
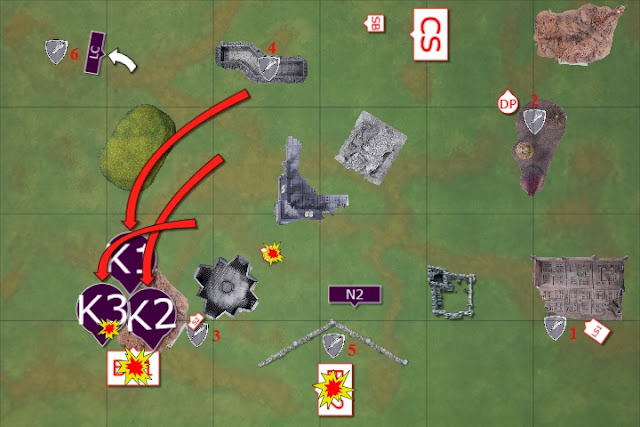
The Nurglings arrrived, appearing from the warp in front of the White Scars' main objective. The Knights moved up on the Bikers in the forest.
The Conclave cast Invisibility on themselves and Phaseform on the Knights.
The Knights opened fire on the bikers in front of them with a missile pod, wounding one but failing to get past the biker's armour (I think this was the first armour save I got to make the whole game!). The second missile pod fired at the Scout Biker, hitting him but failing to wound.
One Knight fired its Gatling Cannon at the Landspeeder, destroying the enemy skimmer.
The third Knight fired its missiles at the Scout biker, but failed to wound. The Battle Cannon fired at the bikers next to the Nurglings, killing 5 of the squad. The Gatling Cannon soon finished off the lone survivor to wipe out the squad.
In the assault phase, the Knights charged the Bikers in the woods. The Sergeant's meltabombs took one hull point from a Knight before the unit was obliterated by the Superheavy walkers.
At the end of his turn, Mark scored Big Game Hunter and Discarded Supremacy. He also scored 3 kill points.
VICTORY POINTS:
White Scars- Maelstrom 8, Kill Points 2
Imperial Knights/Space Marines- Maelstrom 2, Kill Points 6
TURN 5- WHITE SCARS
This turn, I drew Objective 2, Objective 4, Objective 6, Big Game Hunter (destroy an enemy vehicle), No Prisoners (destroy 3 enemy units) and Witchhunter.

This turn, I had a small dilemna. I could either turbo-boost my Command Squad far away from the Knights, saving their kill points and slay the warlord, or go after the Librarius Conclave, hoping the game would go to turn 6 so that I could assault them. After much deliberation, I decided to go for it!
Khan led his unit as fast as possible towards the enemy pyskers, while the rest of the army advanced on the Nurglings and to secure the objectives. The Stormhawk moved on to engage the Nurglings.
In the shooting phase, the Landspeeder Storm fired at the Nurglings, killing one of the squad. The Stormhawk fired at the Nurglings, wounding them once.
In the assault phase, the Scouts assaulted the Nurglings. Their attacks removed one more of the squad for no wounds in reply. The warp power holding the Nurglings in the material realm failed and they were banished to the warp once more (they failed their instability test). The Scouts consolidated onto the objective.
At the end of my turn, I scored Objective 2, Objective 4 and one kill point.
TURN 5- IMPERIAL KNIGHTS/SPACE MARINES
This turn, Mark drew Assassinate, Blood and Guts, Hungry for Glory and Objective 5.

The Imperial Knights turned and advanced on the White Scars' Command Squad, as the Librarius Conclave moved away from the approaching enemy bikers.
Once again, the Conclave made themselves Invisible, while casting Phaseform on the Knights.
The Knights opened fire on the Scouts holding the White Scars objective, killing the unit. They fired at the Command Squad, wounding Khan once with their Gatling Cannon.
At the end of his turn, Mark scored one kill point.
VICTORY POINTS:
White Scars- Maelstrom 10, Kill Points 3
Imperial Knights/Space Marines- Maelstrom 2, Kill Points 7
We rolled to see if the game would continue and it did not. At the end of turn 5, Mark had scored his primary objective for 4 points and I had not scored mine (after the Scouts were eliminated). After totalling up our victory points, the game ended 14 to 13 to me. An exceedingly narrow win! This resulted in 11 tournament points to me and 9 to Mark.
However, we were having so much fun and were interested to see what would happen between the White Scars and conclave, that we decided to play another turn. This would not count towards our tournament score, but we just wanted to see what would happen if the game played out.
TURN 6- WHITE SCARS
This turn, I drew Hungry for Glory (issue a challenge), Behind Enemy Lines (have a unit in the enemy deployment zone), No Prisoners, Witchhunter and Objective 6.
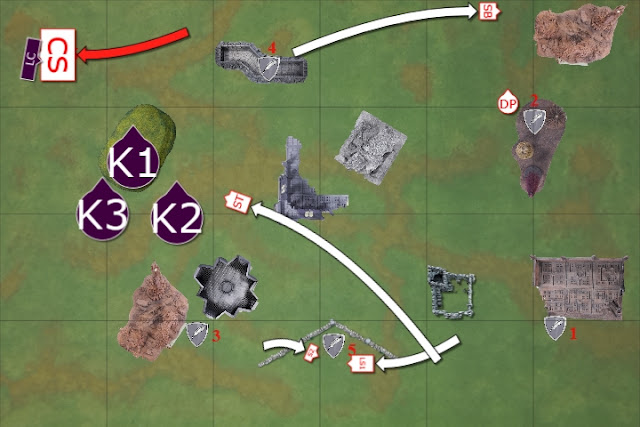
Khan led his unit up to the enemy Psykers, while the rest of the army moved to secure the objectives.
In the shooting phase, the Command Squad fired at the Conclave, wounding them once with their grav weapons, but failing to get past the Invulnerable save of the Terminator armour.
The Stormhawk fired at the closest Knight. It's Las-talon penetrated, but was saved by the ion shield of the Knight.
In the assault phase, the Command Squad charged the Conclave, the Chaplain issuing a challenge as they advance, which one of the Terminator Librarians accepted.
The Command Squad struck at the Conclave, but were unable to get past the Terminator armour of the Librarians. The Conclave struck back, killing one of the Veterans. I lost the combat, but was Fearless thanks to my Chaplain.
At the end of my turn, I scored Hungry for Glory and Behind Enemy Lines for 2 maelstrom points.
TURN 6- IMPERIAL KNIGHTS/SPACE MARINES
This turn, Mark drew Assassinate, Blood and Guts, Hungry for Glory and Objective 5.
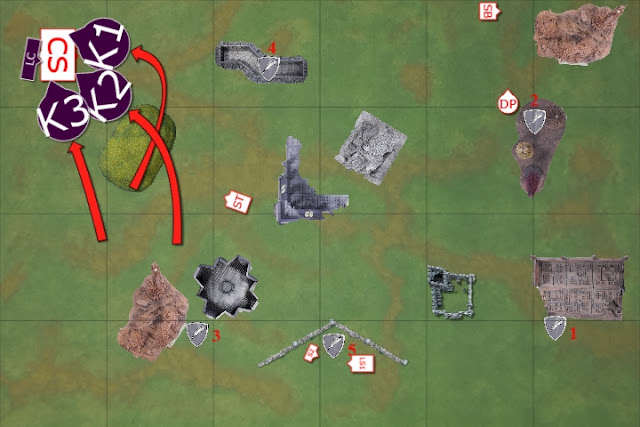
The Knights advanced on the Command Squad in combat with the Conclave. The Conclave were able to cast Invisibility on themselves once more.
The Knights were unable to shoot as they wished to charge the Command Squad.
The Knights crashed into the Command Squad, their hammer of wrath hits causing no damage. The White Scars struck at the Conclave, but once more the Terminator armour of the Librarians proved too strong. The Conclave struck back, but were similarly unable to harm the White Scars.
The Knights then struck. Some abysmal rolling from Mark saw the Knights cause only one wound, which was saved by a Storm Shield. Only one of the Knights was able to Stomp the White Scars (thanks to the positioning of the combat), but rolled the full 3 stomps. Unfortunately, the three stomp attacks caused no damage on the White Scars and the combat was drawn.
At the end of his turn, Mark scored no points.
With that, the game really was over as we ran out of time. Annoyingly, had the game continued to turn 6, I would have scored 20 victory points to Mark's 9 victory points, after claiming my own objective and contesting his. Oh well.
AFTER-BATTLE THOUGHTS
Thanks to Mark for a really close and exciting game. He was a great opponent with some really unlucky dice rolls at the end.
I honestly thought I was going to lose this one going in. Three invisible Knights with ignores cover AP3 weapons was no something my army was really designed to go up against. I think I was incredibly lucky to pull a narrow win in this game and Mark's bad luck with shooting in some of his turns cost him the game in the end.
After talking the game over with Mark and Innes (from the Dundee club who was on the table next to me), I realised that with a little more aggression, I could have scored a big win.
I should have sent my Centurions after the Librarius Conclave in the first turn. The Scout Bikers could have allowed the pod to go on target and get into range for the grav cannons. I could have used my other units to pop the void shields before they fired. Had I taken out or seriously harmed the conclave before he could cast any powers, I would have seriously cripped Mark's army. Getting my cover saves against his Knights would have made a big difference to the game.
Other than that mistake, I think my plan worked pretty well. By moving out of range of the Gatling Cannons for the first few turns, I was able to save most of my units while racking up maelstrom points. Once the Knights got close enough, I was able to advance and give them too many targets to destroy before the game ended.
I got incredibly lucky in winning the game. I think one key moment was when the Gatling Cannon failed to destroy the Landspeeder on turn 2. This meant that he scored no points that turn, where realistically he should have scored a kill point and big game hunter for destroying the speeder. This would maybe have allowed him to kill another unit the following turn, rather than have to shoot at the speeder again. This could have drawn the game or allowed him to get a win, based on the maelstrom cards.
I also got lucky with the Stormhawk detonating the Void Shield Generator. I almost took out Tigirius in the blast, which would have made a big difference on the rest of the game (no more Invisibility).
Thanks again to Mark for a great game and for playing the additional turn after the game had ended. It was interesting to see what may have happened.
Caledonian Revolution 2016
Game 1- White Scars vs Tau/Grey Knights
Game 2- White Scars vs Necrons
Game 3- White Scars vs Dark Angels
Game 4- White Scars vs Imperial Knights/Space Marines
Game 5- White Scars vs Tyranids
Caledonian Revolution 2016
Game 1- White Scars vs Tau/Grey Knights
Game 2- White Scars vs Necrons
Game 3- White Scars vs Dark Angels
Game 4- White Scars vs Imperial Knights/Space Marines
Game 5- White Scars vs Tyranids


Yeah man good job! I was on the edge of my seat during the last turns, so exciting! Totally deserved victory!
ReplyDeleteAlso very interesting insights from Innes, you should really get him to write a guest article or something :)
PS: I'm pretty sure the VSG would've given you a kill point as well - not that it would've mattered much.
One more thing - what was the purpose of the demon detachment? The nurgkings are cheap durable obsec units, but the Masque? Cheap HQ?
DeleteThe ETC ruled that buildings don't give up kill points. I have no idea why, as it is part of your army.
DeleteI'll try and convince him to write some guest posts. He wrote a really nice article recently on competitive play, I should link to it in a later post.
I think the Daemon detachment was for obsec. I have never seen the Masque used before, not sure what it's purpose was.
Masque has a bunch of options that she can use in the movement phase to target one unit within 12'', one of which drops WS and I by 5, one which drops BS by 5 and prevents the unit over watching and one which limits the unit to a D3'' move, run and charge. Nasty as hell against Tau and Deathstars
Deletewow close game.
ReplyDeletei was worried about how you would deal with 3 knights. however them being one unit, they turned in to a large deathstar, which in the modern game is not that viable.
is it the way the map looks as in the first turn it looks like you control more than one objective.
it is possible you could have been more aggressive, but then a gain a few bad dice rolls and it could have been game over for you. i think you played it spot.
refusing to engage and picking up lots of malestrom points was a great tactic, which to be honest i would have done the same.
how did you come with the final score of 14-13? i don't have a copy of the ETC rules. i think i would have been disappointed if i lost that game outscoring my opponent 10-2 on Malestrom (even if he had control of his primary objective that would still have ben 10-6)
The way the mission works is you only draw one card on turn 1, you only start getting one card for each objective from turn 2 onward. I'm not sure why it works this way.
DeleteThe mission scoring is a combination of primary, maelstrom and kill points.
Good game! I definitely agree that you made the right strategic choice with maelstrom but that you should've been more aggressive to the conclave earlier. Knights are always a buggar so it's good to see you out manoeuvre them. Looking forward to seeing how the last game went!
ReplyDeleteI was concerned that I would be unable to drop the void shield and do much damage on the Librarius with my Centurions.
DeleteMy options were to either hide and go for maelstrom points or go with a full assault on the Knights and Librarius on turn 1. If I failed to take out the shields and Librarius on turn 1, odds are I would have been multi-assaulted and lost a lot of my army to the Knights. Decided to play it safer and strategically retreat (i.e. run away!).
Who were your three targets this time round?
ReplyDeleteSays at the top, my primary was the Librarian warlord, secondary was the Void shield generator and tertiary was Knight 1.
DeleteAh sorry didn't see that! Ah well look forward to seeing who the final opponent was :)
ReplyDeleteTalk about weathering the storm. Well done.
ReplyDeleteCheers Rory!
DeleteI think Knights can shoot whoever they want, as long as a single weapon shoots the intended unit of their charge? As super heavy walkers they can shoot all but one weapons at something else, and fire at the unit they wish to charge, or am I wrong?
ReplyDeleteGreat report again, love the diagrams and narrative. Must take ages and reminds me of Old WD.
As far as I am aware, you are correct. The only reason they could not shoot in turn 6 was that they wanted to charge the Command Squad. As the Command Squad were already locked in combat, they could not shoot at other units as they were unable to fire at least one weapon at the Command Squad. If he had shot at my other units, he would have been unable to charge them.
DeleteIt does take quite a while to put them together, but I think it is worth it.
Well played !!! Exalt !
ReplyDeleteThanks Steve.
DeleteEven without going for the Conclave in Turn 1, this is a really good example of how to play against this sort of DeathStar. Great job picking around the edges and staying focused on the Objectives.
ReplyDeleteAlso, I'm pretty sure I wouldn't have been able to resist playing out Turn 6 either.
As mentioned above, The Masque doesn't do much against a more spread out Army like this, but can be absolutely brutal against Armies that rely on a single Unit to do most of the heavy lifting. Imagine what even one Turn of her using the -5BS would have done to those Knights, for instance.
Cheers WestRider. I did think that moving out of range was my best bet and going after the Maelstrom. I didn't think I'd have much chance taking on the Knights head on and would lose too much of my army to them.
Delete