
Welcome to my first battle report of 2016! This week's battle report saw my Dark Angels take on Scott's Tau in an Eternal War mission. I had not played against Scott before, but had played with him in a Doubles Tournament where my White Scars and his Tau took on an Astra Militarum/Adeptus Mechanicus army. I would be interesting to see how the game progressed.


My army consisted of:
Interrogator-Chaplain- Bike, Auspex, Mace of Redemption (IC)
Librarian- Mastery level 2, Bike (L)
10 Tactical Marines- Plasma gun, sergeant with meltabombs (TS1)
Rhino (R)
5 Tactical Marines- Plasma Cannon (TS2)
5 Devastators- 3 Missile Launchers, Lascannon (D1)
Dreadnought- Assault Cannon, Heavy Flamer (D2)
Drop Pod (DP)
5 Black Knights- Huntsmaster has meltabombs (BK)
5 Ravenwing Bikers- 2 Grav guns, sergeant has meltabombs (RB1)
4 Ravenwing Bikers- 2 Meltaguns, sergeant has meltabombs (RB2)
Darkshroud- Assault Cannon (D3)
Darkshroud- Assault Cannon (D3)
Whirlwind (W)
My warlord trait gave me Feel no Pain when in range of an objective. My psychic powers were Mind Worm, Righteous Repugnance and Mind Wipe.
A different army from what I have been running with my Dark Angels (a lot fewer bikers than normal!). I chose the Interrogator-Chaplain to lead the force. Armed with a Mace of Redemption, he is a formidable force in combat and a huge boost for the Black Knights I was taking. He was backed up by a Librarian on a bike. With the lack of Tau psykers, I was hopeful that he would be able to achieve something in the game.
I then take a tactical squad in a rhino for some objective grabbing and a unit with a plasma cannon (great for taking on Tau suits). The Devastators were also picked to provide some high strength firepower to deal with any big Tau suits that Scott may bring.
I also wanted to try out a Dreadnought in a drop pod to add some punch to the army. A heavy flamer and assault cannon should make a mess of any fire warriors when it arrives. I added three unit of bikers; the almost-compulsory black knights and two units of bikers with grav guns and meltaguns for dealing with any Riptides. Lastly, I took a Whirlwind to target any Fire Warriors in the army.
Scott's army consisted of:
Coldstar Commander (TC)
Dark Strider (With FW)
7 Strike Squad (SS)
9 Fire Warriors (FW)
Drone Turret (DT)
Sniper drone team (DS1)
Sniper drone team (DS2)
2 Ramorra Drone Fighters (RDF)
Y'vahra suit (Yv)
Optimised Stealth Cadre
Ghostkeel (G)
4 Stealth Suits (CT1)
4 Stealth Suits (CT2)
Scott's warlord trait gave him +1 to seize the initiative and re-rolls to reserve rolls.
A tough looking army for the Tau. I hate the Y'vahra with a passion, as a biker army enthusiast, it is the perfect counter to them (and most units in the game).
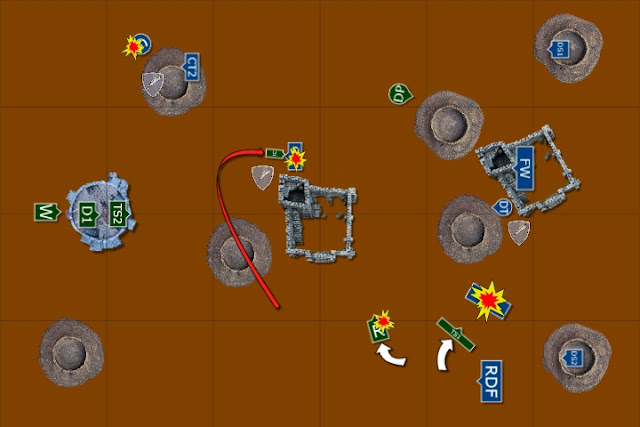
We rolled for mission and got Crusade with 3 objectives, deploying on the short board edges. I won the roll off for table edge and deployment. I chose the side with the landing pad for my devastators and tactical squad and some cover for my units.
I deployed the devastators and plasma cannon tacticals on the pad, with the Whirlwind deployed behind it. The bike units and Rhino deployed far forward, ready to engage with the enemy.
Scott countered with the Tau surrounding the ruins in his deployment zone.
Scott won the roll for Scout moves and moved some units around the deployment zone. I pushed the bikers forward, hoping to engage the Tau at short range with my bolters and plasma talons.


Scott then managed to seize the initiative. This was going to hurt.
TURN 1- TAU

The Y'vahra advanced on the Black Knights, its landing attack causing three wounds that the armour of the Knights saved .The Optimised Stealth Cadre moved up on the right flank. The Tau Commander used his flying move to cross the flank to the Y'vahra.


In the shooting phase, the sniper drones on the right fire at the meltagun bikers, slaying one despite their Jinking. The other sniper drones marker lighted the Black Knights, while firing at the Dark Shroud, but caused no damage.
The Stealth suits fired at the meltagun bikers, slaying all of the bikers thanks to the formation rules giving them +1BS and ignores cover. The Ghostkeel fired at the Librarian, wounding him once. The other unit of Stealth suits in the formation fired at the Grav gun bikers, killing two of the squad.


On the other flank, the Strike squad fired at the Black Knights, marker lighting them twice and wound them, but the Jinking bikers saved all 7 wounds. The Commander used the lights to remove the cover saves and killed two of the Black Knights. The Y'vahra then fired its flamers at the unit, killing another two of the elite bikers.
The Drone Turret fired at the Darkshroud, stripping a hull point from the skimmer despite its jinking (I failed a 2+ re-rollable cover save).
Scott then used his assault moves to move away from the Dark Angels. That was a rough turn for my Dark Angels. Getting seized upon was pretty brutal and I lost a lot of my bikers in the first turn. Even worse, I could not assault the Tau units as I had scouted.


TURN 1- DARK ANGELS

The drop pod with the Dreadnought arrived. My plan was to drop them beside the fire warriors and drone turret, but the pod scattered 11" towards the Ghostkeel.

The Ravenwing units moved up towards the Y'vahra to engage it, while the Rhino advanced towards the Tau.


At the end of the phase, the Ghostkeel intercepted the Dreadnought. Due to the formation special rules, it got to fire at the rear armour of the Dreadnought. The walker was penetrated twice, stunning and immobilising it, pretty much ruining my plan to take out the stealth suits.
In the psychic phase, the librarian attempted to cast Mind Wipe on the Strike squad, but failed to manifest the power.
The grav gun bikers fired at the Y'vahra, wounding it 6 times and Scott failed four saves to destroy the suit. He then reminded me that it was flying and after re-rolling, I caused a single wound which was saved.
(Note- after another Tau player mentioned it to me, I checked the rules for the Y'vahra. Even though it moves as a flying monstrous creature, it lands at the end of the movement phase, so I am not sure it needs 6's to hit it. As a result, my grav guns should have destroyed it in turn 1. This may have had a big impact on the rest of the game).
The plasma cannon tactical squad fired at the stealth suits, killing one. The Whirlwind fired at the Strike squad, killing three of the squad.
The remaining Black Knight fired at the Tau Commander, wounding him once despite snap firing. The Darkshroud also fired at the Commander, hitting with an amazing 3 of its 4 snap shots and wounding him again. The Commander failed his grounding test under the onslaught and took another wound, leaving him on one remaining.
The Devastators fired at the Ghostkeel, hitting with two of the missiles. I then proceeded to roll two 1's to wound and the Tau battlesuit was unharmed.
Not a great turn for me, I failed to do a lot of damage against the Tau and my Dreadnought was neutralised pretty effectively before it even got a chance to do anything. At this point, I was pretty much expecting the game to be over.
TURN 2- TAU

The Stealth suits at the rear advanced on the Dark Angels from the cover of the crater. Amazingly, two suits failed their dangerous terrain tests, then their armour saves and died. The Tau Commander moved towards the Librarian, while the Y'vahra moved to engage the grav gun bikers. The Ghostkeel and Stealth suits continued to advance on the landing pad.


In the shooting phase, the Fire Warriors and sniper drones marker lighted the grav gun bikers. The Y'vahra used the lights to remove their Jink saves and killed two of the bikers, leaving one remaining.

The Ghostkeel fired at the Dreadnought, finishing off the damaged walker.
The sniper drones, stealth suits and Tau Commander fired at the Black Knights, killing the last squad member and leaving the Chaplain alone. The other crisis suit unit fired at the Librarian and killed him.
The Strike squad fired at the Darkshroud, scoring a penetrating and glancing hit that was saved by the Jinking skimmer. They then assaulted the enemy vehicle, easily wiping it out with their EMP grenades.
The stealth suits used their assault moves to advance on the landing pad, but yet another suit succumbed to dangerous terrain and died.
TURN 2- DARK ANGELS

The Rhino advanced on the Strike squad, the tactical squad disembarking to engage as the Interrogator-Chaplain and lone biker retreated to engage the Y'vahra.


In the shooting phase, the drop pod fired at the nearby Tau Commander. The storm bolter caused one wound which succeeded in slaying the Tau warrior.
The Plasma cannon targeted the stealth suits, killing another of one of the squad. The Devastators fired at the Y'vahra, wounding it twice, but its armour saved it from harm. The lone grav biker fired at it, getting two wounds past its invulnerable save and leaving it on 2.
The Whirlwind fired at the Fire Warriors, but scattered off target and caused no damage. The Tactical squad fired at the Strike squad in front of them, hitting 10 times with their bolters. I then managed to only wound twice, despite only needing a 3+ to wound. Both shots managed to kill members of the Strike squad though.


The lone biker and Chaplain assaulted the Y'vahra, the lone biker easily dying to the overwatch fire of the mighty suit. The Interrogator-Chaplain made it in to combat and succeeded in wounding it once, leaving it on a single wound. He suffered no damage in return.
A better turn for me. I had almost dealt with the Y'vahra, but my tactical squad had performed pitifully against the Strike squad thanks to some awful rolling.
TURN 3- TAU

The Y'vahra used its Nova Reactor to escape from combat. I did not know it could do this. Damn! I thought I had it!
The Ghostkeel and Stealth suits moved up on the objective and into cover. The Ramorra fighters arrived from reserve, moving to engage the tactical marines.


The fire warriors marker lighted the Rhino, then fired their rifles at it in support of the Turret Drone, glancing the vehicle once.
The Strike squad fired at the tactical squad in front of them, killing two. The Ramorras added their firepower to the attack, killing another two of the marines. The unit passed their morale check.
The sniper drones fired at the Chaplain, wounding him once. The stealth suits also targeted the Dark Angels' warlord, wounding him again. The lone stealth suit fired at the tactical squad on the landing pad, killing one of the squad.
Finally, the Ghostkeel fired at the Devastators, killing two of the squad. They passed their morale check and kept fighting.

TURN 3- DARK ANGELS
The Rhino moved towards the central objective, but managed to immobilise itself on a crater on the way. The Interrogator-Chaplain moved to engage the crisis suits in the centre of the board, while the tactical squad advanced on the Strike squad.

The plasma cannon squad opened fire on the Ghostkeel. The plasma cannon wounded it once, but its cover save protected it from harm. The bolters of the squad managed to wound the battlesuit twice. The Devastators fired at the Ghostkeel, taking another wound from the mighty suit.
The Tactical squad fired at the Strike squad. Their bolters wiping out the whole squad. The Whirlwind fired at the Fire Warriors, killing three of the squad with its missiles. The Rhino fired at the unit and managed to kill another one.


The Chaplain fired at the stealth suits and managed to bring one of them down. He then assaulted the unit. The overwatch fire wounded the Interrogator-Chaplain and he failed his armour save. Fortunately, his warlord trait now gave him Feel no Pain and he passed the save. He crashed into the final suit, only hitting once with his 5 attacks, but succeeded in killing the last member of the squad.
TURN 4- TAU

The Y'vhara moved back onto the table, moving up in front of the tactical squad. The Ramorras moved to the centre of the board to engage the Chaplain.


The Ghostkeel opened fire on the Devastators, wiping the squad out. The last Stealth suit fired at the tactical marines, but missed them.
The Ramorras fired at the Interrogator-Chaplain, wounding him 9 times and finally killing him. The Y'vahra fired at the tactical squad, easily wiping them out with its flamers.


TURN 4- DARK ANGELS

With very little left, I tried to salvage some points from the game. The tactical marines fired at the stealth suit, killing the last member of the squad and taking him off the objective.


The Whirlwind fired at the Fire Warriors, but once again missed his target and they were left unharmed. With that, the game ended.
VICTORY POINTS:
Tau- 6 (1 objective and 3 secondary)
Dark Angels- 1 (slay the warlord)
AFTER-BATTLE THOUGHTS
That was a pretty brutal game for my Dark Angels, thanks to Scott for a very tough match.
When we originally organised the game, Scott said he was trying an experimental army. I foolishly read this as taking a "weak" army, so modified my Dark Angels to an all comers-type force. Once my grav guns and black knights were gone, there was not too much left that could effectively deal with the larger battle suits.
Getting seized on was probably the die roll that helped decide the game. I only found out that he had +1 to seize after I had performed my Scout moves, so had deployed aggressively figuring I would have the first turn. My plan was to deal with the Y'vahra with my Black Knights, then take on the other units in combat from turn 2. That plan fell apart pretty quickly after Scott's first turn and the game was pretty much over with from turn 1.
Despite that, the army did ok. Had I taken out the Y'vahra on turn 1 (which I probably should have done now that I have checked the rules), it would have freed up the Interrogator-Chaplain and grav bikers to target the Strike squad and Fire Warriors. I doubt I could have won, but may have done a lot more damage than I did.
My luck was pretty poor throughout the game. The Drop pod scattering pretty much meant the death of the Dreadnought. That Tau formation is pretty powerful, allowing them to shoot the rear armour of any vehicle in range. The tactical squad also performed poorly against the Strike squad, failing to wound with 80% of their hits in turn 3. Had my Rhino not immobilised itself, it may have been able to contest some objectives, as Scott was having real trouble harming it with his fire warriors and strike squad.
Scott had some poor luck too. His Commander died quick easily despite having the protection of flying and his crisis suits kept killing themselves on difficult terrain.
Maybe I need to institute a no Forge World policy for Tau to get rid of that stupid Y'vhara........


Coldstar Commander (TC)
Dark Strider (With FW)
7 Strike Squad (SS)
9 Fire Warriors (FW)
Drone Turret (DT)
Sniper drone team (DS1)
Sniper drone team (DS2)
2 Ramorra Drone Fighters (RDF)
Y'vahra suit (Yv)
Optimised Stealth Cadre
Ghostkeel (G)
4 Stealth Suits (CT1)
4 Stealth Suits (CT2)
Scott's warlord trait gave him +1 to seize the initiative and re-rolls to reserve rolls.
A tough looking army for the Tau. I hate the Y'vahra with a passion, as a biker army enthusiast, it is the perfect counter to them (and most units in the game).
We rolled for mission and got Crusade with 3 objectives, deploying on the short board edges. I won the roll off for table edge and deployment. I chose the side with the landing pad for my devastators and tactical squad and some cover for my units.
I deployed the devastators and plasma cannon tacticals on the pad, with the Whirlwind deployed behind it. The bike units and Rhino deployed far forward, ready to engage with the enemy.
Scott countered with the Tau surrounding the ruins in his deployment zone.
Scott won the roll for Scout moves and moved some units around the deployment zone. I pushed the bikers forward, hoping to engage the Tau at short range with my bolters and plasma talons.
 |
| Deployment. Objectives are represented by the three shields. Scout moves are represented by the Grey arrows. |


Scott then managed to seize the initiative. This was going to hurt.
TURN 1- TAU

The Y'vahra advanced on the Black Knights, its landing attack causing three wounds that the armour of the Knights saved .The Optimised Stealth Cadre moved up on the right flank. The Tau Commander used his flying move to cross the flank to the Y'vahra.


In the shooting phase, the sniper drones on the right fire at the meltagun bikers, slaying one despite their Jinking. The other sniper drones marker lighted the Black Knights, while firing at the Dark Shroud, but caused no damage.
The Stealth suits fired at the meltagun bikers, slaying all of the bikers thanks to the formation rules giving them +1BS and ignores cover. The Ghostkeel fired at the Librarian, wounding him once. The other unit of Stealth suits in the formation fired at the Grav gun bikers, killing two of the squad.


On the other flank, the Strike squad fired at the Black Knights, marker lighting them twice and wound them, but the Jinking bikers saved all 7 wounds. The Commander used the lights to remove the cover saves and killed two of the Black Knights. The Y'vahra then fired its flamers at the unit, killing another two of the elite bikers.
The Drone Turret fired at the Darkshroud, stripping a hull point from the skimmer despite its jinking (I failed a 2+ re-rollable cover save).
Scott then used his assault moves to move away from the Dark Angels. That was a rough turn for my Dark Angels. Getting seized upon was pretty brutal and I lost a lot of my bikers in the first turn. Even worse, I could not assault the Tau units as I had scouted.

TURN 1- DARK ANGELS

The drop pod with the Dreadnought arrived. My plan was to drop them beside the fire warriors and drone turret, but the pod scattered 11" towards the Ghostkeel.

The Ravenwing units moved up towards the Y'vahra to engage it, while the Rhino advanced towards the Tau.

At the end of the phase, the Ghostkeel intercepted the Dreadnought. Due to the formation special rules, it got to fire at the rear armour of the Dreadnought. The walker was penetrated twice, stunning and immobilising it, pretty much ruining my plan to take out the stealth suits.
In the psychic phase, the librarian attempted to cast Mind Wipe on the Strike squad, but failed to manifest the power.
The grav gun bikers fired at the Y'vahra, wounding it 6 times and Scott failed four saves to destroy the suit. He then reminded me that it was flying and after re-rolling, I caused a single wound which was saved.
(Note- after another Tau player mentioned it to me, I checked the rules for the Y'vahra. Even though it moves as a flying monstrous creature, it lands at the end of the movement phase, so I am not sure it needs 6's to hit it. As a result, my grav guns should have destroyed it in turn 1. This may have had a big impact on the rest of the game).
The plasma cannon tactical squad fired at the stealth suits, killing one. The Whirlwind fired at the Strike squad, killing three of the squad.
The remaining Black Knight fired at the Tau Commander, wounding him once despite snap firing. The Darkshroud also fired at the Commander, hitting with an amazing 3 of its 4 snap shots and wounding him again. The Commander failed his grounding test under the onslaught and took another wound, leaving him on one remaining.
The Devastators fired at the Ghostkeel, hitting with two of the missiles. I then proceeded to roll two 1's to wound and the Tau battlesuit was unharmed.
Not a great turn for me, I failed to do a lot of damage against the Tau and my Dreadnought was neutralised pretty effectively before it even got a chance to do anything. At this point, I was pretty much expecting the game to be over.
TURN 2- TAU

The Stealth suits at the rear advanced on the Dark Angels from the cover of the crater. Amazingly, two suits failed their dangerous terrain tests, then their armour saves and died. The Tau Commander moved towards the Librarian, while the Y'vahra moved to engage the grav gun bikers. The Ghostkeel and Stealth suits continued to advance on the landing pad.


In the shooting phase, the Fire Warriors and sniper drones marker lighted the grav gun bikers. The Y'vahra used the lights to remove their Jink saves and killed two of the bikers, leaving one remaining.

The Ghostkeel fired at the Dreadnought, finishing off the damaged walker.
The sniper drones, stealth suits and Tau Commander fired at the Black Knights, killing the last squad member and leaving the Chaplain alone. The other crisis suit unit fired at the Librarian and killed him.
The Strike squad fired at the Darkshroud, scoring a penetrating and glancing hit that was saved by the Jinking skimmer. They then assaulted the enemy vehicle, easily wiping it out with their EMP grenades.
The stealth suits used their assault moves to advance on the landing pad, but yet another suit succumbed to dangerous terrain and died.
TURN 2- DARK ANGELS

The Rhino advanced on the Strike squad, the tactical squad disembarking to engage as the Interrogator-Chaplain and lone biker retreated to engage the Y'vahra.


In the shooting phase, the drop pod fired at the nearby Tau Commander. The storm bolter caused one wound which succeeded in slaying the Tau warrior.
The Plasma cannon targeted the stealth suits, killing another of one of the squad. The Devastators fired at the Y'vahra, wounding it twice, but its armour saved it from harm. The lone grav biker fired at it, getting two wounds past its invulnerable save and leaving it on 2.
The Whirlwind fired at the Fire Warriors, but scattered off target and caused no damage. The Tactical squad fired at the Strike squad in front of them, hitting 10 times with their bolters. I then managed to only wound twice, despite only needing a 3+ to wound. Both shots managed to kill members of the Strike squad though.


The lone biker and Chaplain assaulted the Y'vahra, the lone biker easily dying to the overwatch fire of the mighty suit. The Interrogator-Chaplain made it in to combat and succeeded in wounding it once, leaving it on a single wound. He suffered no damage in return.
A better turn for me. I had almost dealt with the Y'vahra, but my tactical squad had performed pitifully against the Strike squad thanks to some awful rolling.
TURN 3- TAU

The Y'vahra used its Nova Reactor to escape from combat. I did not know it could do this. Damn! I thought I had it!
The Ghostkeel and Stealth suits moved up on the objective and into cover. The Ramorra fighters arrived from reserve, moving to engage the tactical marines.


The fire warriors marker lighted the Rhino, then fired their rifles at it in support of the Turret Drone, glancing the vehicle once.
The Strike squad fired at the tactical squad in front of them, killing two. The Ramorras added their firepower to the attack, killing another two of the marines. The unit passed their morale check.
The sniper drones fired at the Chaplain, wounding him once. The stealth suits also targeted the Dark Angels' warlord, wounding him again. The lone stealth suit fired at the tactical squad on the landing pad, killing one of the squad.
Finally, the Ghostkeel fired at the Devastators, killing two of the squad. They passed their morale check and kept fighting.

TURN 3- DARK ANGELS

The Rhino moved towards the central objective, but managed to immobilise itself on a crater on the way. The Interrogator-Chaplain moved to engage the crisis suits in the centre of the board, while the tactical squad advanced on the Strike squad.

The plasma cannon squad opened fire on the Ghostkeel. The plasma cannon wounded it once, but its cover save protected it from harm. The bolters of the squad managed to wound the battlesuit twice. The Devastators fired at the Ghostkeel, taking another wound from the mighty suit.
The Tactical squad fired at the Strike squad. Their bolters wiping out the whole squad. The Whirlwind fired at the Fire Warriors, killing three of the squad with its missiles. The Rhino fired at the unit and managed to kill another one.


The Chaplain fired at the stealth suits and managed to bring one of them down. He then assaulted the unit. The overwatch fire wounded the Interrogator-Chaplain and he failed his armour save. Fortunately, his warlord trait now gave him Feel no Pain and he passed the save. He crashed into the final suit, only hitting once with his 5 attacks, but succeeded in killing the last member of the squad.
TURN 4- TAU

The Y'vhara moved back onto the table, moving up in front of the tactical squad. The Ramorras moved to the centre of the board to engage the Chaplain.


The Ghostkeel opened fire on the Devastators, wiping the squad out. The last Stealth suit fired at the tactical marines, but missed them.
The Ramorras fired at the Interrogator-Chaplain, wounding him 9 times and finally killing him. The Y'vahra fired at the tactical squad, easily wiping them out with its flamers.


TURN 4- DARK ANGELS

With very little left, I tried to salvage some points from the game. The tactical marines fired at the stealth suit, killing the last member of the squad and taking him off the objective.


The Whirlwind fired at the Fire Warriors, but once again missed his target and they were left unharmed. With that, the game ended.
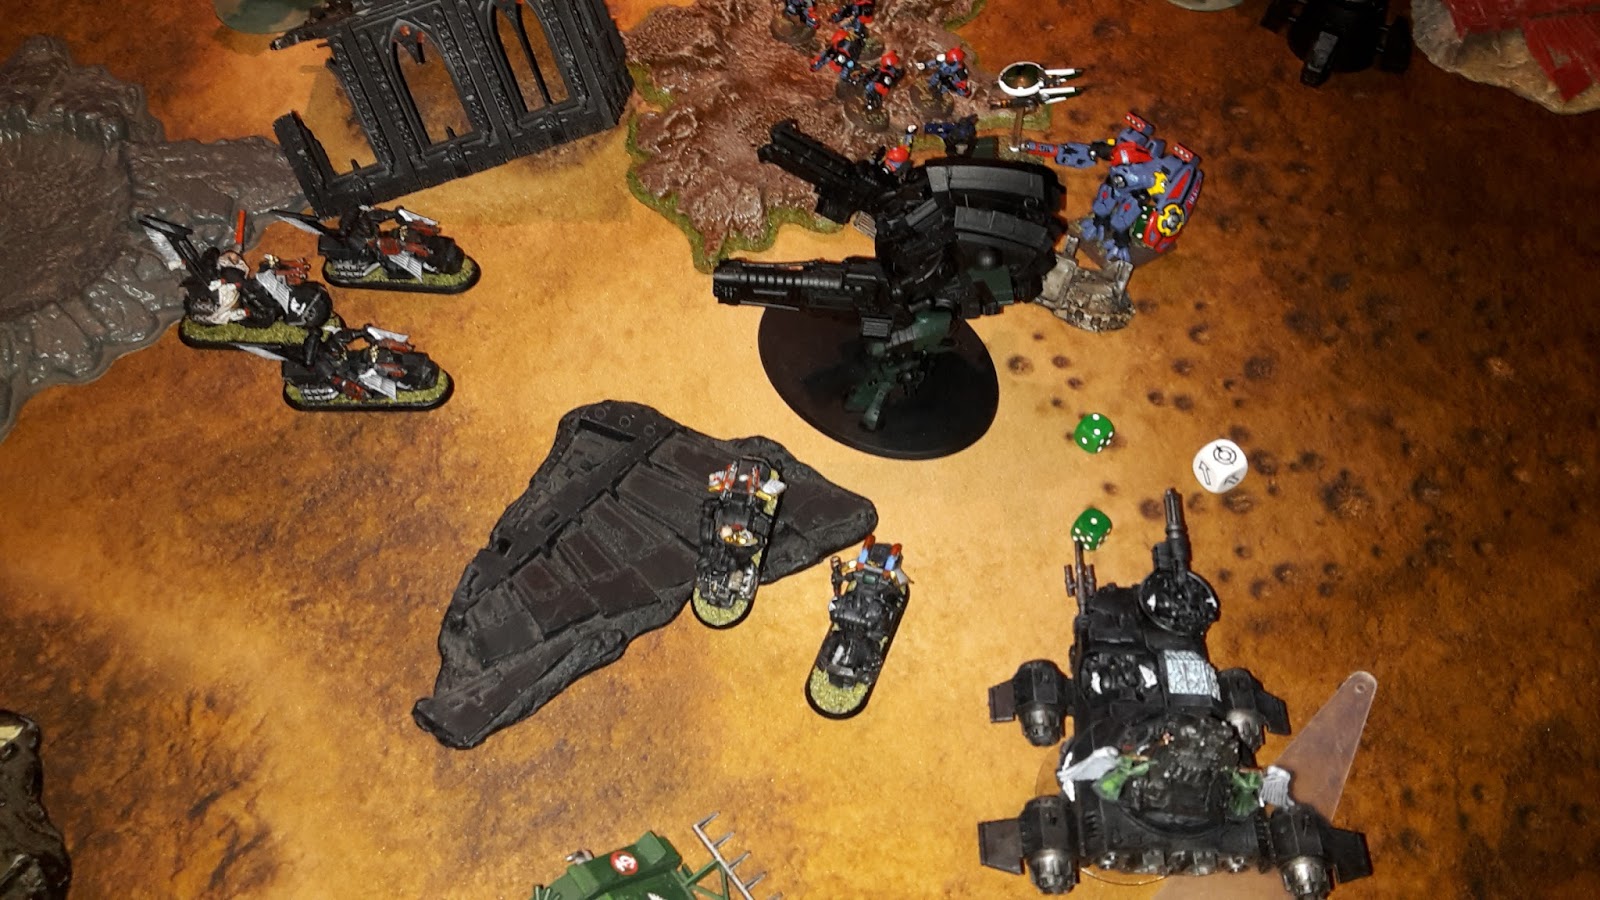
 |
| End of the Game. |
VICTORY POINTS:
Tau- 6 (1 objective and 3 secondary)
Dark Angels- 1 (slay the warlord)
AFTER-BATTLE THOUGHTS
That was a pretty brutal game for my Dark Angels, thanks to Scott for a very tough match.
When we originally organised the game, Scott said he was trying an experimental army. I foolishly read this as taking a "weak" army, so modified my Dark Angels to an all comers-type force. Once my grav guns and black knights were gone, there was not too much left that could effectively deal with the larger battle suits.
Getting seized on was probably the die roll that helped decide the game. I only found out that he had +1 to seize after I had performed my Scout moves, so had deployed aggressively figuring I would have the first turn. My plan was to deal with the Y'vahra with my Black Knights, then take on the other units in combat from turn 2. That plan fell apart pretty quickly after Scott's first turn and the game was pretty much over with from turn 1.
Despite that, the army did ok. Had I taken out the Y'vahra on turn 1 (which I probably should have done now that I have checked the rules), it would have freed up the Interrogator-Chaplain and grav bikers to target the Strike squad and Fire Warriors. I doubt I could have won, but may have done a lot more damage than I did.
My luck was pretty poor throughout the game. The Drop pod scattering pretty much meant the death of the Dreadnought. That Tau formation is pretty powerful, allowing them to shoot the rear armour of any vehicle in range. The tactical squad also performed poorly against the Strike squad, failing to wound with 80% of their hits in turn 3. Had my Rhino not immobilised itself, it may have been able to contest some objectives, as Scott was having real trouble harming it with his fire warriors and strike squad.
Scott had some poor luck too. His Commander died quick easily despite having the protection of flying and his crisis suits kept killing themselves on difficult terrain.
Maybe I need to institute a no Forge World policy for Tau to get rid of that stupid Y'vhara........


Another good report buddy! One thing your opponent also missed is that the Tau Commander would have been insta-killed by his failed grounding test - the Coldstar Suit is really limited in that respect as it can't get to T5.
ReplyDeleteThe OSC is really brutal, though I had exactly the same difficulty as your opponent in my game last night - the ghostkeel's guns despite hitting rear armour don't give you any kind of guarantee that you'll take down a vehicle despite hitting the rear armour (I only managed a single glance from 6 S7 shots and a twin linked melta). Dice are a killer!
After that first turn I think you did pretty well to make things last as long as you did - I've noticed in my last couple of games (playing eternal war missions) that in the early turns the Tau can really rack up the casualties. Both my last games have finished with my opponent only having three models left. They do seem to struggle more against MSU armies though, as their rules tend to favour focusing on fewer targets and wiping them out, than being able to target lots of things.
Cheers Nick!
DeleteI honestly thought about calling it after turn 2 when I had done nothing against the Tau army really, but that would have been unfair on Scott. To come all the way for a game (the weather was horrible that night) and have it be over less than an hour into it would be too much.
In the final turn, I forgot to move my Whirlwind. I was going to shoot the Stealth suit and grab the objective with the tank. I would not have won, but it would have brought the VP difference a bit closer.
Absolutely - he was probably feeling a bit guilty at that point how much damage he'd done, so if you'd called it you'd only have made it worse, I think a big part of the 'social contract' between the two players is giving it everything, even if you are a bit fatalistic about your prospects. I did a piece a while back on keeping your foot on the gas and not letting opponents off the hook when you're ahead after a game when I eased up because things were looking bleak for the other guy in turn 2. He turned it round and pulled off a draw. Ever since then I try to always push as hard as I can.
Deletenice to have these reports back.
ReplyDeletei suppose hindsight is great but here are my thoughts
1. did you know you would be playing eternal war missions? if so then i don't think you needed to worry about any obj sec units. those tact squads points could have been used else where.
2. instead of the 5 man tact maybe some scouts
3. one dread in a pod is a bit hit and miss. he needs support of other stuff in pods
4. i prefer max squads of bike. it only takes a few bad rolls and your squad is a lot smaller
5. great tactics against the big suit. definitely a game changer in thinking it was flying. that flank would have collapsed without that there and your bikes would have swept to victory (then again seeing some of you dice rolls....)
6. buy some new dice. the ones you used look like they are broken
7. at 1500, 2 characters can seem a bit too much. 1 would have been fine.
8. in 7th a single librarian is no longer a solid choice even against Tau. if the powers go off they it can help but they are a bit too unreliable (but fun)
9. would you have not scouted knowing your opponent had bonuses to seizing the initiative or would you still take the risk?
10. could think of anything else for number 10!
i look forward to seeing more reports in 2016
Glad you are enjoying them. It was nice to be back and playing some games in the New Year.
DeleteThanks for your comments, with regards to them:
1. I make up my army before we decide on missions. We could have played either eternal war or maelstrom, so I like to have some objective secured just in case.
2. I tried to squeeze some scouts into the list, but couldn't find the points. I actually only own one unit of scouts for my tactical marines, so I normally field tactical marines instead.
3. I wanted to try the Dread in the pod. I figured there would not be much to hurt it in combat, but forgot about interceptor and formations rules. It really was just a waste of points.
4. I normally run them in units of 5, but the unit of 4 was because I was struggling for points.
5. I agree, the game might have gone very differently with the Y'vahra out of the way early on. I could have got into combat where it matters and taken out a lot of the Tau (maybe).
6. I need to do this. I had a game last night and my rolling was just abysmal. Funnily enough, my opponent was sharing my dice and his rolling was on fire. I guess they just hate me after years of abuse.
7 and 8. Two characters is a bit much for 1500 pts. I wanted to try the Librarian again but needed a tougher character for my warlord. I agree with you, a solitary Librarian really struggles to achieve anything in a game. I was hoping for Aversion to force the Y'vahra to snap fire and keep my bikes alive.
9. I still probably would have scouted. I needed to close the distance as much as possible to get in to short range for my bolters and grav guns. The only difference is that I may have been able to assault the Y'vahra on turn 1 if he had got close enough to fire his flamers.
10. Glad there was only 9 things I did wrong in this battle!
2. That should be "only own one unit of Scouts for my Dark Angels".
Delete