
Welcome to the first battle report from my recent visit to the North East Open tournament in Newcastle. This was the second time I had attended the event, and was hoping to improve my performance over the last time. This was a 5-game, 2000 pts ITC tournament using the new ITC mission rules.

In the first game of the day, my White Scars would be taking on Adam's T'au in ITC mission 1.
My army consisted of:
Battalion Detachment
Captain on Bike- Twin Bolter, Thunder Hammer, Storm Shield, Master of Snares, Wrath of the Heavens
Librarian- Jump Pack, Force Stave, Mantle of the Stormseer, Ride the Winds, Storm-wreathed
5 Intercessors- Bolt Rifles, Bolt Pistols
5 Intercessors- Bolt Rifles, Bolt Pistols
5 Intercessors- Bolt Rifles, Bolt Pistols
5 Intercessors- Bolt Rifles, Bolt Pistols
3 Eliminators- Bolt Sniper Rifles, Camo Cloaks
3 Devastator Centurions- Grav-cannons and grav-amps, Hurricane Bolters
3 Devastator Centurions- Grav-cannons and grav-amps, Hurricane Bolters
Battalion Detachment
Captain- Jump Pack, Master Crafted Thunder Hammer, Storm Shield, Chapter Master, Imperium's Sword
Lieutenant- Jump Pack, Power Axe, MC Bolter
5 Scouts- Bolters
5 Scouts- Bolters
5 Scouts- Bolt Pistol, Combat Knives
3 Inceptors- Assault Bolters
3 Inceptors- Assault Bolters
Battalion Detachment
Chaplain- Jump Pack, Crozius Arcanum, Bolt Pistol, Litany of Hate
Khan on Bike- Khan's Spear
3 Inceptors- Assault Bolters
3 Inceptors- Assault Bolters
Battalion Detachment
Chaplain- Jump Pack, Crozius Arcanum, Bolt Pistol, Litany of Hate
Khan on Bike- Khan's Spear
5 Infiltrators- Marksman Bolt Carbines, Smoke Grenades
5 Infiltrators- Marksman Bolt Carbines, Smoke Grenades
5 Tactical Marines- Bolters
5 Infiltrators- Marksman Bolt Carbines, Smoke Grenades
5 Tactical Marines- Bolters
Thunderfire Cannon- Techmarine Gunner with Flamer, Plasma Cutter, 2 Servo-arms
A change up from my last tournament list. I dropped the Impulsor and Phobos Librarian from the list, as they didn't really do much for it. Instead I added a unit of Grav Centurions. I had faced a few of these in my last tournament, and was impressed by their firepower and damage ability, so wanted to see how they would perform in my list.
Adam's list consisted of:
Battalion Detachment
Coldstar Commander- 2 Shield Drones, Through unity, devastation, Drone Controller, 3 Missile Pods
Ethereal- Hover drone, 2 Shield Drones
5 Breacher Team- Pulse Blaster, Shield Drone, Guardian Drone
5 Breacher Team- Pulse Blaster, Shield Drone, Guardian Drone
5 Breacher Team- Pulse Blaster, Shield Drone, Guardian Drone
Drone Squad 1- 6 Shield Drones, 2 Marker Drones
Drone Squad 2- 6 Shield Drones, 2 Marker Drones
Drone Squad 3- 4 Shield Drones, 4 Marker Drones
Vanguard Detachment
Commander- 4 Cyclic Ion Blasters, 2 Shield Drones
Firesight Marksman- Markerlight
Ghostkeel- 2 Fusion Blasters, Cyclic Ion Raker, Shield Generator, Velocity Tracker, 2 Stealth Drones
Ghostkeel- 2 Fusion Blasters, Cyclic Ion Raker, Shield Generator, Velocity Tracker, 2 Stealth Drones
Vanguard Detachment
Commander- 4 Cyclic Ion Blasters, 2 Shield Drones
Riptide- 2 SMS system, Heavy Burst Cannon, Velocity Tracker, Advanced Targeting System
Riptide- 2 SMS system, Heavy Burst Cannon, Velocity Tracker, Advanced Targeting System
Ghostkeel- 2 Fusion Blasters, Cyclic Ion Raker, Shield Generator, Velocity Tracker, 2 Stealth Drones
Sept Choices:
Gifted Pilots- If suit is stationary or removes less than half its move, you can re-roll 1's to wound.
Stabilisation Systems- Ignore the penalty for moving and firing heavy weapons.
A lot of Drones to take out! This list featured a lot of heavy firepower that could make a mess of my Marines. I would need to get them into combat quickly and try to neuter the drones before I could take on the heavier elements of the army.
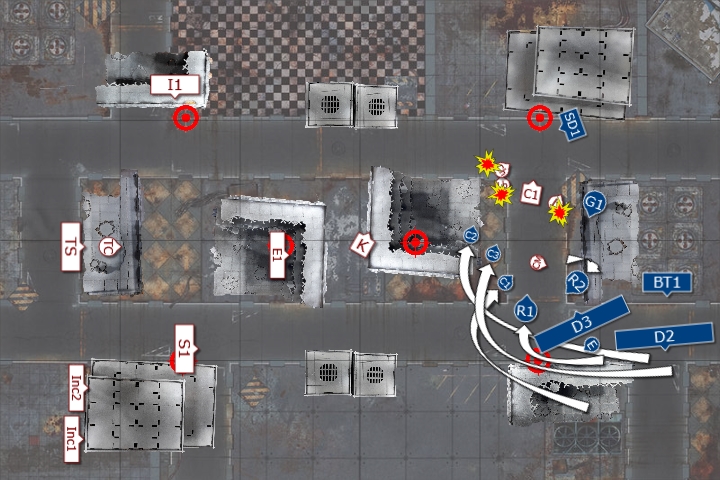
Adam won the roll off and chose to be the Defender, that was surprising to me! He then rolled for the deployment and chose Hammer and Anvil, which was to be expected. We placed the objectives as shown below:

For secondaries, I chose Behind Enemy Lines, Butcher's Bill and the Postman (Khan). With the deployment type and objective placement, I figured I could easily get to four of the objectives with my Biker to score all the points. Adam chose Engineer's (the two large Drone squads with majority Shield Drones), Marked for Death (Centurions, two Inceptors and Chapter Master) and Headhunter.
I deployed my army first. I put the Thunderfire Cannon, Tactical Squad, Chapter Master and Lieutenant in the central ruins as a firebase, with a unit of Intercessors holding the objective on the left. I put the Khan on the objective on the right and put a unit of Scouts behind him. I put the two units of Infiltrators and Scouts on the right flank, with a unit of Scouts on the left, as close to the enemy deployment zone as possible. The Eliminators went in the central ruins, while the rest of my characters deployed in the centre, on my deployment line.
I spent 3CP to put the Centurions and two squads of Intercessors in reserve, along with the Inceptor Squads.
In reply, Adam deployed the Ghostkeels at the back of his deployment zone on the right flank. He then deployed the bulk of his forces on his left, right up to the line. Both Riptides went on the left, surrounded by drones, with the Fire Warriors acting as a screen for them. The Commanders deployed further back on the left and in the centre, with another fire warrior squad holding the ruins towards the back.
I was fully expecting Adam to deploy on his back line, making it a long slog for my forces to get to his army. As it was, much of my forward forces would be able to charge his army on turn 1. My plan was to go for the throat of the army, charging and hopefully wrapping some squads to stop them from falling back to keep me safe from the enemy firepower.


I took the first turn and there was no seize the initiative (thankfully!). Adam spent 2CP to prepare positions.
TURN 1- WHITE SCARS

I used the Canticle of Hate on the Chaplain, passing it with a CP re-roll.
The Scouts on the left moved up to screen the Khan, keeping him safe from the enemy firepower. On the right flank, the Scouts advanced onto the central objective, while the Infiltrators advanced on the Tau. The Scouts and Infiltrators moved up on the Tau line, while the characters advanced to support them.


The Librarian cast Storm-wreathed on the Biker Captain to block the enemy overwatch, passing with a CP re-roll. He then cast Ride the Winds on him as well.
The Eliminators fired at the Firesight Marksman, wounding him once. The Infiltrators fired at the Breacher Team, wounding them 6 times, but only killing one. The Scouts added their firepower, killing three more. The Thunderfire Cannon fired twice at the Drones, killing one squad of two.
In the charge phase, the Biker Captain assaulted the Breachers, Drones and Riptide. The Infiltrators charged the Breacher Team, losing one of their squad to supporting fire from the other Tau. The Scouts and Chaplain charged the lone Fire Warrior, while the second squad of Infiltrators charged the Drones and Firesight Marksman.
In the fight phase, the Captain struck at the Riptide, doing three wounds with a CP re-roll. Only one drone succumbed to the attacks. I positioned the Infiltrators on the right so that only one could attack, kiling one of the Fire Warriors. The squad then consolidated to wrap the remainder of the squad in combat.


The Chaplain killed the lone Fire Warrior, then both he and the Scouts consolidated into the Breacher Team in front of them. The other Infiltrator squad attached the Drones and Marksman, but failed to get through their armour.
The Tau struck back, but failed to do any damage to the Astartes forces.

At the end of my turn, I scored hold 1, kill 1, the objective bonus, Behind Enemy lines, Butcher's Bill and the Postman.
TURN 1- TAU

The Tau Commander ordered Mont'ka and pulled his forces back from the White Scars, with only one squad staying locked in combat with the enemy forces. The Riptide was able to fall back, after I failed my Master of Snares roll, even with a CP re-roll. The Drones were also able to fall back from combat.


The Riptide overcharged its Nova Reactor to get a 3+ invulnerable save.
In the shooting phase, the Marker Drones lit up the Infiltrators, Adam then using the stratagem to put another light on the squad. The Commander fired at the Infiltrators, killing three of the squad. The second Commander added his firepower, killing the rest of the squad.
The Ghostkeels opened up on the Scouts in the ruins in front of them, killing the squad.


In the fight phase, the Captain struck, killing two of the Breacher team. Adam pulled the casualties from the Chaplain and Scouts. The Infiltrators then attacked, but only managed to kill one after some terrible rolls, leaving one alive. The lone Fire Warrior did no damage to the Infiltrators, passing his morale test to stay in the fight.
At the end of the turn, Adam scored hold 1 and kill 1. I scored hold more and kill more.
VICTORY POINTS:
White Scars- 8
Tau- 2
A great first turn for the Scars had seen me get into the enemy lines and start with a strong lead. I would need to see if I could capitalise on this.
TURN 2- WHITE SCARS

In my second turn, I moved to the Tactical Doctrine, and passed the Canticle of Hate on the Chaplain.
The Khan advanced to grab the second objective in my deployment zone, while the Chapter Master and Lieutenant advanced towards the central ruins. The forward White Scars units continued to move up on the retreating Tau. At the end of the phase, the Centurions arrived, landing to the south to target the Riptides.


In the psychic phase, the Librarian cast Storm-wreathed on the Biker Captain. He then cast Ride the Winds on him.
I used the Gravitic Amplification stratagem on the Centurions. The Bolters targeted the Drones, while the Grav Cannons targeted the Riptides. The Bolters only managed to kill one drone (after some great saves!), while the Grav did 6 wounds, but was passed onto the nearby drones, killing two of the units.
The Infiltrators fired at the lone Fire Warrior, but failed to kill him with their pistols. The Biker Captain was able to kill one Shield Drone, while the Thunderfire Cannon took out another drone unit holding the objective.
The Biker Captain charged the Riptide and Drones, as Adam had left space for him to get through. The Chaplain and Scouts assaulted the Firesight Marksman, while the Librarian charged the Breacher Team.


The Captain struck at the Riptide, only doing one wound, which a Drone saved. The Chaplain killed the Marksman, consolidating into the Drones. The Infiltrators killed the last of the Breacher Team, while the Librarian was able to move into the Drones as well. The Riptide managed to do 3 wounds on the Captain, but failed to get past the Storm Shield.
At the end of my turn, I scored hold 1, kill 1, the bonus, behind enemy lines (for 2 pts), the Postman and Butcher's Bill.
TURN 2- TAU

The Ethereal gave nearby units re-rolls of 1 to hit. Both Riptides overcharged to give themselves extra shots.
The Captain was able to block the Drones from falling back with a CP re-roll, while the Riptide was able to fall back (I had only passed one out of 6 of the rolls so far).


The Ghostkeels moved up on the objective, while the rest of the army continued to move back from the White Scars.
The Drones tried to markerlight the Scouts, but failed to hit them. The Riptide fired at the Centurions and Eliminators (with the SMS). One Centurion was killed and one was wounded. An Eliminator also took a wound. The Ghostkeels fired at the Centurions, but failed to do any damage. The second Riptide added its firepower, killing the Centurions and two of the Scouts. The Commander fired at the Infiltrators, killing one.

In the fight phase, the Drones did no damage. In reply, the Librarian, Chaplain and Captain killed two of the Drones.
At the end of his turn, Adam scored Hold 1, kill 1 and Marked for Death. I scored hold more and kill more.
VICTORY POINTS:
White Scars- 17
Tau- 5
TURN 3- WHITE SCARS

In my third turn, I switched to the Assault Doctrine. The Litany of Hate passed on the Chaplain as well.
The Captain, Librarian and Chaplain moved up towards the Ghostkeels, while the Chapter Master and Lieutenant advanced to join them. The Infiltrators moved up on the Drones, while the Scouts moved to grab the objective. The Khan advanced on the central objective.


At the end of the phase, I brought in the reserves. I put the two units of Intercessors on to the south to target the Drones. I brought the Inceptors in on my right flank in the deployment zone. There was not point risking the units to give away points for Marked for Death.


The Librarian cast Storm-wreathed with the help of a CP re-roll on the Captain.
The Intercessors fired on the Drones, killing three of the squad. The Infiltrators and Scouts added their firepower, but failed to do any damage. The Thunderfire Cannon fired at a lone Drone, killing it.
The Eliminators fired at the Ethereal, wounding him once and killing a drone as well.
The Captain charged both Ghostkeels. The Chaplain charged in too, surviving the firepower of the supporting Ghostkeel. The Librarian joined him in the charge. The Infiltrators charged the last Drone from the squad in front of them, but the support fire of the Riptides killed the squad. The Intercessors managed to make a long charge on the squad.


In the fight phase, the Captain struck at the Ghostkeel, doing 4 wounds. The Drones intercepted two wounds and the Ghostkeel took one wound, taking four damage. The Chaplain failed to harm the other Ghostkeel, while the Librarian killed a drone.
The Intercessors were able to kill two more Drones in combat. The attacks back put one wound on the Biker Captain.
At the end of my turn, I scored hold 1, kill 1, Behind Enemy Lines (maxed out), Postman, Butcher's Bill and the bonus point.
TURN 3- TAU

The Captain was able to stop both Ghostkeels from falling back. This was a big blow for Adam, as he would not be able to target and kill my characters with his powerful shooting attacks.
The Commanders and Ethereal moved up on the White Scars on the left flank. Both Riptides overcharged for additional shots.


The firepower of the Tau lit up the Intercessors and Scouts, wiping out all three squads with their shooting.
In combat, the Ghostkeel did a wound on the Captain, but it was saved. The Captain did four wounds on the Ghostkeel, but managed to kill three drones. The Chaplain did 3 wounds, which were all saved. The Librarian did two wounds on the Ghostkeel, which got through its invulnerable save and did a great 6 damage on it (the maximum).
At the end of his turn, Adam scored hold 1, kill 1 and Engineers. I scored hold more and kill more.
VICTORY POINTS:
White Scars- 25
Tau- 8
TURN 4- WHITE SCARS

We were running short on time, so this would be a very quick turn. The Khan moved up to grab a final objective, while the Chapter Master and Lieutenant advanced towards the Tau lines. The Librarian cast Storm-wreathed on the Chapter Master, then smite, causing 3 mortal wounds on the Ghostkeel.

The Thunderfire targeted the Drones, killing both. In the charge phase, the Chapter Master charged the Riptide, while the Lieutenant charged the Ghostkeel.

The Chapter Master struck at the Riptide, but only managed to kill a few Drones. The Captain killed one Ghostkeel, while the Chaplain killed the other.
At the end of my turn, I scored Hold 1, kill 1, the objective bonus, Butcher's Bill and the Postman.
TURN 4- TAU

The remaining Tau forces moved up on the White Scars characters. The firepower managed to kill the Lieutenant, Chaplain and Librarian, as Adam focused his firepower on the weaker characters.


At the end of his turn, he scored Hold 1, kill 1, Engineers, Headhunter (for 3 pts) and kill more. I scored hold more.
VICTORY POINTS:
White Scars- 31
Tau- 15

A win for the White Scars.
AFTER-BATTLE THOUGHTS
Thanks to Adam for a fun game, it was pretty brutal for the Tau.
I was really surprised when Adam picked the Defender option when he won the roll off. Given the number of infiltrating units and the Chapter Tactics for the White Scars, it was going to be really easy for me to get into his lines on my first turn. I was worried when we were playing Hammer and Anvil, but again, Adam chose to deploy pretty close to the edge of his deployment zone.
These were two big advantages for me. Even though I didn't managed to do a whole lot of damage to his army, thanks to the masses of drones, I didn't need to in order to win the mission. I was able to tie up his units to stop the firepower from doing a lot of damage to my forces, as well as keeping him pretty well locked in his deployment zone.
After my first turn, I think it may have been better for Adam to advance towards my lines rather than retreating. I had not been able to get the Librarian into combat in my first turn, leaving him out in the open. Had he sent a Commander after him to kill him, that would have negated my ability to shut down his overwatch fire with my psychic powers. It would have been really tough to charge in against his forces after that.
In addition, he could have pushed the Ghostkeels forward on the other flank to go after my backline forces, which may have forced me to split my army to have to deal with them. The Chapter Master probably could have dealt with one in combat easily, but there was nothing to stop him from being targeted by the others after that and killed.
I think White Scars are a very tough match up for Tau. The ability to get a lot of first turn charges off, as well as being able to shut down enemy overwatch and stop them from falling back and shooting is a killer combination against Tau.
I was particularly happy with the combat wrapping that I did in turn 1. This stopped much of my front forces from being targeted by the enemy firepower, as I was locked in combat, allowing me to use this as a spring board to force the Tau army back.
The Drones were as annoying as ever, tanking a ton of wounds I tried to put on the Riptides and Ghostkeels. In fact, I didn't actually managed to kill many of them, focusing on the two-model drone units to get Butcher's Bill each time.
I really like the Postman secondary in this mission. That was the reason that I took the Khan in the list. The mobility, durability and combat ability are great for this particular secondary. It also works well in Hammer and Anvil deployment, as I didn't have to venture too close to the enemy army to score the first three points.
Overall, a good start to the tournament. The next game would see my White Scars take on the Iron Hands, post the new FAQ.
A change up from my last tournament list. I dropped the Impulsor and Phobos Librarian from the list, as they didn't really do much for it. Instead I added a unit of Grav Centurions. I had faced a few of these in my last tournament, and was impressed by their firepower and damage ability, so wanted to see how they would perform in my list.
Adam's list consisted of:
Battalion Detachment
Coldstar Commander- 2 Shield Drones, Through unity, devastation, Drone Controller, 3 Missile Pods
Ethereal- Hover drone, 2 Shield Drones
5 Breacher Team- Pulse Blaster, Shield Drone, Guardian Drone
5 Breacher Team- Pulse Blaster, Shield Drone, Guardian Drone
5 Breacher Team- Pulse Blaster, Shield Drone, Guardian Drone
Drone Squad 1- 6 Shield Drones, 2 Marker Drones
Drone Squad 2- 6 Shield Drones, 2 Marker Drones
Drone Squad 3- 4 Shield Drones, 4 Marker Drones
Vanguard Detachment
Commander- 4 Cyclic Ion Blasters, 2 Shield Drones
Firesight Marksman- Markerlight
Ghostkeel- 2 Fusion Blasters, Cyclic Ion Raker, Shield Generator, Velocity Tracker, 2 Stealth Drones
Ghostkeel- 2 Fusion Blasters, Cyclic Ion Raker, Shield Generator, Velocity Tracker, 2 Stealth Drones
Vanguard Detachment
Commander- 4 Cyclic Ion Blasters, 2 Shield Drones
Riptide- 2 SMS system, Heavy Burst Cannon, Velocity Tracker, Advanced Targeting System
Riptide- 2 SMS system, Heavy Burst Cannon, Velocity Tracker, Advanced Targeting System
Ghostkeel- 2 Fusion Blasters, Cyclic Ion Raker, Shield Generator, Velocity Tracker, 2 Stealth Drones
Sept Choices:
Gifted Pilots- If suit is stationary or removes less than half its move, you can re-roll 1's to wound.
Stabilisation Systems- Ignore the penalty for moving and firing heavy weapons.
A lot of Drones to take out! This list featured a lot of heavy firepower that could make a mess of my Marines. I would need to get them into combat quickly and try to neuter the drones before I could take on the heavier elements of the army.
Adam won the roll off and chose to be the Defender, that was surprising to me! He then rolled for the deployment and chose Hammer and Anvil, which was to be expected. We placed the objectives as shown below:

For secondaries, I chose Behind Enemy Lines, Butcher's Bill and the Postman (Khan). With the deployment type and objective placement, I figured I could easily get to four of the objectives with my Biker to score all the points. Adam chose Engineer's (the two large Drone squads with majority Shield Drones), Marked for Death (Centurions, two Inceptors and Chapter Master) and Headhunter.
I deployed my army first. I put the Thunderfire Cannon, Tactical Squad, Chapter Master and Lieutenant in the central ruins as a firebase, with a unit of Intercessors holding the objective on the left. I put the Khan on the objective on the right and put a unit of Scouts behind him. I put the two units of Infiltrators and Scouts on the right flank, with a unit of Scouts on the left, as close to the enemy deployment zone as possible. The Eliminators went in the central ruins, while the rest of my characters deployed in the centre, on my deployment line.
I spent 3CP to put the Centurions and two squads of Intercessors in reserve, along with the Inceptor Squads.
In reply, Adam deployed the Ghostkeels at the back of his deployment zone on the right flank. He then deployed the bulk of his forces on his left, right up to the line. Both Riptides went on the left, surrounded by drones, with the Fire Warriors acting as a screen for them. The Commanders deployed further back on the left and in the centre, with another fire warrior squad holding the ruins towards the back.
I was fully expecting Adam to deploy on his back line, making it a long slog for my forces to get to his army. As it was, much of my forward forces would be able to charge his army on turn 1. My plan was to go for the throat of the army, charging and hopefully wrapping some squads to stop them from falling back to keep me safe from the enemy firepower.


I took the first turn and there was no seize the initiative (thankfully!). Adam spent 2CP to prepare positions.
TURN 1- WHITE SCARS

I used the Canticle of Hate on the Chaplain, passing it with a CP re-roll.
The Scouts on the left moved up to screen the Khan, keeping him safe from the enemy firepower. On the right flank, the Scouts advanced onto the central objective, while the Infiltrators advanced on the Tau. The Scouts and Infiltrators moved up on the Tau line, while the characters advanced to support them.


The Librarian cast Storm-wreathed on the Biker Captain to block the enemy overwatch, passing with a CP re-roll. He then cast Ride the Winds on him as well.
The Eliminators fired at the Firesight Marksman, wounding him once. The Infiltrators fired at the Breacher Team, wounding them 6 times, but only killing one. The Scouts added their firepower, killing three more. The Thunderfire Cannon fired twice at the Drones, killing one squad of two.
In the charge phase, the Biker Captain assaulted the Breachers, Drones and Riptide. The Infiltrators charged the Breacher Team, losing one of their squad to supporting fire from the other Tau. The Scouts and Chaplain charged the lone Fire Warrior, while the second squad of Infiltrators charged the Drones and Firesight Marksman.
In the fight phase, the Captain struck at the Riptide, doing three wounds with a CP re-roll. Only one drone succumbed to the attacks. I positioned the Infiltrators on the right so that only one could attack, kiling one of the Fire Warriors. The squad then consolidated to wrap the remainder of the squad in combat.


The Chaplain killed the lone Fire Warrior, then both he and the Scouts consolidated into the Breacher Team in front of them. The other Infiltrator squad attached the Drones and Marksman, but failed to get through their armour.
The Tau struck back, but failed to do any damage to the Astartes forces.

At the end of my turn, I scored hold 1, kill 1, the objective bonus, Behind Enemy lines, Butcher's Bill and the Postman.
TURN 1- TAU

The Tau Commander ordered Mont'ka and pulled his forces back from the White Scars, with only one squad staying locked in combat with the enemy forces. The Riptide was able to fall back, after I failed my Master of Snares roll, even with a CP re-roll. The Drones were also able to fall back from combat.


The Riptide overcharged its Nova Reactor to get a 3+ invulnerable save.
In the shooting phase, the Marker Drones lit up the Infiltrators, Adam then using the stratagem to put another light on the squad. The Commander fired at the Infiltrators, killing three of the squad. The second Commander added his firepower, killing the rest of the squad.
The Ghostkeels opened up on the Scouts in the ruins in front of them, killing the squad.


In the fight phase, the Captain struck, killing two of the Breacher team. Adam pulled the casualties from the Chaplain and Scouts. The Infiltrators then attacked, but only managed to kill one after some terrible rolls, leaving one alive. The lone Fire Warrior did no damage to the Infiltrators, passing his morale test to stay in the fight.
At the end of the turn, Adam scored hold 1 and kill 1. I scored hold more and kill more.
VICTORY POINTS:
White Scars- 8
Tau- 2
A great first turn for the Scars had seen me get into the enemy lines and start with a strong lead. I would need to see if I could capitalise on this.
TURN 2- WHITE SCARS

In my second turn, I moved to the Tactical Doctrine, and passed the Canticle of Hate on the Chaplain.
The Khan advanced to grab the second objective in my deployment zone, while the Chapter Master and Lieutenant advanced towards the central ruins. The forward White Scars units continued to move up on the retreating Tau. At the end of the phase, the Centurions arrived, landing to the south to target the Riptides.


In the psychic phase, the Librarian cast Storm-wreathed on the Biker Captain. He then cast Ride the Winds on him.
I used the Gravitic Amplification stratagem on the Centurions. The Bolters targeted the Drones, while the Grav Cannons targeted the Riptides. The Bolters only managed to kill one drone (after some great saves!), while the Grav did 6 wounds, but was passed onto the nearby drones, killing two of the units.
The Infiltrators fired at the lone Fire Warrior, but failed to kill him with their pistols. The Biker Captain was able to kill one Shield Drone, while the Thunderfire Cannon took out another drone unit holding the objective.
The Biker Captain charged the Riptide and Drones, as Adam had left space for him to get through. The Chaplain and Scouts assaulted the Firesight Marksman, while the Librarian charged the Breacher Team.


The Captain struck at the Riptide, only doing one wound, which a Drone saved. The Chaplain killed the Marksman, consolidating into the Drones. The Infiltrators killed the last of the Breacher Team, while the Librarian was able to move into the Drones as well. The Riptide managed to do 3 wounds on the Captain, but failed to get past the Storm Shield.
At the end of my turn, I scored hold 1, kill 1, the bonus, behind enemy lines (for 2 pts), the Postman and Butcher's Bill.
TURN 2- TAU

The Ethereal gave nearby units re-rolls of 1 to hit. Both Riptides overcharged to give themselves extra shots.
The Captain was able to block the Drones from falling back with a CP re-roll, while the Riptide was able to fall back (I had only passed one out of 6 of the rolls so far).


The Ghostkeels moved up on the objective, while the rest of the army continued to move back from the White Scars.
The Drones tried to markerlight the Scouts, but failed to hit them. The Riptide fired at the Centurions and Eliminators (with the SMS). One Centurion was killed and one was wounded. An Eliminator also took a wound. The Ghostkeels fired at the Centurions, but failed to do any damage. The second Riptide added its firepower, killing the Centurions and two of the Scouts. The Commander fired at the Infiltrators, killing one.

In the fight phase, the Drones did no damage. In reply, the Librarian, Chaplain and Captain killed two of the Drones.
At the end of his turn, Adam scored Hold 1, kill 1 and Marked for Death. I scored hold more and kill more.
VICTORY POINTS:
White Scars- 17
Tau- 5
TURN 3- WHITE SCARS

In my third turn, I switched to the Assault Doctrine. The Litany of Hate passed on the Chaplain as well.
The Captain, Librarian and Chaplain moved up towards the Ghostkeels, while the Chapter Master and Lieutenant advanced to join them. The Infiltrators moved up on the Drones, while the Scouts moved to grab the objective. The Khan advanced on the central objective.


At the end of the phase, I brought in the reserves. I put the two units of Intercessors on to the south to target the Drones. I brought the Inceptors in on my right flank in the deployment zone. There was not point risking the units to give away points for Marked for Death.


The Librarian cast Storm-wreathed with the help of a CP re-roll on the Captain.
The Intercessors fired on the Drones, killing three of the squad. The Infiltrators and Scouts added their firepower, but failed to do any damage. The Thunderfire Cannon fired at a lone Drone, killing it.
The Eliminators fired at the Ethereal, wounding him once and killing a drone as well.
The Captain charged both Ghostkeels. The Chaplain charged in too, surviving the firepower of the supporting Ghostkeel. The Librarian joined him in the charge. The Infiltrators charged the last Drone from the squad in front of them, but the support fire of the Riptides killed the squad. The Intercessors managed to make a long charge on the squad.


In the fight phase, the Captain struck at the Ghostkeel, doing 4 wounds. The Drones intercepted two wounds and the Ghostkeel took one wound, taking four damage. The Chaplain failed to harm the other Ghostkeel, while the Librarian killed a drone.
The Intercessors were able to kill two more Drones in combat. The attacks back put one wound on the Biker Captain.
At the end of my turn, I scored hold 1, kill 1, Behind Enemy Lines (maxed out), Postman, Butcher's Bill and the bonus point.
TURN 3- TAU

The Captain was able to stop both Ghostkeels from falling back. This was a big blow for Adam, as he would not be able to target and kill my characters with his powerful shooting attacks.
The Commanders and Ethereal moved up on the White Scars on the left flank. Both Riptides overcharged for additional shots.


The firepower of the Tau lit up the Intercessors and Scouts, wiping out all three squads with their shooting.
In combat, the Ghostkeel did a wound on the Captain, but it was saved. The Captain did four wounds on the Ghostkeel, but managed to kill three drones. The Chaplain did 3 wounds, which were all saved. The Librarian did two wounds on the Ghostkeel, which got through its invulnerable save and did a great 6 damage on it (the maximum).
At the end of his turn, Adam scored hold 1, kill 1 and Engineers. I scored hold more and kill more.
VICTORY POINTS:
White Scars- 25
Tau- 8
TURN 4- WHITE SCARS

We were running short on time, so this would be a very quick turn. The Khan moved up to grab a final objective, while the Chapter Master and Lieutenant advanced towards the Tau lines. The Librarian cast Storm-wreathed on the Chapter Master, then smite, causing 3 mortal wounds on the Ghostkeel.

The Thunderfire targeted the Drones, killing both. In the charge phase, the Chapter Master charged the Riptide, while the Lieutenant charged the Ghostkeel.

The Chapter Master struck at the Riptide, but only managed to kill a few Drones. The Captain killed one Ghostkeel, while the Chaplain killed the other.
At the end of my turn, I scored Hold 1, kill 1, the objective bonus, Butcher's Bill and the Postman.
TURN 4- TAU
The remaining Tau forces moved up on the White Scars characters. The firepower managed to kill the Lieutenant, Chaplain and Librarian, as Adam focused his firepower on the weaker characters.


At the end of his turn, he scored Hold 1, kill 1, Engineers, Headhunter (for 3 pts) and kill more. I scored hold more.
VICTORY POINTS:
White Scars- 31
Tau- 15

A win for the White Scars.
AFTER-BATTLE THOUGHTS
Thanks to Adam for a fun game, it was pretty brutal for the Tau.
I was really surprised when Adam picked the Defender option when he won the roll off. Given the number of infiltrating units and the Chapter Tactics for the White Scars, it was going to be really easy for me to get into his lines on my first turn. I was worried when we were playing Hammer and Anvil, but again, Adam chose to deploy pretty close to the edge of his deployment zone.
These were two big advantages for me. Even though I didn't managed to do a whole lot of damage to his army, thanks to the masses of drones, I didn't need to in order to win the mission. I was able to tie up his units to stop the firepower from doing a lot of damage to my forces, as well as keeping him pretty well locked in his deployment zone.
After my first turn, I think it may have been better for Adam to advance towards my lines rather than retreating. I had not been able to get the Librarian into combat in my first turn, leaving him out in the open. Had he sent a Commander after him to kill him, that would have negated my ability to shut down his overwatch fire with my psychic powers. It would have been really tough to charge in against his forces after that.
In addition, he could have pushed the Ghostkeels forward on the other flank to go after my backline forces, which may have forced me to split my army to have to deal with them. The Chapter Master probably could have dealt with one in combat easily, but there was nothing to stop him from being targeted by the others after that and killed.
I think White Scars are a very tough match up for Tau. The ability to get a lot of first turn charges off, as well as being able to shut down enemy overwatch and stop them from falling back and shooting is a killer combination against Tau.
I was particularly happy with the combat wrapping that I did in turn 1. This stopped much of my front forces from being targeted by the enemy firepower, as I was locked in combat, allowing me to use this as a spring board to force the Tau army back.
The Drones were as annoying as ever, tanking a ton of wounds I tried to put on the Riptides and Ghostkeels. In fact, I didn't actually managed to kill many of them, focusing on the two-model drone units to get Butcher's Bill each time.
I really like the Postman secondary in this mission. That was the reason that I took the Khan in the list. The mobility, durability and combat ability are great for this particular secondary. It also works well in Hammer and Anvil deployment, as I didn't have to venture too close to the enemy army to score the first three points.
Overall, a good start to the tournament. The next game would see my White Scars take on the Iron Hands, post the new FAQ.
Great report, text book take down of the Tau, pin them and win on the mission. The writing was on the wall from turn 1, and the nail was when you were scoring almost as much as in the Tau turn with the end of battle round points.
ReplyDeleteI also love the breakdown you do at the end of the battle report, its very informative. Got to read up on the White Scar rules, as a Tau player that was entertaining but brutal to read.
Rathstar
Thanks, Rathstar. Yeah, it was pretty much how I play against most Tau armies when I can these days. The thing is, they have the mobility to get out of combat and press your lines as they move.
DeleteHad he taken the first turn, I would probably have deployed my army further back and more conservatively, so he could have ventured out and gotten more board control with his army. This may not have given me as many hold more and bonus points during the game and brought it a lot closer.
Ouch brutal but played well to your speed strength. Nicely done. The T’au started the fight back in the last turn however by then the damage was done. Great report.
ReplyDeleteThanks Siph! I feel bad when games are so one sided, but I am not going to argue about a favourable match up at a tournament.
DeleteEspecially after so many Imperial Knights!
DeleteIndeed! I did not escape them in this tournament, but fortunately they are not as popular as they once were.
Delete