
This week's battle report sees another outing for my tournament Dark Angels army, this time facing the new Necron codex for the first time, commanded by Moz.
In this game, were were playing Kill Confirmed from the Chapter Approved Maelstrom of War missions, using Vanguard Strike deployment. This mission uses three cards per turn, and you cannot discard any cards that require you to kill an enemy unit. In addition, you earn a victory point for each enemy unit destroyed.

In this game, were were playing Kill Confirmed from the Chapter Approved Maelstrom of War missions, using Vanguard Strike deployment. This mission uses three cards per turn, and you cannot discard any cards that require you to kill an enemy unit. In addition, you earn a victory point for each enemy unit destroyed.

My Dark Angels army consisted of:
Battalion Detachment
Azrael (Az)
Primaris Lieutenant- Master-crafted Auto Bolt Rifle (L)
Primaris Ancient- Bolt Rifle (An)
5 Intercessors- Bolt Rifle (I1)
5 Intercessors- Bolt Rifle (I2)
5 Devastator Squad- Heavy Bolter, Bolters, Armorium Cherub (D)
5 Scouts- Bolters, Heavy Bolter (S1)
5 Scouts- Bolters, Heavy Bolter (S2)
5 Scouts- Bolt Pistols, Combat Knives (S3)
10 Hellbalsters- Plasma Incinerators (H)
Outrider Detachment
Sammael (S)
5 Black Knights- Plasma Talons, Corvus Hammers (BK)
4 Ravenwing Bikers- Flamer, Twin Bolters, Storm Bolter (RB1)
4 Ravenwing Bikers- Meltagun, Twin Bolters, Storm Bolter (RB2)
4 Ravenwing Bikers- Twin Bolters, Storm Bolter (RB3)
4 Ravenwing Bikers- Twin Bolters, Storm Bolter (RB3)
Ravenwing Darkshroud- Assault Cannon (D)
10 Command Points
After the recent FAQ, I dropped the Dark Talon from my list and added a third unit of Ravenwing Bikers. As much as I like the Dark Talon, I'm not sure it is worth 200 pts in my list. It has the potential to do a lot of damage, but it rarely survives past turn 1 in my games. Perhaps I am just playing it wrong and need more practice, but it didn't really bring much to my list.
Moz's army consisted of:
Battalion Detachment
Cryptek (C1)
Cryptek (C2)
20 Necron Warriors (NW1)
20 Necron Warriors (NW2)
10 Immortals (I)
5 Lychguard (L)
The Deceiver (D)
Monolith (M)
Tesseract Vault (V)
A lot of big heavy armour in the Necron List. I had not actually faced them since the codex was released, so would be interested to see how they worked now. I had not faced the Tesseract Vault, but had heard that it was a pretty powerful addition to the army.
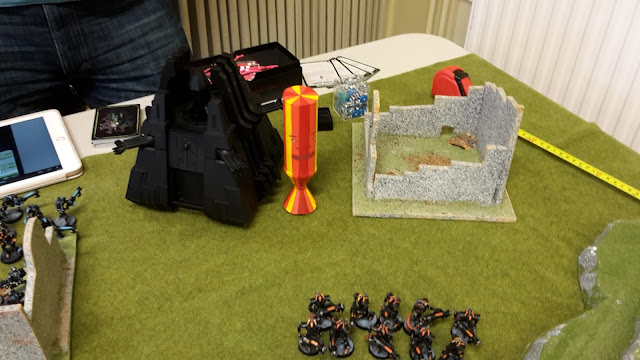
We set up the objectives as shown below:

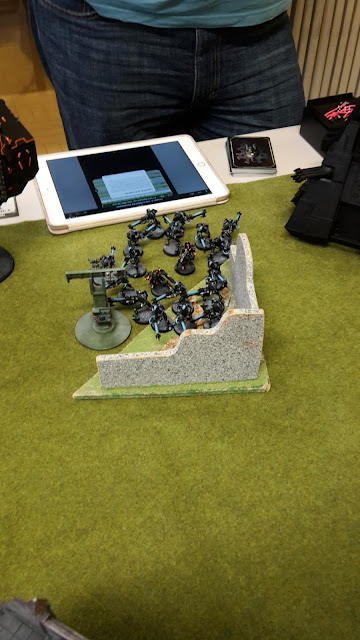
We then deployed our forces.

I put the Hellblasters and Black Knights on the left flank, opposite the Tesseract Vault, hoping to take it out early with my Plasma firepower. The Devastators held the objective in the centre of my deployment zone, while the Intercessors spread out. I put the Bikers on the right hand flank to move up on the objectives and flank the Necron forces.
I deployed the three Scout units in front as a screen to block the Necron advance and soak up the powers from the Tesseract Vault.
Moz deployed the Tesseract Vault, one squad of Warriors and the two Crypteks on the right flank, with the Immortals, Deceiver and Monolith on the left. He kept the Lynchguard and one unit of Warriors in reserve to deploy from the Monolith.


I used the Secret Agenda stratagem to keep my maelstrom cards a secret for the game. I didn't get the command point back. I think this is a great stratagem, stopping your opponent from knowing what you are going after.
I lost the roll off for first turn and failed to seize the initiative. Moz then used the Deceiver's powers to move the Deceiver, Tesseract Vault and Monolith to his left flank, right besides the Bikers and Scouts. This put my Plasma squads far out of position to deal with the big threats.


TURN 1- NECRONS
In his first turn, Moz drew Secure Objective 1, Defend Objective 3 and Defend Objective 5.

On the left flank, the Immortals moved up towards the Scouts position, while the Tesseract Vault, Deceiver and Monolith began their relentless advance on the Dark Angels lines.

On the right, the Cryptek used Veil of Darkness to teleport himself and the Necron Warriors besides the Hellblaster Squad.

I used Auspex Scan to fire on the Warriors with the Hellblasters, wounding them 7 times and killing seven of the Necron Warriors.
The Ctan then used their powers. The Vault used Seismic Assault on the Flamer Bikers, causing one mortal wound. It then used Cosmic Fire on the Scouts, but failed to manifest the power. It then used Antimatter Meteor on the Scouts, killing three.
The Deceiver used Transdimensional Thunderbolt on the Bikers, failing to harm the target unit, but doing one wound on the unit of Bikers behind them.
In the shooting phase, the Immortals fired on the two remaining Scouts, killing them and gaining First Blood. The Monolith fired at the Intercessors and Bikers, doing 5 wounds on the Primaris Marines and killing two of the Bike squad.
The Tesseract Vault fired on the unit of Bikers, killing them in a flurry of Gauss fire.

On the other flank, the Necron Warriors fired on the Hellblaster sqaud, wounding them three times and killing one of the Primaris Marines. The Ancient allowed the Hellblaster to fire back and he was able to slay two more of the Necrons.
At the end of his turn, Moz scored First Blood and two kill points. He discarded Defend Objective 2.
TURN 1- DARK ANGELS
In my first turn, I drew Secure Objective 3, Secure Objective 6 and Defend Objective 1.

On the left flank, the Hellblaster Squad and Dark Angels characters moved up on the Necron Warriors. The Scout Squad moved up to engage the lone Cryptek, while the Black Knights used the Speed of the Raven Stratagem to advance on the Cryptek (once again, I did not get the command point back).


On the right, the Bikers and Intercessors moved up on the Immortals.
The Hellblaster Squad overcharged their Plasma Incinerators and fired on the Necron Warriors. They managed to wipe out the squad for the loss of one of the Primaris Marines.


Sammael fired his Plasma Cannon at the Cryptek that was supporting the Warriors, killing him.
The Black Knights then used Weapons of the Dark Age, firing on the Cryptek and killing him.

On the right flank, the Bikers fired on the Immortals, killing five of the squad. The Meltagun Bike squad then fired on them, killing another four in total and leaving one remaining. The three Intercessors fired on the lone surviving Immortal, wounding him once. Moz failed his armour save, but used a command point re-roll to pass it and leave one surviving. That was annoying, as with one left, more of the squad could come back thanks to his reanimation protocols.
The Devastator squad fired on the Monolith, wounding it once.
In the charge phase, the Bikers assaulted the lone Immortal. I managed to make the charge after using a command point re-roll (which I got back this time with my warlord trait). The Bikers struck at the lone Necron, killing him and wiping out the unit.

At the end of my turn, I scored Secure Objective 3, Secure Objective 6, Slay the Warlord and four kill points. I also discarded Defend Objective 1.
VICTORY POINTS:
Necrons- 3
Dark Angels- 7
A good start for the Dark Angels. I had taken out a number of the enemy units to go ahead in points. However, the Tesseract Vault and Monolith were a bit threat with their potent firepower and my units were out of position to deal with it.
TURN 2- NECRONS
In his second turn, Moz had Secure Objective 1, Secure Objective 2 and Defend Objective 5.

The Tesseract Vault moved up on the Bikers holding the objective, while the Monolith and Deceiver moved up on the Primaris Marines.


The Tesseract Vault used Antimatter Meteor on the Bikers in front of it, killing two of them. It then used Cosmic Fire, killing one more of the squad, then used Time's Arrow, killing the last Bikers and finishing off the squad.
The Deceiver then used Sky of Falling Stars, killing one of the Intercessors.

In the shooting phase, the Monolith fired at the Intercessors, killing the squad. The Tesseract Vault fired on the last unit of Ravenwing Bikers, wounding them 18 times! I failed 7 saves and it left one Biker on a single wound. The lone Biker passed his morale test.
At the end of his turn, Moz scored two kill points, Secure Objective 1 and Secure Objective 2. He discarded Defend Objective 5.
TURN 2- DARK ANGELS
In my second turn, I drew Secure Objective 2, Secure Objective 5 and Secure Objective 6. Kill points would now be hard to come by, as I would need to take out the big vehicles.

I moved the lone Biker up to the Deceiver, hoping his Meltagun could damage the enemy character. The Scout squad moved up towards the objective in the enemy deployment zone.


I then advanced the Black Knights back to join the Hellblaster Squad. I could have sent them after the Tesseract Vault and tried to damage it. However, they would likely have not killed it and would be wiped out in the following turn. I decided to pull them back to go after the Vault with the Hellblasters and Black Knights once it got closer, using the short range of its weapons and powers to force it to come to me.
The Meltagun Biker fired on the Deceiver, hitting and wounding, but he made his invulnerable save. The Devastators then used the Hellfire Shells stratagem to fire on the Deceiver. They managed to do two mortal wounds with a command point re-roll. I then used the Armorium Cherub to fire once more, doing another three mortal wounds.


The central Scout unit fired their Heavy Bolter at the Deceiver, wounding him two more times and leaving him on only three wounds remaining.
At the end of my turn, I scored Secure Objective 5 and Secure Objective 6. I discarded Secure Objective 2.
VICTORY POINTS:
Necrons- 7
Dark Angels- 9
The Necrons had narrowed the gap. I would need to be careful, as I had a lot more kill points to give up than the Necrons.
TURN 3- NECRONS
In his third turn, Moz drew Priority Orders Received (Kingslayer), Secure Objective 6 and Behind Enemy Lines.

Moz used the Enhanced Beam stratagem to deploy the Necron Warriors and Immortals from the Monolith, while the Necron forces continued to move up on the Dark Angels lines.

The Tesseract Vault used Transdimensional Thunderbolt to kill the last Biker, then hit the Scouts with a Seismic Assault, killing one. It then used Antimatter Meteor on the central Scouts, but failed to do any damage.
The Vault then opened fire on the central Scout unit, wounding them 11 times. I failed 6 of my 3+ saves and the unit perished.


At the end of his turn, Moz scored two kill points and discarded Priority Orders Received.
TURN 3- DARK ANGELS
In my third turn, I drew Secure Objective 4, Hold the Line and Overwhelming Firepower.

There wasn't much movement by the Dark Angels. The Scouts advanced on objective 4, ready to sacrifice themselves to hold the objective.


The Devastators fired on the Lynchguard with the Hellfire Shells stratagem, killing one. I got the command point back thanks to Azrael.
Sammael fired his Plasma Cannon at the Vault, hitting and wounding twice, but it saved the shots on a double 6.
At the end of my turn, I scored Secure Objective 4 and Behind Enemy Lines. I discarded Overwhelming Firepower.
VICTORY POINTS:
Necrons- 9
Dark Angels- 11
I still maintained my slight lead in the game. The short range of the Monolith and Tesseract Vault was stopping them from causing a lot of damage on my army, but they were slowly getting closer to my lines.
TURN 4- NECRONS
This turn, Moz drew Secure Objective 5 to go with Secure Objective 6 and Behind Enemy Lines.

The Lynchguard that was slain arose again. The Necron forces moved up on the Dark Angels once more, the Necron Warriors advancing to get closer to the enemy lines.


The Tesseract Vault targeted the Scouts with its powers, killing only one of the squad.
In the shooting phase, the Monolith fired at the central Scouts, killing the squad. The Tesseract Vault fired on the Devastators, but was only able to kill one despite wounding 12 times.

At the end of his turn, Moz scored one kill point and discarded Secure Objective 6.
TURN 4- DARK ANGELS
In my fourth turn, I drew Secure Objective 2, Defend Objective 6 and No Prisoners.

Azrael decided that now was the time to launch the counter-attack. The Hellblasters and Black Knights moved up into range of the enemy Tesseract Vault.


The Black Knights used the Weapons of the Dark Age stratagem (for which I got the command point back). They overcharged their Plasma Talons and fired on the Vault, managing a great 10 wounds after all their shots hit and wounded! Moz failed 6 saves and the Vault took 18 wounds.
The Hellblasters then overcharged their weapons, firing at the Vault. They managed to hit with 9 of their 10 shots, but only wounded four times. Moz failed two saves and the Vault took 6 wounds. Sammael fired on the Vault, taking one more wound with its Storm Bolters, while the Lieutenant did another two wounds.
The Devastator Squad then fired their Hellfire Shells at the Vault and was able to take its last two wounds, destroying the construct. The Tesseract Vault exploded, killing three of the nearby Warriors.


The Intercessors added their firepower to the carnage, killing two more of the Necron Warriors.
At the end of my turn, I scored one kill point and No Prisoners. I discarded Secure Objective 2.
VICTORY POINTS:
Necrons- 10
Dark Angels- 13
TURN 5- NECRONS
In his fifth turn, Moz drew Area Denial and had Behind Enemy Lines and Secure Objective 5.

The Necron Warriors and Ctan advanced to get behind the enemy lines. The Deceiver then used Transdimensional Thunderbolt on the Intercessors, wounding them once.


The Monolith fired on the Devastators, wounding them 7 times. I then failed 5 of my 4+ saves and the squad perished.
At the end of the turn, Moz scored one kill point, Behind Enemy Lines and got three points for area denial. This took him to 15 points and gave him the lead for the first time in the game.
TURN 5- DARK ANGELS
This turn, I drew Secure Objective 3, Scour the Skies and Priority Orders Received (Domination).

The Black Knights and Sammael moved up on the Necron Warriors, the Black Knights using Speed of the Raven to advance on the enemy squad.


They then used Weapons of the Dark Age to overcharged their weapons and fire on the Monolith. One Black Knight died to the overcharge, but they managed to do 15 wounds on the enemy vehicle.
Sammael fired at the Monolith, wounding it once with his Plasma Cannon. His Storm Bolters targeted the Necron Warriors, killing two of the squad.
The Hellblasters fired their Plasma Incinerators at the Monolith, destroying the enemy vehicle. The Intercessors fired on the Necron Warriors, killing three of the squad.
In the charge phase, the Black Knights assaulted the Necron Warriors and the Deceiver. Sammael also managed to charge the Warriors after using a command point re-roll.
The Black Knights attacked the Warriors, killing two of the squad and wounding the Deceiver once. Sammael then struck at the Necron Warriors, wiping them out.


The Deceiver then attacked the Black Knights, killing three of the squad with a command point re-roll.
At the end of my turn, I scored two kill points, Scour the Skies and Secure Objective 3. I discarded Priority Orders Received.
VICTORY POINTS:
Necrons- 15
Dark Angels- 19
We rolled to see if the game continued and it did not. Moz scored Linebreaker, making the final score:
Moz's army consisted of:
Battalion Detachment
Cryptek (C1)
Cryptek (C2)
20 Necron Warriors (NW1)
20 Necron Warriors (NW2)
10 Immortals (I)
5 Lychguard (L)
The Deceiver (D)
Monolith (M)
Tesseract Vault (V)
A lot of big heavy armour in the Necron List. I had not actually faced them since the codex was released, so would be interested to see how they worked now. I had not faced the Tesseract Vault, but had heard that it was a pretty powerful addition to the army.
We set up the objectives as shown below:

We then deployed our forces.

I put the Hellblasters and Black Knights on the left flank, opposite the Tesseract Vault, hoping to take it out early with my Plasma firepower. The Devastators held the objective in the centre of my deployment zone, while the Intercessors spread out. I put the Bikers on the right hand flank to move up on the objectives and flank the Necron forces.
I deployed the three Scout units in front as a screen to block the Necron advance and soak up the powers from the Tesseract Vault.
Moz deployed the Tesseract Vault, one squad of Warriors and the two Crypteks on the right flank, with the Immortals, Deceiver and Monolith on the left. He kept the Lynchguard and one unit of Warriors in reserve to deploy from the Monolith.


I used the Secret Agenda stratagem to keep my maelstrom cards a secret for the game. I didn't get the command point back. I think this is a great stratagem, stopping your opponent from knowing what you are going after.
I lost the roll off for first turn and failed to seize the initiative. Moz then used the Deceiver's powers to move the Deceiver, Tesseract Vault and Monolith to his left flank, right besides the Bikers and Scouts. This put my Plasma squads far out of position to deal with the big threats.


TURN 1- NECRONS
In his first turn, Moz drew Secure Objective 1, Defend Objective 3 and Defend Objective 5.

On the left flank, the Immortals moved up towards the Scouts position, while the Tesseract Vault, Deceiver and Monolith began their relentless advance on the Dark Angels lines.

On the right, the Cryptek used Veil of Darkness to teleport himself and the Necron Warriors besides the Hellblaster Squad.

I used Auspex Scan to fire on the Warriors with the Hellblasters, wounding them 7 times and killing seven of the Necron Warriors.
The Ctan then used their powers. The Vault used Seismic Assault on the Flamer Bikers, causing one mortal wound. It then used Cosmic Fire on the Scouts, but failed to manifest the power. It then used Antimatter Meteor on the Scouts, killing three.
The Deceiver used Transdimensional Thunderbolt on the Bikers, failing to harm the target unit, but doing one wound on the unit of Bikers behind them.
In the shooting phase, the Immortals fired on the two remaining Scouts, killing them and gaining First Blood. The Monolith fired at the Intercessors and Bikers, doing 5 wounds on the Primaris Marines and killing two of the Bike squad.
The Tesseract Vault fired on the unit of Bikers, killing them in a flurry of Gauss fire.

On the other flank, the Necron Warriors fired on the Hellblaster sqaud, wounding them three times and killing one of the Primaris Marines. The Ancient allowed the Hellblaster to fire back and he was able to slay two more of the Necrons.
At the end of his turn, Moz scored First Blood and two kill points. He discarded Defend Objective 2.
TURN 1- DARK ANGELS
In my first turn, I drew Secure Objective 3, Secure Objective 6 and Defend Objective 1.

On the left flank, the Hellblaster Squad and Dark Angels characters moved up on the Necron Warriors. The Scout Squad moved up to engage the lone Cryptek, while the Black Knights used the Speed of the Raven Stratagem to advance on the Cryptek (once again, I did not get the command point back).


On the right, the Bikers and Intercessors moved up on the Immortals.
The Hellblaster Squad overcharged their Plasma Incinerators and fired on the Necron Warriors. They managed to wipe out the squad for the loss of one of the Primaris Marines.


Sammael fired his Plasma Cannon at the Cryptek that was supporting the Warriors, killing him.
The Black Knights then used Weapons of the Dark Age, firing on the Cryptek and killing him.

On the right flank, the Bikers fired on the Immortals, killing five of the squad. The Meltagun Bike squad then fired on them, killing another four in total and leaving one remaining. The three Intercessors fired on the lone surviving Immortal, wounding him once. Moz failed his armour save, but used a command point re-roll to pass it and leave one surviving. That was annoying, as with one left, more of the squad could come back thanks to his reanimation protocols.
The Devastator squad fired on the Monolith, wounding it once.
In the charge phase, the Bikers assaulted the lone Immortal. I managed to make the charge after using a command point re-roll (which I got back this time with my warlord trait). The Bikers struck at the lone Necron, killing him and wiping out the unit.

At the end of my turn, I scored Secure Objective 3, Secure Objective 6, Slay the Warlord and four kill points. I also discarded Defend Objective 1.
VICTORY POINTS:
Necrons- 3
Dark Angels- 7
A good start for the Dark Angels. I had taken out a number of the enemy units to go ahead in points. However, the Tesseract Vault and Monolith were a bit threat with their potent firepower and my units were out of position to deal with it.
TURN 2- NECRONS
In his second turn, Moz had Secure Objective 1, Secure Objective 2 and Defend Objective 5.

The Tesseract Vault moved up on the Bikers holding the objective, while the Monolith and Deceiver moved up on the Primaris Marines.


The Tesseract Vault used Antimatter Meteor on the Bikers in front of it, killing two of them. It then used Cosmic Fire, killing one more of the squad, then used Time's Arrow, killing the last Bikers and finishing off the squad.
The Deceiver then used Sky of Falling Stars, killing one of the Intercessors.

In the shooting phase, the Monolith fired at the Intercessors, killing the squad. The Tesseract Vault fired on the last unit of Ravenwing Bikers, wounding them 18 times! I failed 7 saves and it left one Biker on a single wound. The lone Biker passed his morale test.
At the end of his turn, Moz scored two kill points, Secure Objective 1 and Secure Objective 2. He discarded Defend Objective 5.
TURN 2- DARK ANGELS
In my second turn, I drew Secure Objective 2, Secure Objective 5 and Secure Objective 6. Kill points would now be hard to come by, as I would need to take out the big vehicles.

I moved the lone Biker up to the Deceiver, hoping his Meltagun could damage the enemy character. The Scout squad moved up towards the objective in the enemy deployment zone.


I then advanced the Black Knights back to join the Hellblaster Squad. I could have sent them after the Tesseract Vault and tried to damage it. However, they would likely have not killed it and would be wiped out in the following turn. I decided to pull them back to go after the Vault with the Hellblasters and Black Knights once it got closer, using the short range of its weapons and powers to force it to come to me.
The Meltagun Biker fired on the Deceiver, hitting and wounding, but he made his invulnerable save. The Devastators then used the Hellfire Shells stratagem to fire on the Deceiver. They managed to do two mortal wounds with a command point re-roll. I then used the Armorium Cherub to fire once more, doing another three mortal wounds.


The central Scout unit fired their Heavy Bolter at the Deceiver, wounding him two more times and leaving him on only three wounds remaining.
At the end of my turn, I scored Secure Objective 5 and Secure Objective 6. I discarded Secure Objective 2.
VICTORY POINTS:
Necrons- 7
Dark Angels- 9
The Necrons had narrowed the gap. I would need to be careful, as I had a lot more kill points to give up than the Necrons.
TURN 3- NECRONS
In his third turn, Moz drew Priority Orders Received (Kingslayer), Secure Objective 6 and Behind Enemy Lines.

Moz used the Enhanced Beam stratagem to deploy the Necron Warriors and Immortals from the Monolith, while the Necron forces continued to move up on the Dark Angels lines.

The Tesseract Vault used Transdimensional Thunderbolt to kill the last Biker, then hit the Scouts with a Seismic Assault, killing one. It then used Antimatter Meteor on the central Scouts, but failed to do any damage.
The Vault then opened fire on the central Scout unit, wounding them 11 times. I failed 6 of my 3+ saves and the unit perished.


At the end of his turn, Moz scored two kill points and discarded Priority Orders Received.
TURN 3- DARK ANGELS
In my third turn, I drew Secure Objective 4, Hold the Line and Overwhelming Firepower.

There wasn't much movement by the Dark Angels. The Scouts advanced on objective 4, ready to sacrifice themselves to hold the objective.


The Devastators fired on the Lynchguard with the Hellfire Shells stratagem, killing one. I got the command point back thanks to Azrael.
Sammael fired his Plasma Cannon at the Vault, hitting and wounding twice, but it saved the shots on a double 6.
At the end of my turn, I scored Secure Objective 4 and Behind Enemy Lines. I discarded Overwhelming Firepower.
VICTORY POINTS:
Necrons- 9
Dark Angels- 11
I still maintained my slight lead in the game. The short range of the Monolith and Tesseract Vault was stopping them from causing a lot of damage on my army, but they were slowly getting closer to my lines.
TURN 4- NECRONS
This turn, Moz drew Secure Objective 5 to go with Secure Objective 6 and Behind Enemy Lines.

The Lynchguard that was slain arose again. The Necron forces moved up on the Dark Angels once more, the Necron Warriors advancing to get closer to the enemy lines.


The Tesseract Vault targeted the Scouts with its powers, killing only one of the squad.
In the shooting phase, the Monolith fired at the central Scouts, killing the squad. The Tesseract Vault fired on the Devastators, but was only able to kill one despite wounding 12 times.

At the end of his turn, Moz scored one kill point and discarded Secure Objective 6.
TURN 4- DARK ANGELS
In my fourth turn, I drew Secure Objective 2, Defend Objective 6 and No Prisoners.

Azrael decided that now was the time to launch the counter-attack. The Hellblasters and Black Knights moved up into range of the enemy Tesseract Vault.


The Black Knights used the Weapons of the Dark Age stratagem (for which I got the command point back). They overcharged their Plasma Talons and fired on the Vault, managing a great 10 wounds after all their shots hit and wounded! Moz failed 6 saves and the Vault took 18 wounds.
The Hellblasters then overcharged their weapons, firing at the Vault. They managed to hit with 9 of their 10 shots, but only wounded four times. Moz failed two saves and the Vault took 6 wounds. Sammael fired on the Vault, taking one more wound with its Storm Bolters, while the Lieutenant did another two wounds.
The Devastator Squad then fired their Hellfire Shells at the Vault and was able to take its last two wounds, destroying the construct. The Tesseract Vault exploded, killing three of the nearby Warriors.


The Intercessors added their firepower to the carnage, killing two more of the Necron Warriors.
At the end of my turn, I scored one kill point and No Prisoners. I discarded Secure Objective 2.
VICTORY POINTS:
Necrons- 10
Dark Angels- 13
TURN 5- NECRONS
In his fifth turn, Moz drew Area Denial and had Behind Enemy Lines and Secure Objective 5.

The Necron Warriors and Ctan advanced to get behind the enemy lines. The Deceiver then used Transdimensional Thunderbolt on the Intercessors, wounding them once.


The Monolith fired on the Devastators, wounding them 7 times. I then failed 5 of my 4+ saves and the squad perished.
At the end of the turn, Moz scored one kill point, Behind Enemy Lines and got three points for area denial. This took him to 15 points and gave him the lead for the first time in the game.
TURN 5- DARK ANGELS
This turn, I drew Secure Objective 3, Scour the Skies and Priority Orders Received (Domination).

The Black Knights and Sammael moved up on the Necron Warriors, the Black Knights using Speed of the Raven to advance on the enemy squad.


They then used Weapons of the Dark Age to overcharged their weapons and fire on the Monolith. One Black Knight died to the overcharge, but they managed to do 15 wounds on the enemy vehicle.
Sammael fired at the Monolith, wounding it once with his Plasma Cannon. His Storm Bolters targeted the Necron Warriors, killing two of the squad.
The Hellblasters fired their Plasma Incinerators at the Monolith, destroying the enemy vehicle. The Intercessors fired on the Necron Warriors, killing three of the squad.
In the charge phase, the Black Knights assaulted the Necron Warriors and the Deceiver. Sammael also managed to charge the Warriors after using a command point re-roll.
The Black Knights attacked the Warriors, killing two of the squad and wounding the Deceiver once. Sammael then struck at the Necron Warriors, wiping them out.


The Deceiver then attacked the Black Knights, killing three of the squad with a command point re-roll.
At the end of my turn, I scored two kill points, Scour the Skies and Secure Objective 3. I discarded Priority Orders Received.
VICTORY POINTS:
Necrons- 15
Dark Angels- 19
We rolled to see if the game continued and it did not. Moz scored Linebreaker, making the final score:
 |
| End of the game. |
VICTORY POINTS:
Necrons- 16
Dark Angels- 19
A win for the Dark Angels.
AFTER-BATTLE THOUGHTS
EDIT- Doh! Forgot to add these in the original post!
Thanks to Moz for a great and tactical game.
Overall, I think the plan worked well. Suiciding the Black Knights to go after the Tesseract Vault in an earlier turn would have proved to be a mistake, as they might have done some damage, but would have been easily wiped out in the following turn. Plus, they needed Sammael in range to keep them from killing themselves with their overcharging Plasma Talons.
I pulled them back to support the Hellblasters and was able to pounce on the Tesseract Vault and Monolith with both units as they came closer.
I think that Moz made an error in re-deploying the Monolith and Vault to his left flank. They were able to pick on the Intercessors and Bikers there quite easily, but their short range and low movement value kept them out of the game and away from most of my army for much of the game.
I might have kept them on the right flank to go after my stronger Hellblasters and Black Knights. Those units could have been decimated in the first turn and seriously reduced my firepower for hitting back at the Necrons.
I really like using the Secret Agenda stratagem. Keeping your maelstrom cards secret each turn is fantastic, all for only one command point. I think I will be using it in almost all my games with the Dark Angels.
Great report, and it looked like a really fun game.
ReplyDeleteMoz's Vault sure does look terrifying, and showed it this game, however I think you are right about it being deployed to the flank being a mistake. Destroying the Vault in a turn sure was impressive. Dark Angels sure are the Plasma Kings :) I think any army has to go for the Black Knights and Hellblasters as soon as possible, they are just so destructive.
I must pop down Spiky more often.
Cheers Rathstar.
DeleteYeah, the Vault is a beast. It has the potential to do horrendous damage at close range.
Any time you fancy a game at Spiky club, give me a shout.
Mike, what dynasty was Moz playing?
ReplyDeleteI'm not sure, I'm afraid. Never saw it in the army list when I wrote it up.
DeleteNo problem. I dig your DA list, you’re very good with it! And practice seems to be paying off. Good luck at the London GT
DeleteList is undefeated so far, but I think the GT will fix that!
Deletei do like this list a lot more than your white scars one.
ReplyDeletethis has 2 big blobs of units that can cause significant damage in one turn.
the extra damage stratagem for plasma is fantastic. it makes that unit very flexible, as it has a volume of high strength and damage shots so can take out most targets.
i would be tempted by a few changes, i think you give up too many kill points.
Looking at the GT missions a lot of them have KPS in it and you have a lot of easy units to kill.
i would drop a scout unit and combine the remaining 2 in to 1. i would also drop the basic unit of bikers.
(i am assuming they are using the beta rules on 1st turn deep strikes so the screen is not needed as much)
with the spare points i would get more black knights
i would also put a missile launcher in the devs to be able to use the flakk stratagem
other than that i think that list looks really good. the hellblaster blob is going to do really well for you. it could take out a knight in 1 turn! (60ish% chance of doing so)
It is certainly a lot more powerful than the White Scars list. As you said, it has a lot of Plasma that can deal with most threats it comes up against.
DeleteI think the Scouts are not as vital in the list as they once were, thanks to the change to the Beta rules. However, they are still useful for quickly grabbing objectives out of my deployment zone in the first turns. They tend to be targeted and wiped out quickly, but are useful for scoring objectives early on.
Unfortunately, the lists for the GT are finalised, so I won't be making any more changes to the list. There were a few changes from the list above, mostly because I forgot I had moved a few things around.
Nice write up, Mike. Congrats on the win.
ReplyDeleteCheers Dave!
DeleteNice battle report. The Black Knights seemed to do pretty well here. Do you find them to be consistently effective?
ReplyDeleteOh, and I really liked your opponent's use of the Master Control Program avatar as a proxy for the Deceiver.
Cheers Scircal!
DeleteI find the Black Knights very useful in my list. However, they are a big target for the enemy firepower due to how effective they can be. They survived a while in this game, but do tend to die quite quickly in most of my other games.
Yeah, the Master Control Program was a nice touch.
Nice report. However, I'm not sure you can use Auspex scan on units that have already been deployed (that is not in reserves) and are being teleported (such as veil of darkness) up the field. The Auspexscan stratagem says you can use it on units coming from reserves. This could have made quite a difference, as all the Necron Warriors would have got to shoot at the Hellblaster Blob.
ReplyDeleteHi Hugh, thanks for commenting!
DeleteThis point was actually addressed in the recent FAQ. To quote directly:
"Q: Can the Auspex Scan Stratagem be used to shoot an enemy
unit that is removed from the battlefield and then set up again,
for example, when using a teleport homer?
A: Yes."
Thanks for the update. I guess a better play for him would have been to Tele port the shield immortals. They get 3+ invul with stratagem that returns mortals on a 6 up. You would probably need a unit of 10 though and some target saturation from Wraiths and Warriors to create a real dilema for what your Hellblasters shoot next. Finish off the Lychguard (taking more mortals) or let them rez - ignore the wraits?!
DeleteAnyway thanks for making these reports - it's a great blog.
Yeah, the Shield Immortals didn't really get to do much in the game.
DeleteGlad you are enjoying them Hugh!