
Here is my guide on magnetising the Imperial Knight.
With my White Scars army recently completed, I was keen to make a start on my Knight. I had picked up the Imperial Knight Renegade box as it was a bargain, selling off one of the Knights to make it even better value. I decided to magnetise my Knight to use all the available options, as I would be unlikely to purchase another.

There were two other guides online that I found very useful for my own attempts. These were Nick's guide (the Burning Eye) and Alex's guide (From the Fang). I decided to write up my own guide too, in part because I was going to do a couple of things differently after checking out the assembly, and what else is the internet for except repeating the same information over and over in a variety of different ways.
For my guide to magnetising the Imperial Knight, you will need:
- Imperial Knight (obviously!)
- Imperial Knight assembly guide (I used the one from the Renegades boxed set and I will be referring to numbered parts throughout)
- Hobby drill with 6 mm and 2 mm drill bits
- Eleven 6 mm x 2 mm magnets (I used these ones)
- Nine 2 mm x 1 mm magnets
- Hobby knife/stanley knife
- Superglue
- Plastic Glue
- Green Stuff or modelling clay
- Marker pen
GENERAL NOTE: I left the armour plates off of the Knight when assembling to make it easier to paint these separately and get to the detail underneath.
Part 1- Legs and Torso
This section will cover how to magnetise the Knight's legs to its torso, how to magnetise the heavy stubber/meltagun and how to magnetise the missile pod/autocannon on the top of the Knight.
This section will cover how to magnetise the Knight's legs to its torso, how to magnetise the heavy stubber/meltagun and how to magnetise the missile pod/autocannon on the top of the Knight.
Magnetising the Torso to the Legs
The first thing that I did was assemble the legs of the Imperial Knight. As mentioned above, I did not glue on the armour plates (parts 61, 62, 73 and 74). I also left off the "feet" parts (52 and 55) to paint separately. I decided to magnetise the legs to the torso based on Nick's guide.
I glued a 6 mm magnet to the top of part 83. Don't glue part 84 onto part 83!
 |
| 6 mm magnet on Part 83. |
I then assembled the torso (steps 4-5d). Part 84 was then glued into part 2- this is different from the assembly instructions.
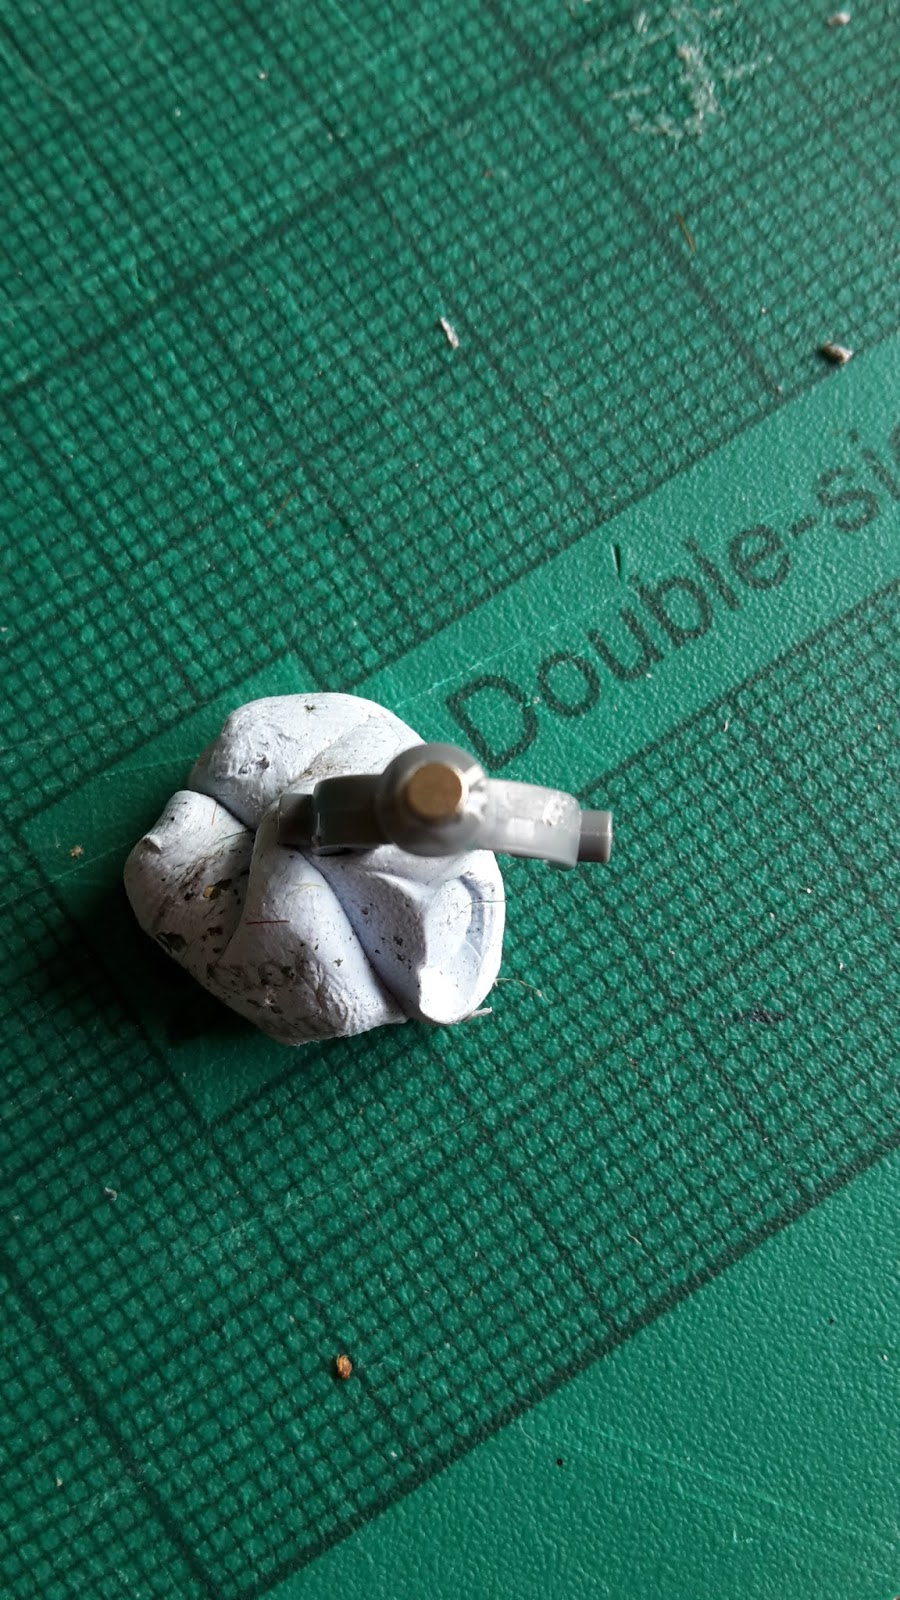
I filled part 84 with some green stuff. I put a second 6 mm magnet on the top of the one on part 83, then pressed part 84 onto it to mark the spot for the magnet to go on the green stuff. The magnet was then glued onto the green stuff (when it was dry).
 |
| Green stuff and magnet applied to the inside of part 84. |
Magnetising the Heavy Stubber and Meltagun
For gun mount A38, cut the mount to remove the thin section of the mount to leave you with 2 parts.
 |
| Part A83 |
 |
| Remove the thin section connecting the top and bottom. Keep both parts! |
Glue a 2 mm magnet to the bottom of the mount.
Add a second magnet and mark the section to be glued (with a marker pen).

Glue the second plastic part of A83 to the top of the second magnet.
 |
| It should look like this when completed. |
Glue the mounting semi-circle (part 100) in place. Glue the top part of A83 to the section.


 |
| Glue to top part in place. The gun will still be able to rotate thanks to the magnets. |
 |
| Bottom view. |
Do the same with the second gun mount (part 99). You only need to do the bottom section that attaches to the gun, you won't need the top part. You can now assemble the rest of the guns. On a side note, the guard for my meltagun (part 98) wouldn't actually fit over the barrel of the meltagun, so I don't have that in place.
 |
| Meltagun (minus gun guard) |
 |
| Heavy Stubber. |


Magnetising the missile pod and Autocannons
Glue a small piece of sprue to the underside of hull part 120 where the small hole is situated.

Glue a magnet to the top of this sprue section.

Cut the bottom "circle" off of the missile pod bottom section (part A28), the part that is supposed to go into the hole in the top hull. Glue a 2 mm magnet onto the centre of the missile pod bottom so that it will attach to the one in the hull.

Do the same for the bottom of the autocannon section (part A3)


Assemble the rest of the guns. You can now easily swap out the missile pod for the Autocannon. I decided not to magnetise the two different missile parts on the pod. I figured that one could easily sub for the other in a game.


2. Magnetising the Left Arm
This section will look at magnetising the left arm to make the weapons interchangeable. This section will cover the Reaper Chainsword and Thunderstrike Gauntlet, but once both arms are completed, all the weapons will be interchangeable between the two arms.
Reaper Chainsword
Reaper Chainsword
Cut the bottom part off of part 97 (the section that is supposed to go in parts 93 and 94).


Drill a hole for a 6 mm magnet into the bottom of part 97. I find it easier to first drill a 1 mm hole to act as a guide for the larger magnet hole. Superglue the magnet into the hole, then assemble the rest of the part as per Section 14a.
 |
| 1 mm guide hole. |
 |
| 6 mm hole for the magnet. |

 |
| Glue the magnet in place. |
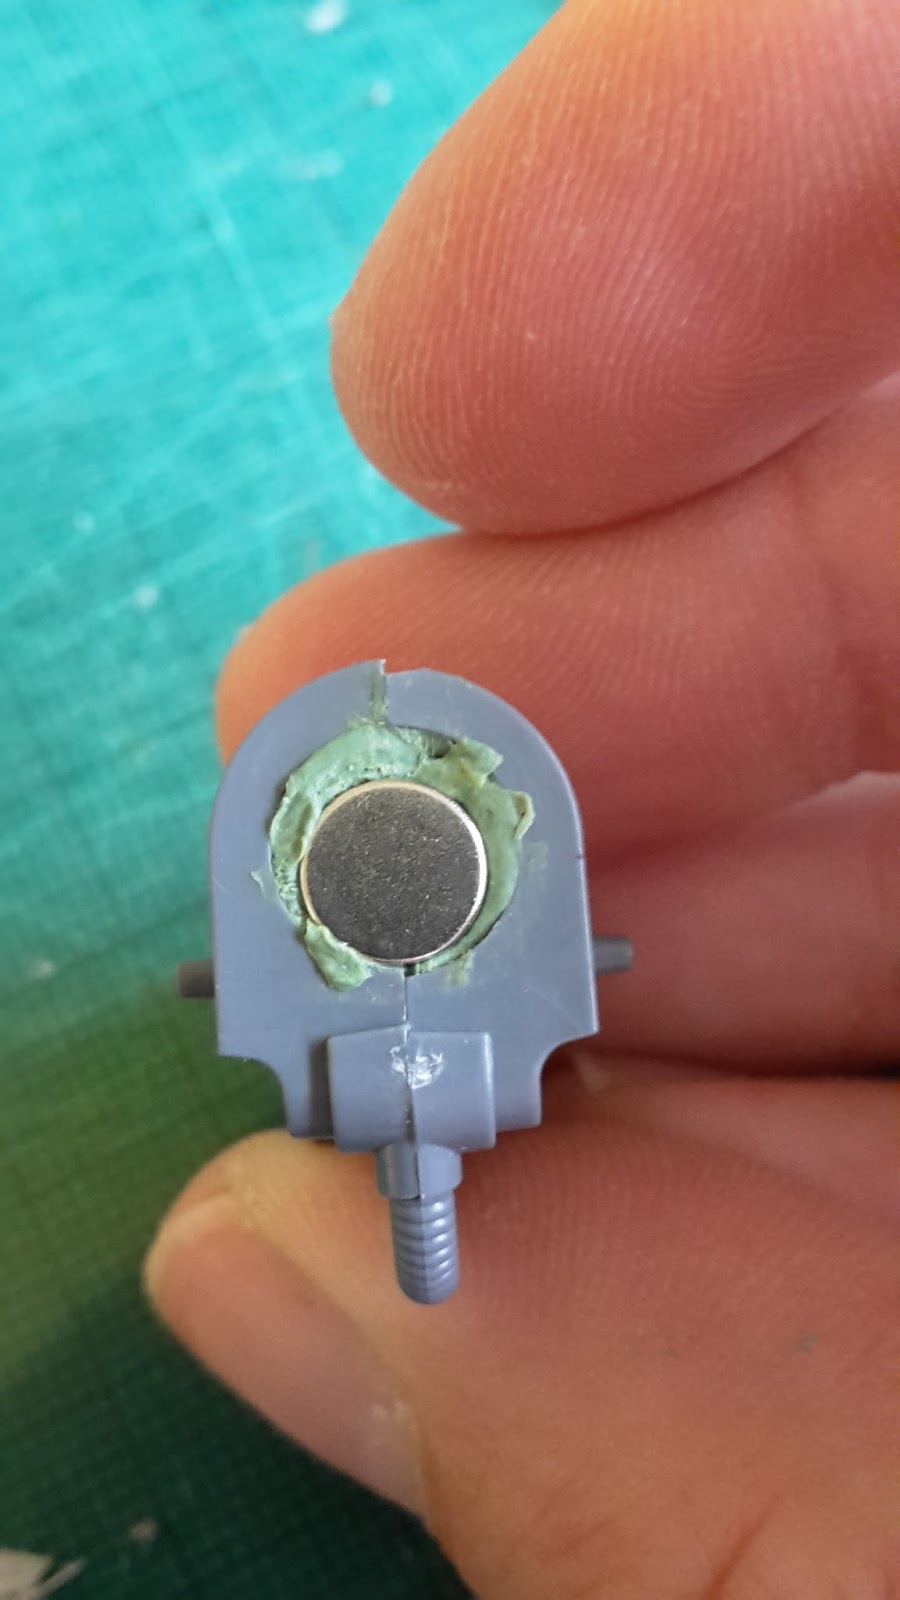
Glue the lower section of the arm together (parts 34 and 35), but do not glue onto part 15. Fill the hole at the top with green stuff and press in a 6 mm magnet so that it will attach to the magnet on the top part of the arm.

 |
| Fill the hole with green stuff. |
 |
| Insert a magnet so that it will attach to the previously assembled arm section. |
 |
| Should look like this when completed. |
 |
| Ensure that the magnets will attach to one another before gluing in place! |
Assemble the rest of the Chainsword as per the instructions.
Thunderstrike Gauntlet
Assemble parts A45, A46, A54 and A55 as per the intructions. Fill in the hole with green stuff and add a 6 mm magnet so that it will attach to the top part of the arm.

Assemble the rest of the gauntlet as per the instructions.


3. Assembling the Right Arm
This section will cover the assembly of the ranged weapon arms of the Imperial Knight. Once completed, all weapons will be completely interchangeable on the Knight.
Magnetising the Avenger Gatling Cannon
Cut the bottom off of part 92, as with the Chainsword and Gauntlet above. Cut the bottom part off of part 97 (the section that is supposed to go in parts 93 and 94).


Magnetising the Avenger Gatling Cannon
Cut the bottom off of part 92, as with the Chainsword and Gauntlet above. Cut the bottom part off of part 97 (the section that is supposed to go in parts 93 and 94).
Drill a hole for a 6 mm magnet into the bottom of part 92. I find it easier to first drill a 1 mm hole to act as a guide for the larger magnet hole. Superglue the magnet into the hole, then assemble the rest of the part as per Section 9a.
|
| 1 mm guide hole. |
|
| 6 mm hole for the magnet. |
|
| Glue the magnet in place. |
Glue the lower section of the arm together (parts A11 and A12), but do not glue onto part 92. Fill the hole at the top with green stuff and press in a 6 mm magnet so that it will attach to the magnet on the top part of the arm.
|
| Fill the hole with green stuff. |
|
| Insert a magnet so that it will attach to the previously assembled arm section. |
|
| Should look like this when completed. |
|
| Ensure that the magnets will attach to one another before gluing in place! |
Assemble the rest of the gun as per the instructions.
Magnetising the Battle Cannon and Thermal Cannon
Assemble and add magnets to the upper arm sections of the two cannons (Parts 97, 20 and 21) as for the previous sections detailed above.
Drill a 2 mm hole in the casing for the cannons (part 23). Glue a piece of sprue over the hole (on the inside of the casing). Glue a magnet in the hole on the outside of the cannon. Glue parts 22, 23, 17 and 9 together.


Glue a 2 mm magnet to the inside of part 15 (the thermal cannon fuel pack) so that it attaches to the one in part 23.

Add some green stuff to the inside of part 10 (fully assembled) and add a 2 mm magnet so that it attaches to part 23.

I had to cut the tubing off of part 10 so that it would fit on the gun casing. It would not fit with part 17 in place.

Assemble the gun shields and barrels for the battle cannon and thermal cannon. The next step is magnetising the two different barrels to fit the casing. Originally, I fitted the barrels and casings with a 2 mm magnet, but this was not strong enough, so I replaced it with a 6 mm magnet.
Glue a piece of sprue into the inside of the casing for the gun. Glue a 6 mm magnet onto this piece of sprue (in the picture you can see the 2 mm magnet I was originally going to use). Add green stuff into the barrels of the two cannons. Fit a magnet into each barrel so that it attaches to the one in the barrel casing.


 In the last picture you will see that I ran out of green stuff. In order to solve this, I used some blue tack. Once the position for the magnet was determined, I added a liberal dose of super glue to the blue tack and allowed it to dry before gluing in the magnet.


 With that, my magnetisation of the Imperial Knight is completed. I chose not to magnetise any of the armour plates or face plates of the Knight. I will just glue these on when I have painted them.


I hope you found this guide useful. It was pretty straightforward to do and only took me parts of a single weekend to complete.
Magnetising the Battle Cannon and Thermal Cannon
Assemble and add magnets to the upper arm sections of the two cannons (Parts 97, 20 and 21) as for the previous sections detailed above.
Drill a 2 mm hole in the casing for the cannons (part 23). Glue a piece of sprue over the hole (on the inside of the casing). Glue a magnet in the hole on the outside of the cannon. Glue parts 22, 23, 17 and 9 together.


Glue a 2 mm magnet to the inside of part 15 (the thermal cannon fuel pack) so that it attaches to the one in part 23.

Add some green stuff to the inside of part 10 (fully assembled) and add a 2 mm magnet so that it attaches to part 23.

I had to cut the tubing off of part 10 so that it would fit on the gun casing. It would not fit with part 17 in place.

Assemble the gun shields and barrels for the battle cannon and thermal cannon. The next step is magnetising the two different barrels to fit the casing. Originally, I fitted the barrels and casings with a 2 mm magnet, but this was not strong enough, so I replaced it with a 6 mm magnet.
Glue a piece of sprue into the inside of the casing for the gun. Glue a 6 mm magnet onto this piece of sprue (in the picture you can see the 2 mm magnet I was originally going to use). Add green stuff into the barrels of the two cannons. Fit a magnet into each barrel so that it attaches to the one in the barrel casing.


I hope you found this guide useful. It was pretty straightforward to do and only took me parts of a single weekend to complete.
Glad you found my guide helpful pal!
ReplyDeleteDo you know how you're going to paint him up?
Very helpful Nick. Didn't really need to do my own guide, but it all ups up in blog content!
DeleteThink I am going to go for a green colour. I like the look of the House Cadmus colour scheme.
Really great guide! Could have used this a week ago hehe :)
ReplyDeleteSorry Greg, I was going through buckets of white paint at that point to get my White Scars finished!
DeleteGreat tutorial Mike, I like the loads of pictures for each step. I two knights that need building at some point and while I probably won't magnetize everything, the turret gun is probably one that I will want to change.
ReplyDeleteCheers Joe! Hope you will find it useful.
Delete