
In my final game of the tournament, I would be facing Mark and his Ork army. The third mission of the day was Targets of Opportunity with the Vanguard Strike deployment zone. This is the mission where you only get one turn to score your three cards, having to draw new cards each turn.

The board featured some more fantastic scenery with a lot of line of sight blocking terrain and a large section in the middle. This would be useful, potentially forcing Mark to split his army to come at my gunline.
My army consisted of:
Brigade Detachment
Captain on Bike- Thunder Hammer, The Shield Eternal, Twin Boltgun, Iron Resolve Warlord Trait (C1)
Captain with Jump Pack- Lightning Claw, Combi-Melta (C2)
Librarian with Jump Pack- Force Stave, Boltgun, Null Zone, Psychic Fortress (L2)
Lieutenant with Jump Pack- Power Axe, Master-Crafted Boltgun, Bolt Pistol (L1)
5 Scouts- Boltguns (S1)
5 Scouts- Boltguns, Sergeant has Bolt Pistol and Combat Knife (S2)
5 Scouts- Bolt Pistols and Combat Knives (S3)
5 Tactical Marines- Bolters, Heavy Bolter (TS1)
5 Tactical Marines- Bolters, Heavy Bolter (TS2)
5 Tactical Marines- Bolters, Missile Launcher (TS3)
Company Ancient- Standard of the Emperor Ascendant, Chainsword (A)
5 Vanguard Veterans- Jump Packs, 5 Pairs of Lightning Claws (VV1)
5 Vanguard Veterans- Jump Packs, 2 Chainswords each (VV2)
5 Assault Marines- Jump Packs, 2 Plasma Pistols, Bolt Pistols, Chainswords, Sergeant with Plasma Pistol (AS1)
5 Assault Marines- Jump Packs, 2 Plasma Pistols, Bolt Pistols, Chainswords, Sergeant with Power Fist and Meltabombs (AS2)
5 Assault Marines- Jump Packs, 2 Plasma Pistols, Bolt Pistols, Chainswords, Sergeant with Power Sword (AS3)
6 Scout Bikers- Twin Boltguns, Astartes Shotguns, Combat Knives (SB)
Thunderfire Cannon. Techmarine Gunner (T) with 2 Servo-arms, Plasma Cutter, Flamer, Bolt Pistol (TC)
5 Devastator Marines- 2 Heavy Bolters, Plasma Cannon, Bolters (D1)
5 Devastator Marines- 3 Missile Launchers, Bolters (D2)
The Biker Captain was my warlord.
Mark's army consisted of:
Battalion Detachment
Warboss- Kustom Shoota, Power Klaw (W)
Weirdboy- Da Jump (WB1)
Weirdboy- Warpath (WB2)
30 Boyz- Sluggas, Choppas, Nob with Power Claw, 3 Rokkits (B1)
30 Boyz- Sluggas, Choppas, Nob with Power Claw, 3 Rokkits (B2)
30 Boyz- Sluggas, Choppas, Nob with Power Claw, 3 Rokkits (B3)
20 Boyz- Shootas, Nob with Power Claw (B4)
23 Boyz- Shootas, 2 Big Shootas, Nob with Power Claw (B5)
Battalion Detachment
Big Mek- Kustom Force Field, Killsaw (BM1)
Big Mek- Kustom Force Field, Killsaw (BM2)
30 Boyz- Shootas, Nob with Power Claw, 3 Rokkits (B6)
30 Boyz- Shootas, Nob with Power Claw, 3 Rokkits (B7)
20 Boyz- Shootas, Nob with Power Claw, 3 Rokkits (B8)
10 Gretchin (G1)
10 Gretchin (G2)
Chinork Warkopta- 2 Rattler Kannons, Big Shoota (WK)
That's a lot of Orks! I'm not sure if my army had the firepower to take care of that many Boyz. Morale would not be an issue, as the nearby Ork units could mitigate the effects of any casualties.
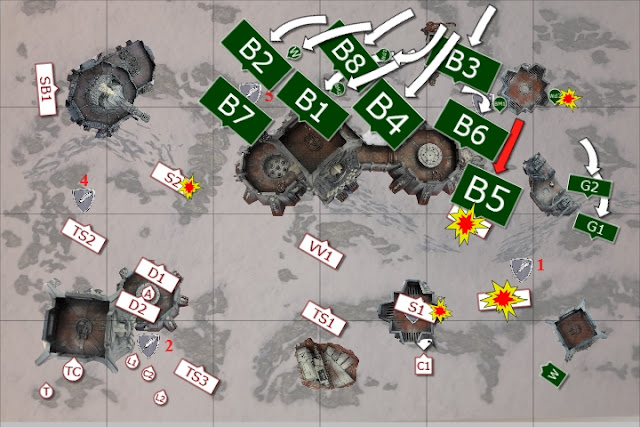
We set up the objectives as shown below:

I deployed my Devastators and Ancient in the building in my deployment zone. The Thunderfire Cannon went behind, with the Lieutenant and Jump Pack Captain nearby. I put the three Tactical Squads across my deployment zone, and the Scout Bikers at the end of each flank of my deployment zone.
I put the Lightning Claw Vanguard Veteran unit on the table. I wanted to use them as a counter-assault unit. I put the other four units of Jump Pack Marines in reserve. I used the Scouts as a screen to block the movement of the Orks.
Mark put two units of Gretchin on the right flank, with the rest of the Boyz units and characters spread out across his deployment zone. Mark put the Warkopta in reserve.


I lost the roll off for first turn, but did manage to seize the initiative.
TURN 1- WHITE SCARS
In my first turn, I drew Secure Objective 1, Defend Objective 6 and Advance (have all my units out of my deployment zone).

On the right flank, the Scout Bikers moved up on the objective. The nearby Scout unit advanced in front of the Ork lines, sacrificing their lives to buy their battle brothers more time. The Vanguard Veterans moved up to block the gap left by the advancing Scouts.


On the left flank, the Scout Bikers moved around the bunker, hiding from the Ork horde.
In the shooting phase, the Thunderfire Cannon used its Tremor Shells stratagem on the Ork mob in front of them. I hoped to slow the movement of the Orks on the right flank with my Scouts and using the Tremor Shells stratagem on the other mob. This should hopefully halt the entire Ork advance.


The rest of the White Scars fired at the Ork mobs, killing 15 in total among various mobs with their long range firepower. Mark had some great Kustom Force Field saves, so the damage was not as much as it could have been.
At the end of my turn, I scored Secure Objective 1.
TURN 1- ORKS
In his first turn, Mark drew Domination (hold all the objectives), Hold the Line (have no enemy units in your deployment zone) and Defend Objective 6. Mark used two command points to discard Domination and re-drew Blood and Guts (kill a unit in assault).
The Orks moved up on the White Scars lines, slowed on each flank by the Scouts and Thunderfire Cannon. The Warkopta arrived from reserve, landing besides the Scout Bikers on the left flank.


One of the Weirdboyz cast Da Jump on a unit of Shoota Boyz, teleporting them to the other side of the deployment zone, in front of the Scout unit. The Eldritch power overloaded the psykers mind, causing 3 mortal wounds after he perilled.
In the shooting phase, the Warkopta fired at the Scouts in Bastion, only hitting twice with its 16 shots and killing one of the White Scars. The Shoota Boyz on the left fired at the Scout Bikers, killing one with the Rokkits and another with the Shootas of the squad. The Grots opened fire on the Scout Bikers, but failed to do any damage. The second unit of Shoota Boyz fired at the Scout Bikers, killing the last member of the squad.

On the other flank, the teleported Shoota Boyz fired on the Scouts in front of them, killing one of the squad.
The three Slugga Boyz mobs on the right fired their Rokkits at the Scouts, but failed to score any hits (he had advanced the units, so needed 6's to hit).
In the charge phase, the Ork mob on the left charged the Scout unit, easily wiping out the squad with their massed attacks.

At the end of his turn, Mark scored Blood and Guts and First Blood. He spent 2 command points to hold on to Hold the Line for his next turn. I also scored Defend Objective 6.
VICTORY POINTS:
White Scars- 3
Orks- 2
TURN 2- WHITE SCARS
In my second turn, I drew Secure Objective 5, Assassinate (kill an enemy character) and Hold the Line (have no enemy units in the enemy deployment zone).

The Biker Captain used the Born in the Saddle stratagem to advance on the Ork mob on the right flank, supported by the Lightning Claw Vanguard Veterans. On the left flank, the Scout Bikers moved around the Bunker to target the Ork horde, and the Librarian moved up to support the Scouts.


At the end of the phase, the Vanguard Veterans arrived from reserve, moving to support the Biker Captain. Two units of Assault Marines also arrived, deep striking deep into the enemy deployment zone.

In the psychic phase, the Librarian cast Smite, killing three of the Shoota Boyz mob in front of him.
In the shooting phase, the Thunderfire Cannon fired at the same unit of Shoota Boyz, killing two and slowing them with its Tremor Shells stratagem. The Scout Bikers fired at a unit of Slugga Boyz. A combination of terrible wound rolls and great Kustom Force Field saves saw only two Orks perish.


The Devastator Squads and Tactical Squads on the left flank fired at the same unit of Slugga Boyz, killing only 9 with their combined firepower. The Scouts in the Bunker fired at the Ork Boyz at the front, killing two of the squad.
The Assault Marines fired their Plasma Pistols at the Weirdboy in front of them. The overcharged Plasma shots killed the enemy psyker, with one of the White Scars perishing to an overheat on their pistol.
In the charge phase, the two units of Vanguard Veterans and Captain assaulted the Shoota Boyz in front of them.


The Vanguard Veterans wielding two Chainswords struck first. Even though they hit on a 3+ and re-rolled 1's, I only managed to hit with 11 of the 20 attacks. Seven of the Orks perished to the attacks of the Veterans. Mark then used two command points to interrupt and attack with the Boyz. They focused their attacks on the Lightning Claw Vanguard Veterans, killing three of the squad.
The other unit of Vanguard Veterans attacked back, killing 4 with their Lightning Claws, the Captain slaying another two of the Ork Boyz. The Mob passed their morale test thanks to the strength of the nearby Slugga Boyz mob.
At the end of my turn, I scored Hold the Line and Assassinate.
TURN 2- ORKS
In his turn, Mark drew Secure Objective 5 and Advance to go with Hold the Line. He used two command points to re-draw Advance and got Secure Objective 1 instead.

The Shoota Boyz fell back from combat with the White Scars, as the Gretchin mobs moved around the gun emplacement to target the Veterans. Another unit of Shoota Boyz moved up on the Assault Marines behind the Bunker.


On the other flank, the Orks continued their slow advance, moving up on the Scouts and Scout Bikers.
The Weirdboy cast Warpath on the Shoota Boyz moving up on the Assault Marines, getting the power off, but perilling and taking two wounds.
The Gretchin opened fire on the closest unit of Vanguard Veterans, only doing a single wound, but I failed my save and a Veteran perished. The Shoota Boyz opened fire on the same unit of Veterans, killing the unit with their massed firepower.

The slain unit of Veterans allowed the Warkopta to target the Biker Captain, wounding him three times. I failed two saves, but used a Command Point re-roll to pass another save and the Captain took a single wound.
The backfield Shoota Boyz fired at the unit of Assault Marines further away from them. Some great rolling saw about half of the shots hit. The squad was wounded 6 times, killing two of the White Scars. One Rokkit hit and wounded, but I saved the wound, leaving two of the squad remaining.
On the other flank, the Shoota Boyz fired at the Scout Squad, killing three of the squad. The other Mobs fired their Rokkits at the Scout Bikers, killing one of the squad.
In the charge phase, a Slugga Boyz mob charged the Scout Bikers, while the Shoota Boyz assaulted the Vanguard Veterans and Biker Captain. The other Shoota Boyz attempted to charge the two units of Assault Marines, but only managed to make it in to the front squad.


The Orks struck at the Vanguard Veterans, wiping out the squad. The Nob struck at the Captain with his Power Klaw, wounding him 3 times, but I passed all my invulnerable saves.
I then used two Command Points to interrupt and attack with the Assault Marines, killing four of the squad before they could attack. The Mob then struck back, wiping out the White Scars unit. The other mob attacked the Scout Bikers, easily killing them as well.
The Biker Captain struck back, only managing a single hit and killing one of the squad.

At the end of his turn, Mark scored Secure Objective 1 and Secure Objective 5.
VICTORY POINTS:
White Scars- 5
Orks- 4
At the end of turn 2, things were still incredibly close with only a single point in the game. The Ork mobs were rampaging through any unit I threw at them, but I was holding them back, as they had yet to move far out of their deployment zone.
TURN 3- WHITE SCARS
In my third turn, I drew Area Denial, Secure Objective 5 and Behind Enemy Lines.

The Captain fell back from combat with the Ork Boyz, moving beside the Bunker, while the two Assault Marines moved up on the objective to wrest control from the Big Mek. On the other flank, the Librarian advanced into the enemy deployment zone. The last unit of Assault Marines arrived, landing besides the Shoota Boyz.


In the psychic phase, the Librarian tried to cast Smite, but the Weirdboy blocked the power.
In the shooting phase, the Thunderfire Cannon fired on a unit of Slugga Boyz with its Tremor Shells, killing three in the squad.
The left flank opened fire on the Shoota Boyz mob, killing off the unit thanks to the Devastator Squads. The Assault Marines opened fire on the Shoota Boyz in front of them, killing three of the squad. The other unit of Assault Marines fired their Plasma Pistols at the Big Mek, but were unable to wound him.


At the end of my turn, I scored Behind Enemy Lines (for 2 points), Secure Objective 5 and Area Denial. This brought me up to 9 victory points. Mark would need a good turn to catch up to me.
TURN 3- ORKS
In his third turn, Mark drew Defend Objective 3, Witch Hunter and Assassinate. It would have been hard to for him to have drawn a better hand this turn. My risk with the Librarian had gifted him two cards and he could easily hold Objective 3.

The Ork Mobs on the right moved up to surround the Librarian, while the Shoota Boyz on the left moved up on the Assault Squad. The other unit of Shoota Boyz and two Gretchin Mobs moved up on the Biker Captain.
The Weirboy tried to cast Smite, but failed to manifest the power.

The Shoota Boyz fired at the Assault Squad, wounding 9 times and killing three of the squad. The Slugga Boyz fired at the Librarian, scoring 8 Slugga hits and wounding 7 times! I failed one save and the Librarian was wounded.
The Warkopta targeted the White Scars Captain, using a command point re-roll to score 18 shots with its Rattler Cannons. The enemy vehicle scored three wounds, but I made all three of my saves. The Shoota Boyz fired at the Captain, wounding him 8 times and he failed one save. The Gretchin then fired their Blastas at him, wounding him 3 times and I failed two saves.
In the charge phase, the Slugga Boyz assaulted the Librarian. The Gretchin and Shoota Boyz charged the Biker Captain, but only the Grots made it in to combat. The Shoota Boyz also charged the Assault Marines.

The Slugga Boyz easily slew the Librarian, while the Shoota Boyz killed the Assault Marines. The Grots struck at the Captain, wounding him once and leaving him on a single wound. The Captain swung his Thunder Hammer at the Grots, killing three fo the squad. The Grots then lost 5 more in the morale phase.
At the end of his turn, Mark scored Assassinate and Witch Hunter.
VICTORY POINTS:
White Scars- 9
Orks- 6

Unfortunately, we ran out of time there. It was a shame as this was a really close game. Mark would have probably scored Defend Objective 3, taking it up to 9 to 8 for the White Scars. It would all have come down to the next cards drawn and whether Mark could kill off my warlord.
AFTER-BATTLE THOUGHTS
Thanks to Mark for a really tough fought game, it really did come down to the wire, and I'm not sure I would have won had we had time for another turn.
Overall, I think my plan worked. The combination of the Tremor Shells stratagem and sacrificial units allowed me to stall the Ork advance so much that only a single unit of Boyz made it past the half way point of the board. While I didn't have the firepower to do too much damage to the Orks at long range, I was able to whittle them down slightly and stop them from getting into combat with my backfield gunline.
The terrain was a big help in this game. The large Fortress of Redemption in the centre of the board forced Mark to split his forces in two, allowing me to more easily stall his advance and slow his big mobs down. If I was Mark, I might have deployed the Shoota Boyz mobs on the right flank instead of the Slugga Boyz. This would have allowed him to threaten my backfield units with his firepower. Given the way he was rolling for his Shoota Boyz in this game, he could probably have taken out 2 or 3 units during the course of the game, considerably lowering my firepower.
There were a few mistakes I think I made on writing this up. On turn 2, I don't think I should have sent the Scout Bikers after the Ork mob. My reasoning was that if Mark turned the mob around to go after them, he would take even longer to get to my lines, effectively taking them out of the game. As it was, I think they were just sacrificed for nothing.
Equally, I think sending the Vanguard Veterans and Biker Captain after the mob on turn 2 was an error. I could have held off for another turn and waited for them to get closer to me. This may have brought some units into rapid fire range and allowed me to do more damage with my firepower and hopefully take out the unit in assault. As it was, the Chainsword Vanguard Veterans completely fluffed their attacks, killing not enough Orks and causing me problems.
The cards drawn were pretty even in this game, I think. I was shocked at Mark's draw for turn 3, he really couldn't have picked more perfect cards for his turn thanks to the position of my Librarian. Annoying, of the three objectives my White Scars were sitting on for the whole game, I only drew one of them once. Meanwhile, Mark seems to only draw objectives in his deployment zone.
This was a really close and tense game that could have gone either way to be honest. Had the game gone on, I might have been in serious trouble.
The game timings were roughly as follows:
4.10 pm- deployment
4.30 pm- WS turn 1
4.40 pm- Orks turn 1
5.10 pm- WS turn 2
5.30 pm- Orks turn 2
6.00 pm- WS turn 3
6.15 pm- Orks turn 3
6.30 pm- Game ended
As you can see, the timings were pretty even throughout. Mark did well to play so quickly with over 200 models on the board. Towards the final turn, we weren't even rolling for many of the combat, with me removing the Librarian and Assault Marines without rolling for attacks to try and speed things up.
With two wins and a loss, I was quite happy with the performance of the army. It plays very differently to how I am used to using my White Scars, but was a nice change. I will review the army and see what worked and what could be changed. I ended up finishing 13th out of about 30 players, which I was quite happy with.
I hope you enjoyed the three tournament battle reports. Be sure to check out and like my Facebook page to keep up to date on all new posts on the blog.
The Biker Captain was my warlord.
Mark's army consisted of:
Battalion Detachment
Warboss- Kustom Shoota, Power Klaw (W)
Weirdboy- Da Jump (WB1)
Weirdboy- Warpath (WB2)
30 Boyz- Sluggas, Choppas, Nob with Power Claw, 3 Rokkits (B1)
30 Boyz- Sluggas, Choppas, Nob with Power Claw, 3 Rokkits (B2)
30 Boyz- Sluggas, Choppas, Nob with Power Claw, 3 Rokkits (B3)
20 Boyz- Shootas, Nob with Power Claw (B4)
23 Boyz- Shootas, 2 Big Shootas, Nob with Power Claw (B5)
Battalion Detachment
Big Mek- Kustom Force Field, Killsaw (BM1)
Big Mek- Kustom Force Field, Killsaw (BM2)
30 Boyz- Shootas, Nob with Power Claw, 3 Rokkits (B6)
30 Boyz- Shootas, Nob with Power Claw, 3 Rokkits (B7)
20 Boyz- Shootas, Nob with Power Claw, 3 Rokkits (B8)
10 Gretchin (G1)
10 Gretchin (G2)
Chinork Warkopta- 2 Rattler Kannons, Big Shoota (WK)
That's a lot of Orks! I'm not sure if my army had the firepower to take care of that many Boyz. Morale would not be an issue, as the nearby Ork units could mitigate the effects of any casualties.
We set up the objectives as shown below:

I deployed my Devastators and Ancient in the building in my deployment zone. The Thunderfire Cannon went behind, with the Lieutenant and Jump Pack Captain nearby. I put the three Tactical Squads across my deployment zone, and the Scout Bikers at the end of each flank of my deployment zone.
I put the Lightning Claw Vanguard Veteran unit on the table. I wanted to use them as a counter-assault unit. I put the other four units of Jump Pack Marines in reserve. I used the Scouts as a screen to block the movement of the Orks.
Mark put two units of Gretchin on the right flank, with the rest of the Boyz units and characters spread out across his deployment zone. Mark put the Warkopta in reserve.


I lost the roll off for first turn, but did manage to seize the initiative.
TURN 1- WHITE SCARS
In my first turn, I drew Secure Objective 1, Defend Objective 6 and Advance (have all my units out of my deployment zone).

On the right flank, the Scout Bikers moved up on the objective. The nearby Scout unit advanced in front of the Ork lines, sacrificing their lives to buy their battle brothers more time. The Vanguard Veterans moved up to block the gap left by the advancing Scouts.


On the left flank, the Scout Bikers moved around the bunker, hiding from the Ork horde.
In the shooting phase, the Thunderfire Cannon used its Tremor Shells stratagem on the Ork mob in front of them. I hoped to slow the movement of the Orks on the right flank with my Scouts and using the Tremor Shells stratagem on the other mob. This should hopefully halt the entire Ork advance.


The rest of the White Scars fired at the Ork mobs, killing 15 in total among various mobs with their long range firepower. Mark had some great Kustom Force Field saves, so the damage was not as much as it could have been.
At the end of my turn, I scored Secure Objective 1.
TURN 1- ORKS
In his first turn, Mark drew Domination (hold all the objectives), Hold the Line (have no enemy units in your deployment zone) and Defend Objective 6. Mark used two command points to discard Domination and re-drew Blood and Guts (kill a unit in assault).

The Orks moved up on the White Scars lines, slowed on each flank by the Scouts and Thunderfire Cannon. The Warkopta arrived from reserve, landing besides the Scout Bikers on the left flank.


One of the Weirdboyz cast Da Jump on a unit of Shoota Boyz, teleporting them to the other side of the deployment zone, in front of the Scout unit. The Eldritch power overloaded the psykers mind, causing 3 mortal wounds after he perilled.
In the shooting phase, the Warkopta fired at the Scouts in Bastion, only hitting twice with its 16 shots and killing one of the White Scars. The Shoota Boyz on the left fired at the Scout Bikers, killing one with the Rokkits and another with the Shootas of the squad. The Grots opened fire on the Scout Bikers, but failed to do any damage. The second unit of Shoota Boyz fired at the Scout Bikers, killing the last member of the squad.

On the other flank, the teleported Shoota Boyz fired on the Scouts in front of them, killing one of the squad.
The three Slugga Boyz mobs on the right fired their Rokkits at the Scouts, but failed to score any hits (he had advanced the units, so needed 6's to hit).
In the charge phase, the Ork mob on the left charged the Scout unit, easily wiping out the squad with their massed attacks.

At the end of his turn, Mark scored Blood and Guts and First Blood. He spent 2 command points to hold on to Hold the Line for his next turn. I also scored Defend Objective 6.
VICTORY POINTS:
White Scars- 3
Orks- 2
TURN 2- WHITE SCARS
In my second turn, I drew Secure Objective 5, Assassinate (kill an enemy character) and Hold the Line (have no enemy units in the enemy deployment zone).

The Biker Captain used the Born in the Saddle stratagem to advance on the Ork mob on the right flank, supported by the Lightning Claw Vanguard Veterans. On the left flank, the Scout Bikers moved around the Bunker to target the Ork horde, and the Librarian moved up to support the Scouts.


At the end of the phase, the Vanguard Veterans arrived from reserve, moving to support the Biker Captain. Two units of Assault Marines also arrived, deep striking deep into the enemy deployment zone.

In the psychic phase, the Librarian cast Smite, killing three of the Shoota Boyz mob in front of him.
In the shooting phase, the Thunderfire Cannon fired at the same unit of Shoota Boyz, killing two and slowing them with its Tremor Shells stratagem. The Scout Bikers fired at a unit of Slugga Boyz. A combination of terrible wound rolls and great Kustom Force Field saves saw only two Orks perish.


The Devastator Squads and Tactical Squads on the left flank fired at the same unit of Slugga Boyz, killing only 9 with their combined firepower. The Scouts in the Bunker fired at the Ork Boyz at the front, killing two of the squad.
The Assault Marines fired their Plasma Pistols at the Weirdboy in front of them. The overcharged Plasma shots killed the enemy psyker, with one of the White Scars perishing to an overheat on their pistol.
In the charge phase, the two units of Vanguard Veterans and Captain assaulted the Shoota Boyz in front of them.


The Vanguard Veterans wielding two Chainswords struck first. Even though they hit on a 3+ and re-rolled 1's, I only managed to hit with 11 of the 20 attacks. Seven of the Orks perished to the attacks of the Veterans. Mark then used two command points to interrupt and attack with the Boyz. They focused their attacks on the Lightning Claw Vanguard Veterans, killing three of the squad.
The other unit of Vanguard Veterans attacked back, killing 4 with their Lightning Claws, the Captain slaying another two of the Ork Boyz. The Mob passed their morale test thanks to the strength of the nearby Slugga Boyz mob.
At the end of my turn, I scored Hold the Line and Assassinate.
TURN 2- ORKS
In his turn, Mark drew Secure Objective 5 and Advance to go with Hold the Line. He used two command points to re-draw Advance and got Secure Objective 1 instead.

The Shoota Boyz fell back from combat with the White Scars, as the Gretchin mobs moved around the gun emplacement to target the Veterans. Another unit of Shoota Boyz moved up on the Assault Marines behind the Bunker.


On the other flank, the Orks continued their slow advance, moving up on the Scouts and Scout Bikers.
The Weirdboy cast Warpath on the Shoota Boyz moving up on the Assault Marines, getting the power off, but perilling and taking two wounds.
The Gretchin opened fire on the closest unit of Vanguard Veterans, only doing a single wound, but I failed my save and a Veteran perished. The Shoota Boyz opened fire on the same unit of Veterans, killing the unit with their massed firepower.

The slain unit of Veterans allowed the Warkopta to target the Biker Captain, wounding him three times. I failed two saves, but used a Command Point re-roll to pass another save and the Captain took a single wound.
The backfield Shoota Boyz fired at the unit of Assault Marines further away from them. Some great rolling saw about half of the shots hit. The squad was wounded 6 times, killing two of the White Scars. One Rokkit hit and wounded, but I saved the wound, leaving two of the squad remaining.
On the other flank, the Shoota Boyz fired at the Scout Squad, killing three of the squad. The other Mobs fired their Rokkits at the Scout Bikers, killing one of the squad.
In the charge phase, a Slugga Boyz mob charged the Scout Bikers, while the Shoota Boyz assaulted the Vanguard Veterans and Biker Captain. The other Shoota Boyz attempted to charge the two units of Assault Marines, but only managed to make it in to the front squad.


The Orks struck at the Vanguard Veterans, wiping out the squad. The Nob struck at the Captain with his Power Klaw, wounding him 3 times, but I passed all my invulnerable saves.
I then used two Command Points to interrupt and attack with the Assault Marines, killing four of the squad before they could attack. The Mob then struck back, wiping out the White Scars unit. The other mob attacked the Scout Bikers, easily killing them as well.
The Biker Captain struck back, only managing a single hit and killing one of the squad.

At the end of his turn, Mark scored Secure Objective 1 and Secure Objective 5.
VICTORY POINTS:
White Scars- 5
Orks- 4
At the end of turn 2, things were still incredibly close with only a single point in the game. The Ork mobs were rampaging through any unit I threw at them, but I was holding them back, as they had yet to move far out of their deployment zone.
TURN 3- WHITE SCARS
In my third turn, I drew Area Denial, Secure Objective 5 and Behind Enemy Lines.

The Captain fell back from combat with the Ork Boyz, moving beside the Bunker, while the two Assault Marines moved up on the objective to wrest control from the Big Mek. On the other flank, the Librarian advanced into the enemy deployment zone. The last unit of Assault Marines arrived, landing besides the Shoota Boyz.


In the psychic phase, the Librarian tried to cast Smite, but the Weirdboy blocked the power.
In the shooting phase, the Thunderfire Cannon fired on a unit of Slugga Boyz with its Tremor Shells, killing three in the squad.
The left flank opened fire on the Shoota Boyz mob, killing off the unit thanks to the Devastator Squads. The Assault Marines opened fire on the Shoota Boyz in front of them, killing three of the squad. The other unit of Assault Marines fired their Plasma Pistols at the Big Mek, but were unable to wound him.


At the end of my turn, I scored Behind Enemy Lines (for 2 points), Secure Objective 5 and Area Denial. This brought me up to 9 victory points. Mark would need a good turn to catch up to me.
TURN 3- ORKS
In his third turn, Mark drew Defend Objective 3, Witch Hunter and Assassinate. It would have been hard to for him to have drawn a better hand this turn. My risk with the Librarian had gifted him two cards and he could easily hold Objective 3.

The Ork Mobs on the right moved up to surround the Librarian, while the Shoota Boyz on the left moved up on the Assault Squad. The other unit of Shoota Boyz and two Gretchin Mobs moved up on the Biker Captain.
The Weirboy tried to cast Smite, but failed to manifest the power.

The Shoota Boyz fired at the Assault Squad, wounding 9 times and killing three of the squad. The Slugga Boyz fired at the Librarian, scoring 8 Slugga hits and wounding 7 times! I failed one save and the Librarian was wounded.
The Warkopta targeted the White Scars Captain, using a command point re-roll to score 18 shots with its Rattler Cannons. The enemy vehicle scored three wounds, but I made all three of my saves. The Shoota Boyz fired at the Captain, wounding him 8 times and he failed one save. The Gretchin then fired their Blastas at him, wounding him 3 times and I failed two saves.
In the charge phase, the Slugga Boyz assaulted the Librarian. The Gretchin and Shoota Boyz charged the Biker Captain, but only the Grots made it in to combat. The Shoota Boyz also charged the Assault Marines.

The Slugga Boyz easily slew the Librarian, while the Shoota Boyz killed the Assault Marines. The Grots struck at the Captain, wounding him once and leaving him on a single wound. The Captain swung his Thunder Hammer at the Grots, killing three fo the squad. The Grots then lost 5 more in the morale phase.
At the end of his turn, Mark scored Assassinate and Witch Hunter.
VICTORY POINTS:
White Scars- 9
Orks- 6

Unfortunately, we ran out of time there. It was a shame as this was a really close game. Mark would have probably scored Defend Objective 3, taking it up to 9 to 8 for the White Scars. It would all have come down to the next cards drawn and whether Mark could kill off my warlord.
AFTER-BATTLE THOUGHTS
Thanks to Mark for a really tough fought game, it really did come down to the wire, and I'm not sure I would have won had we had time for another turn.
Overall, I think my plan worked. The combination of the Tremor Shells stratagem and sacrificial units allowed me to stall the Ork advance so much that only a single unit of Boyz made it past the half way point of the board. While I didn't have the firepower to do too much damage to the Orks at long range, I was able to whittle them down slightly and stop them from getting into combat with my backfield gunline.
The terrain was a big help in this game. The large Fortress of Redemption in the centre of the board forced Mark to split his forces in two, allowing me to more easily stall his advance and slow his big mobs down. If I was Mark, I might have deployed the Shoota Boyz mobs on the right flank instead of the Slugga Boyz. This would have allowed him to threaten my backfield units with his firepower. Given the way he was rolling for his Shoota Boyz in this game, he could probably have taken out 2 or 3 units during the course of the game, considerably lowering my firepower.
There were a few mistakes I think I made on writing this up. On turn 2, I don't think I should have sent the Scout Bikers after the Ork mob. My reasoning was that if Mark turned the mob around to go after them, he would take even longer to get to my lines, effectively taking them out of the game. As it was, I think they were just sacrificed for nothing.
Equally, I think sending the Vanguard Veterans and Biker Captain after the mob on turn 2 was an error. I could have held off for another turn and waited for them to get closer to me. This may have brought some units into rapid fire range and allowed me to do more damage with my firepower and hopefully take out the unit in assault. As it was, the Chainsword Vanguard Veterans completely fluffed their attacks, killing not enough Orks and causing me problems.
The cards drawn were pretty even in this game, I think. I was shocked at Mark's draw for turn 3, he really couldn't have picked more perfect cards for his turn thanks to the position of my Librarian. Annoying, of the three objectives my White Scars were sitting on for the whole game, I only drew one of them once. Meanwhile, Mark seems to only draw objectives in his deployment zone.
This was a really close and tense game that could have gone either way to be honest. Had the game gone on, I might have been in serious trouble.
The game timings were roughly as follows:
4.10 pm- deployment
4.30 pm- WS turn 1
4.40 pm- Orks turn 1
5.10 pm- WS turn 2
5.30 pm- Orks turn 2
6.00 pm- WS turn 3
6.15 pm- Orks turn 3
6.30 pm- Game ended
As you can see, the timings were pretty even throughout. Mark did well to play so quickly with over 200 models on the board. Towards the final turn, we weren't even rolling for many of the combat, with me removing the Librarian and Assault Marines without rolling for attacks to try and speed things up.
With two wins and a loss, I was quite happy with the performance of the army. It plays very differently to how I am used to using my White Scars, but was a nice change. I will review the army and see what worked and what could be changed. I ended up finishing 13th out of about 30 players, which I was quite happy with.
I hope you enjoyed the three tournament battle reports. Be sure to check out and like my Facebook page to keep up to date on all new posts on the blog.
do you use a marker to show the units affected by the TREMOR shell ?
ReplyDeleteNo, I just tend to remember as it can only affect one unit in matched play each turn (plus I have my notes for the battle report to help me). A marker or the stratagem card could be useful though.
DeleteI'll be honest, as much fun as that horde would be in a casual game, I can't imagine taking it to a timed environment, seems like you're asking for half a game. Still, at least it was an organically slow army, rather than slow-play, which is an entirely different water boiling device of ocean dwelling vertebrates...
ReplyDeleteOne thing I would have done differently... he seemed to have missed some good points from keeping you out of his deployment zone because, understandably, he runs towards you. In his shoes I think I would have left the grots at the back, strung across the ork deployment zone so as to eliminate the chance of you dropping units behind the line and forcing the mobs to backtrack. But on the other hand, those grots did seem to go on a little bit of a rampage according to your battle report, so maybe my ork bias is playing up, and I should give the little guys their chance to shine by leading the charge :P
Yeah, using the Grots as a screening unit would have helped block me from scoring a number of maelstrom points in the game. As you said though, they did pretty well, almost killing my warlord at one point!
DeleteANother great battle report man, I really enjoy these, keep’it up!
ReplyDeleteHonestly, just some solid content coming out of you.
I look forward to you falling back into some Dark Angel Articles, I’m working on an all Raven Guard army in between painting my Custodes and was really enjoying the BatReps.
Cheers, glad you are enjoying the content.
DeleteGood news on the Dark Angels front. I am planning on testing out army lists for the London GT, so going to be painting up my forces and getting some games with them in the coming months.
Don’t know if this is the place for it, but here is my prospective list:
Delete++ Outrider Detachment +1CP (Imperium - Dark Angels) [28 PL, 525pts] ++
+ HQ +
Librarian on Bike [8 PL, 129pts]: Bolt pistol, Force sword
. Space Marine bike: Twin boltgun
+ Fast Attack +
Ravenwing Bike Squad [5 PL, 99pts]
. Ravenwing Biker: Bolt pistol, Flamer
. . Space Marine bike: Twin boltgun
. Ravenwing Biker: Bolt pistol, Flamer
. . Space Marine bike: Twin boltgun
. Ravenwing Sergeant: Bolt pistol
. . Space Marine bike: Twin boltgun
Ravenwing Bike Squad [5 PL, 99pts]
. Ravenwing Biker: Bolt pistol, Flamer
. . Space Marine bike: Twin boltgun
. Ravenwing Biker: Bolt pistol, Flamer
. . Space Marine bike: Twin boltgun
. Ravenwing Sergeant: Bolt pistol
. . Space Marine bike: Twin boltgun
Ravenwing Bike Squad [5 PL, 99pts]
. Ravenwing Biker: Bolt pistol, Flamer
. . Space Marine bike: Twin boltgun
. Ravenwing Biker: Bolt pistol, Flamer
. . Space Marine bike: Twin boltgun
. Ravenwing Sergeant: Bolt pistol
. . Space Marine bike: Twin boltgun
Ravenwing Bike Squad [5 PL, 99pts]
. Ravenwing Biker: Bolt pistol, Flamer
. . Space Marine bike: Twin boltgun
. Ravenwing Biker: Bolt pistol, Flamer
. . Space Marine bike: Twin boltgun
. Ravenwing Sergeant: Bolt pistol
. . Space Marine bike: Twin boltgun
++ Air Wing Detachment +1CP (Imperium - Dark Angels) [24 PL, 480pts] ++
+ Flyer +
Ravenwing Dark Talon [8 PL, 160pts]: 2x Hurricane bolter
Ravenwing Dark Talon [8 PL, 160pts]: 2x Hurricane bolter
Ravenwing Dark Talon [8 PL, 160pts]: 2x Hurricane bolter
++ Outrider Detachment +1CP (Imperium - Dark Angels) [69 PL, 985pts] ++
+ HQ +
Sammael on Corvex [10 PL, 183pts]
+ Elites +
Ravenwing Ancient [6 PL, 112pts]
. Black Knight Bike: Plasma Talon
+ Fast Attack +
Ravenwing Black Knights [23 PL, 276pts]: 5x Ravenwing Black Knight
. Ravenwing Huntmaster: Corvus Hammer
. . Black Knight Bike: Plasma Talon
Ravenwing Black Knights [23 PL, 276pts]: 5x Ravenwing Black Knight
. Ravenwing Huntmaster: Corvus Hammer
. . Black Knight Bike: Plasma Talon
Ravenwing Darkshroud [7 PL, 138pts]: Heavy bolter
++ Total: [121 PL, 1990pts] ++
Yeah, I love a good all Ravenwing list! I think I'll probably go for a mix of Ravenwing and Greenwing for gaining command points. Hellblasters seem to be really solid in the army thanks to the stratagems.
DeleteI'm going to get my Primaris Marines painted up to test them.
Noooooo more GSC goodness! :D
DeleteThanks for the good batrep, shame it didn't go on.
Sounds like you had a great day. Well done on the two wins.
ReplyDeleteCheers! It was a fun day.
Delete