Dave from over at Confessions of a 40k addict has a range of free terrain kit downloads available on his blog. For a while now, I have been meaning to give them a go and try and make something. Last weekend, I had a free weekend to myself and decided it would be a perfect opportunity to download and print out the plans and try and make one of them myself (the fact that I could potentially win an Imperial Knight was some good motivation too!).
After looking through the available kits, I settled on the 40k tower as it looked good and would provide some great line of sight blocking terrain for the table top. I took some photos of the constructions to show how quick and easy they are to use. In fact, the entire thing, from construction to painting, took less than 48 hours to do (mine is a slightly simplified version of the tower).
What you will need to make the tower:
5 mm Foamboard
Thick card (I used the card from a cereal box)
5 mm balsa wood
masking tape
elastic bands
an old brush brush (for applying the glue)
sharp craft knife
metal ruler
marker pen
I started by cutting out the templates for the tower walls, tower roof walls, tower roof and tower buttresses. These were then copies onto the foamboard using the marker pen and cut out using the craft knife and metal ruler. Ensure that you use a fresh blade for cutting the foamboard, as it will tear if you don't.
On each of the wall sections, mark out a 5 mm strip running along each edge of the long tower wall sides. Using your craft knife, cut out a 45 degree angled strip using the line and the edge of the tower as a guide. Do this for all 4 walls.
Glue the walls and buttresses together with PVA glue as shown below. You can use masking tape on the bottom of the structure to keep the parts together until the glue dries. I find that masking tape provides a good stick for the model without tearing the foamboard when it is removed.
When the main body of the tower is dry, you can fit the roof. Place the tower upside down on the roof section and mark the position of the buttress tops on the roof in marker pen (be sure that you label one of the buttresses and corresponding mark so that they can be lined up appropriately).
Cut out the marked sections to the end of the roof tile. You should now be able to slide the roof onto the buttresses and glue it in place.
Next, fit the roof walls to the buttresses. Again, you will need to mark out and cut 45 degree slopes in the sides of the roof section. Some of the parts my require a bit more trimming to fit, depending on how well the main body of the tower has been put together. As you can see, I have marked my edges in letters, so I know which roof section goes between the two buttresses as I was fitting them.
Next, I got to work on the decoration for the tower. I cut out the wall designs and traced them onto cereal box card, then cut out the shapes from the cereal box card (it may be easier to just glue this sheet onto the card and then cut out as suggested on the sheet).
I cut out another 4 walls for the tower in foamboard and marked where the card decoration sections started and ended on them. I then cut out 5 mm strips of the foamboard to act as spacers for the different card sections on the tower. I could have used balsa wood here instead of the foamboard.
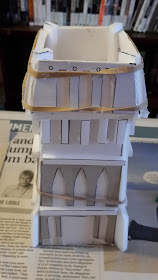
I then glued the card sections and spacers onto the tower using PVA glue. I used elastic bands to keep the card on the tower and stop it from warping or detaching while the glue dried. I used masking tape for the bottom sections of the tower where the buttresses would not allow the elastic bands to keep them in place.
One the sections were dry, I could out twenty strips of foamboard, measuring 20 mm by 5 mm. Five of these were attached to each top section of the tower, spaced equally along the length of the tower.
I then glued the tower roof wall reinforcements on some thick card and cut out the design. These were glued onto the tower roof sections, again using elastic bands to keep the card in place until it had dried.
One done, I cut out strips of balsa wood 5 mm thick. These were fitted for the different sections of the buttresses and glued in place.
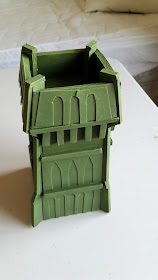
The completed 40k tower construct.
I decided to paint the tower green to match my Imperial Guard army. I gave the tower a basecoat of the green I use in my other terrain projects. I had to give the tower three coats of green to get a consistent colour. If you plan to undercoat the tower with spray paint, remember to protect the exposed foamboard with a layer of paint before applying the spray paint or it may dissolve.
I then gave the tower a quick drybrush highlight in a lighter green colour, before picking out the door in leadbelcher.
There you have the completed tower. As I said above, from construction to painting it was less than 48 hours (started late on Friday night and finished by early Sunday evening). The tower is now ready for its photoshoot, the pictures of which I will be showing tomorrow.


Nice work mate! The tower has some great height, it will be perfect for blocking line of sight. I am so glad I tested the spray undercoat on a spare piece of board, my project would have turned into a puddle :-)
ReplyDeleteYeah, really easy to put together. Saw your work in progress plasma generator- looks amazing! You planning to post the photos on your blog?
DeleteI have quite a few WIP photos for my blog but I am worried about getting it painted in time, so the write up will have to wait until the weekend. Tinting the core red was a pain; thank goodness for hair-dryers :-)
DeleteThat's quite cool! Cheers, Karl
ReplyDeleteVery nice Mike. Very profficient!
ReplyDeletelooks really good!
ReplyDeleteIt looked a little sketchy at a couple of points during the construction, but the final details and the paint job really pulled it all together.
ReplyDeleteAlso, the Confession Tower sounds like something GW would actually call a terrain piece ;)
Yeah, confession tower does sound pretty badass.
Delete